A couple of weeks ago I reviewed the LEGO Harry Potter Great Hall (set 75954). This week I want to take a look at a set that expands on that and provides additional opportunities for the toy photographer – the Hogwarts Whomping Willow (set 75953).
As before, this isn’t a ‘bits and pieces’ review. You can get all the information on what it includes and how the build is from Brickset. What this is though, is a review from the perspective of a toy photographer, looking to find out whether this set allows me to take the kind of photos I want to take.
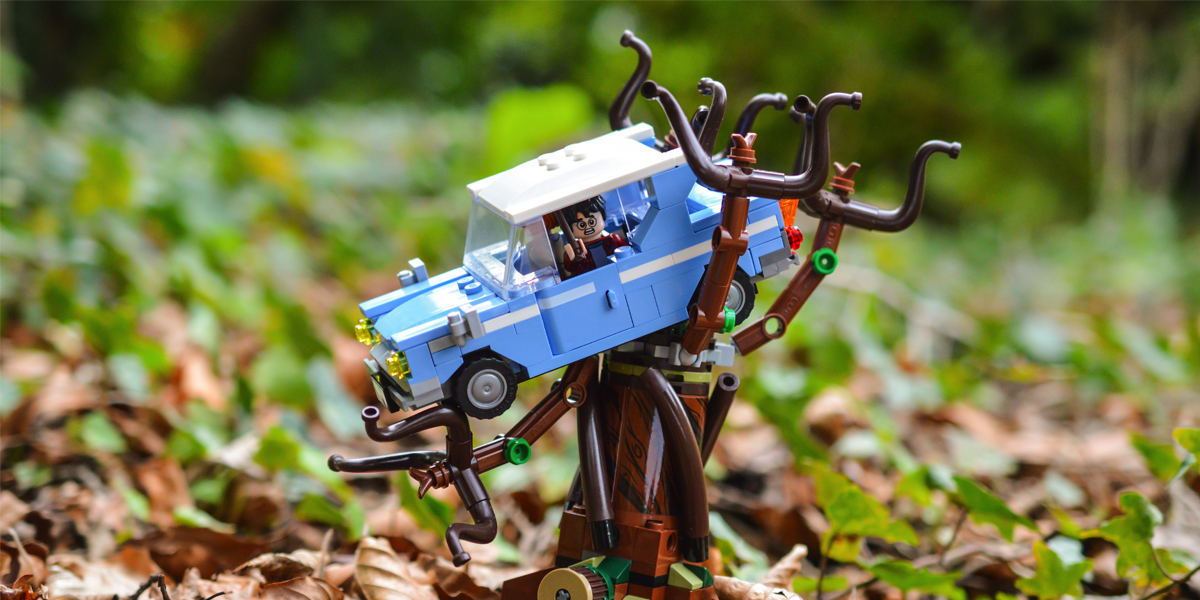
At the same time as looking at the Whomping Willow set, I’ve also snuck in a few shots including parts of Aragog’s Lair (set 75950), because the storyline crossover works perfectly with the car!
I’ve broken this review down into several parts to make sure I give everything a fair look. I’ve considered the exterior of the main set, the interior of the main set, and then the tree, car and minifigures. Let’s get started.
Hogwarts – exterior
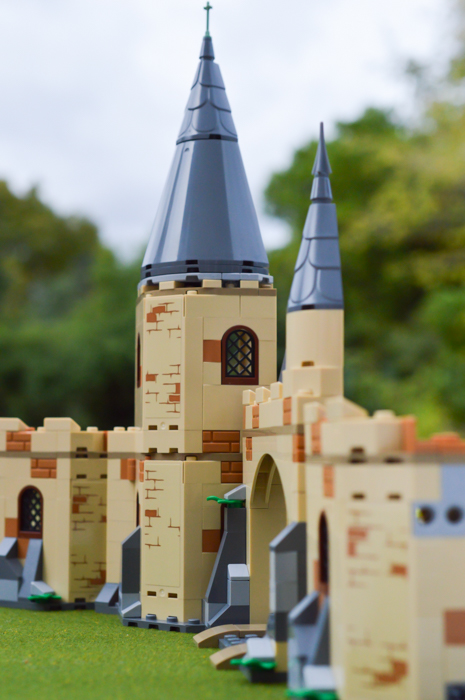
This set is a long front portion of Hogwarts, the exterior not featuring any obviously recognisable details from the books themselves. However it has lots of places to pose figures on it, such as in the gateway or on the parapets. This allows for a lot of flexibility and like the Great Hall set, allows for it to be used as the backdrop to any scene from Hogwarts that you might want outside with a castle backdrop. The continued tan and grey colour scheme matches the Great Hall, expanding that set and allowing for our figures to come into their own and not be overwhelmed by the buildings.

“‘Or maybe,’ said a very cold voice right behind them, ‘he’s waiting to hear why you two didn’t arrive on the school train.'” – Harry Potter and the Chamber of Secrets, page 62.
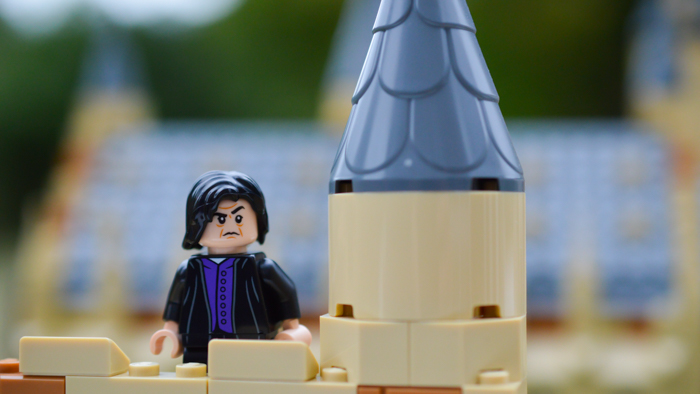
Snape contemplates ways to get Harry expelled.
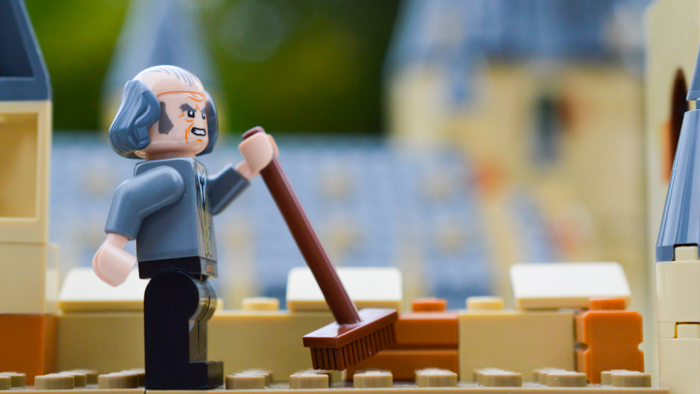
Filch is everywhere! Don’t be too happy or it will be detention for you!
Hogwarts – interior
Whilst the exterior could work for any Harry Potter scene, the interior of this set is generally themed around the Chamber of Secrets storyline, with Snape’s office, a potions classroom and the Gryffindor dormitory. Not to miss using extra space, it also comes with an owlery in the tower.
As Snape is my favourite character from the series, I was looking forward to getting him an office and a classroom! The rooms themselves are filled with little details, from portraits and candles to flasks of unknown substances, as well as a couple of tiny little cauldrons! All of this makes for some great photo backdrops!
I didn’t even need to do too much destroying of the structure to get the photos I wanted this time, as the set is very open into the tiny rooms. This also allows for fairly simple direct lighting! I did move a little furniture at times, but the original set up provided by LEGO worked for me in the photos I wanted. I might create a bigger, darker office for Snape in the future (In my mind, I doubt it has windows, and I’m pretty sure it’s in a dungeon!) but for a starting point, the rooms are great.

“They entered Snape’s office shivering. The shadowy walls were lined with shelves of large glass jars, in which floated all manner of revolting things Harry didn’t really want to know the name of at the moment.” – Harry Potter and the Chamber of Secrets, page 62

“I think I’d better do the actual stealing,’ Hermione continued in a matter of fact tone.” – Harry Potter and the Chamber of Secrets, page 139.

Seamus tries his hardest not to make his potion explode!
As well as the practical spaces, there’s also an open archway that makes a great place for Filch to hide in!

“When Filch wasn’t guarding the scene of the crime, he was skulking red-eyed through the corridors, lunging out at unsuspecting students and trying to put them in detention for things like ‘breathing loudly’ and ‘looking happy’.” – Harry Potter and the Chamber of Secrets, page 111.
Whilst the downstairs has a good amount of space to set up scenes, the upstairs dormitory is tiny! It’s got two very small beds, which our main protagonists fit perfectly, but they aren’t quite the four-poster beds of the books! For these photos I removed the pillar in the way. The tower stays up without it thankfully, and removing it allows that much more flexibility for the angle of photos. Can’t hide the smallness of the room though!

Late night chats in the very snug dorm room!

Looking over the Hogwarts grounds.
There’s also a teeny tiny owlery to send notes home from. I really struggled to find a way to photograph this one, especially as it’s so open to the world around it, being in a small turret!

Ron writing home to his parents after the ‘car incident’.
Overall, there is a lot of scope within a seemingly simple set build. The open facing rooms make it easy to shoot a variety of small scenes and you are sure to find something to photograph within it, from potions bottles to cauldrons, to the dungeon bat.
The Whomping Willow
Beyond the building, this set comes with the infamous Whomping Willow tree. This tree was lots of fun to photograph, (and if you really like play features, it spins around like crazy!). I feel like the tree could have used a few more leaves, but I guess they might just fall off with all the spinning branches! As it stands it’s more of a winter tree for the toy photographer! It’s also great because of the amount of movement it has; all the branches move on ball joints, allowing you to pose the tree exactly as you need!
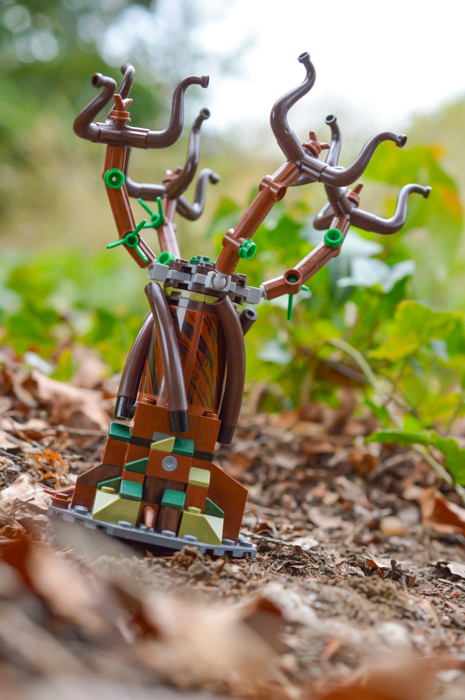
“I noticed, in my search of the park, that considerable damage seems to have been done to a very valuable Whomping Willow,’ Snape went on. – Harry Potter and the Chamber of Secrets, page 63
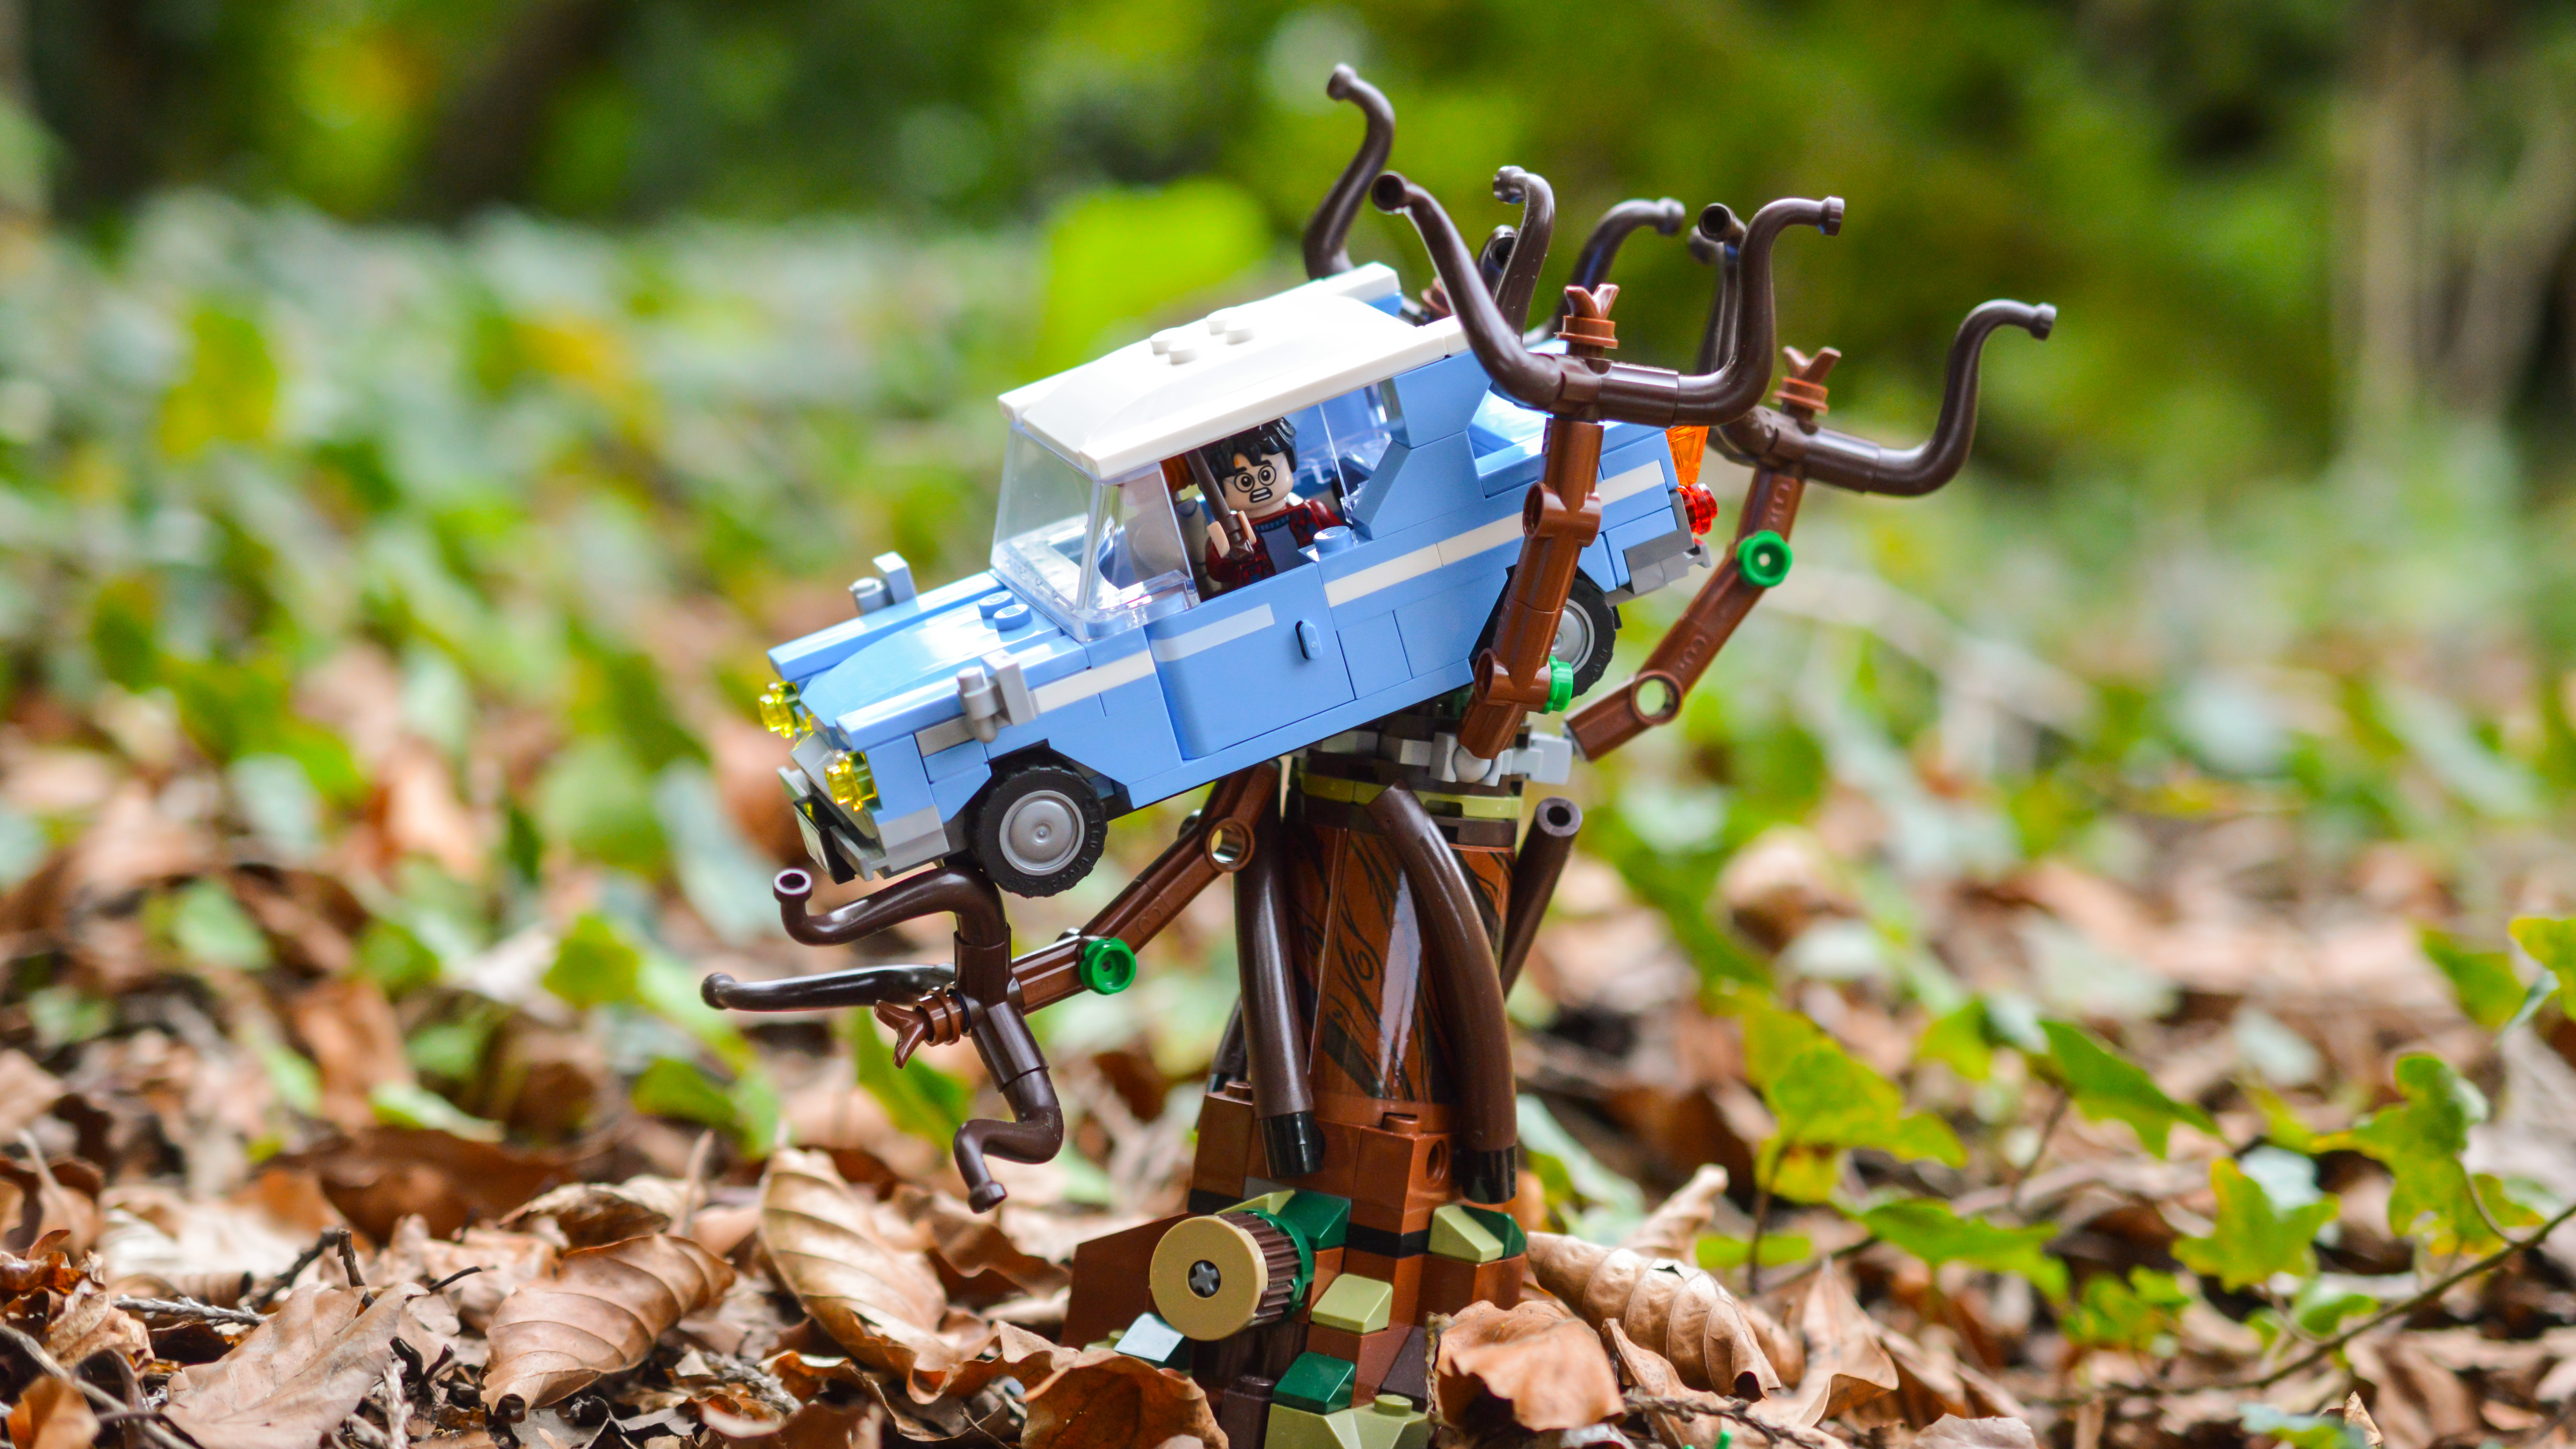
“‘MIND THAT TREE!’ Harry bellowed, lunging for the steering wheel, but too late – ” – Harry Potter and the Chamber of Secrets, page 59

“My wand,’ said Ron, in a shaky voice. ‘Look at my wand.’
The car
Of course, what Chamber of Secrets themed set would be without a tiny Ford Anglia and I must say, I love this model! The bright blue really works well when photographing it, making it pop against grey English skies. The only thing that would have made it better was if our two figures could fit side by side to make for better shots in through the front window. I feel this is probably adaptable if you want to try and make the car meet different photographic needs.
I actually took my car to King’s Cross itself, which was a lot tricker to photograph than it might have been! The middle of the day probably wasn’t the best time to try this, not to mention the fact that King’s Cross is now much more modernised than when J.K was writing!

“And they marched off through the crowd of curious Muggles, out of the station and back into the side road where the old Ford Anglia was parked.” – Harry Potter and the Chamber of Secrets, page 56.
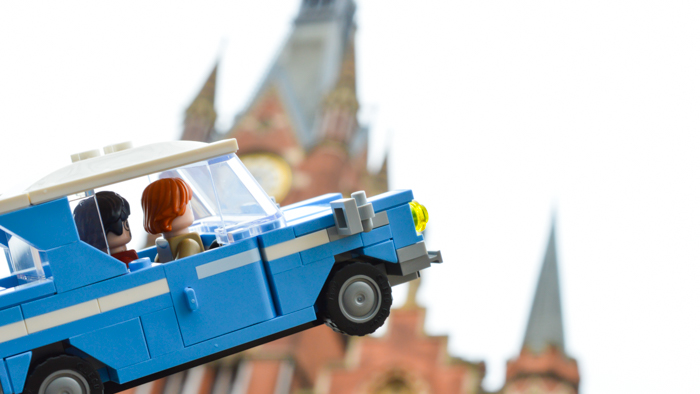
“The ground and the dirty buildings on either side fell away, dropping out of sight as the car rose; in seconds, the whole of London lay, smokey and glittering, below them.” – Harry Potter and the Chamber of Secrets, page 56.

“The tree they had hit was attacking them. Its trunk was bent double, and its gnarled boughs were pummelling every inch of the car it could reach.” – Harry Potter and the Chamber of Secrets, page 59.
Of course, the car also works perfectly for Harry and Ron’s encounter with Aragog later in the Chamber of Secrets! Nothing beats a magical car coming to the rescue!
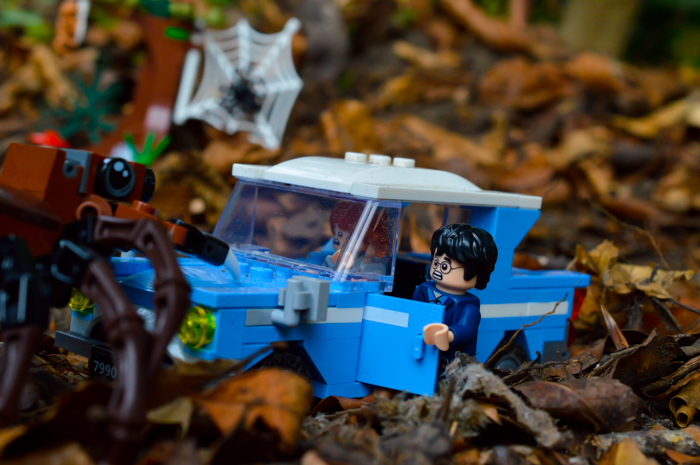
“‘Get Fang!’ Harry yelled, diving into the front seat.” – Harry Potter and the Chamber of Secrets, page 207.
Minifigures
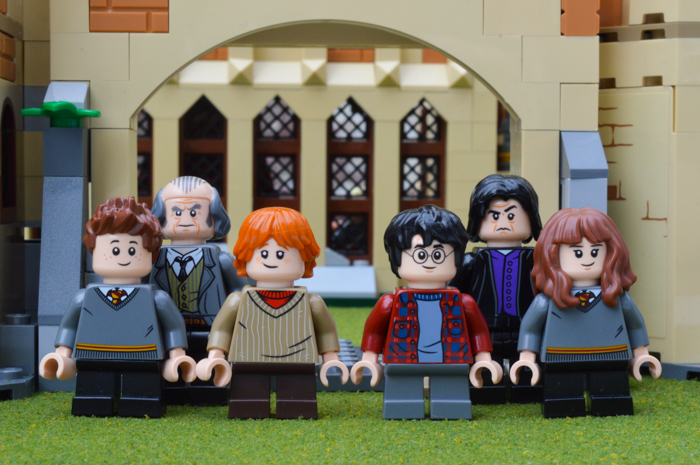
We get quite a good choice of figures with this set, although I think Seamus is an odd addition! Again, it would have been nice to get a Neville Longbottom or a Ginny Weasley (see my comments on the Great Hall set). It would also have been great to get Mrs. Norris, to really round out the photos! I mean, a petrified Mrs.Norris figure would have gone great right? Or how about another ghost?
Snape is a great figure, with that brilliant purple waistcoat, but I do wonder why they didn’t give him a cloak. After all, how can he swoosh like a bat without it? Likewise the Filch figure really has a lot of detail in the printing, and I particularly like the keys on his legs. Hermione and Seamus are both in the standard Gryffindor uniforms, whilst Harry and Ron are dressed more casually, adding some variety!
All the figures come with two faces again, which really helps us photographers out! The kids all have non-moveable legs though, which is a shame as it means they lack poseability. You could always switch these out for some of the Harry Potter CMF legs though if you want to show more movement!
Final thoughts
Originally I was a bit unimpressed with this set and it didn’t seem to match up to the grandeur of the Great Hall. It just seemed a bit flat and with lots of bits (I tend to like my sets to be more complete!). However, once I got my camera out, none of this really mattered as I was never going to use the car and the tree with the building. For me, they are separate parts to the story and live in different locations. The tree worked perfectly out in my garden, and the car too had its role, both at King’s Cross itself, and in the garden facing down violent trees and scary spiders. I really enjoyed photographing these elements, probably more than the scenes inside the castle in the end!
The Hogwarts building itself held surprisingly less appeal considering it is my favourite characters domain! I think I might do a little rejigging to give Snape a bigger, creepier office, which will make me feel happier photographing it! That said, the little spaces within are great for quick and simple Hogwarts themed photos, with lots of great background elements to make use of!
Like the Great Hall, this is a great set for the Harry Potter fan, and I am sure you will find something you enjoy to photograph within it! Let me know in the comments if you have this set and how you have, or plan to, photograph it! If you have any photos taken with the set, add a link to the comments! I’d love to see them!
Disclaimer: These sets were provided by LEGO for review.


Nice review! I also want to expand Snape’s Office, he needs more “creepy” stuff haha.
In my opinion, if LEGO did a Aragog’s Lair more accurate (some kind of hole/cave structure) it would be perfect for connect these sets, and create a better story for toy photography.
Thanks Marco! Yes, creepy is definitely lacking here! I’m not sure how I feel about the prospect of a more accurate Aragog’s layer as spiders are NOT my thing!
Fun, informative review, Lizzi. Thanks for posting!
Thanks for the nice comment Doug! 😀
And now I got the set — even though you didn’t exactly adore it, it seemed. And I really enjoyed the build and hooking it up with the Hogwarts castle. I’ve never had a Snape before so that’s a win (absent cloak notwithstanding). I’m excited to play with it all with my camera. Thanks for the inspiration, Lizzi!