I have become a big fan of making my own props, as much as I can. It adds an extra dimension to the toy photography hobby and potentially saves me a ton of cash, which can be used to buy more toys! Recently, I needed some ancient-looking scrolls and other paper bits for a shot, so I set about creating my own. This is how I did it.
I’ll go through the details below, but it’s pretty easy and cheap. All you need is some paper, a tea bag or two and an oven. Let’s get started.
Let’s begin by figuring out the proper scale…
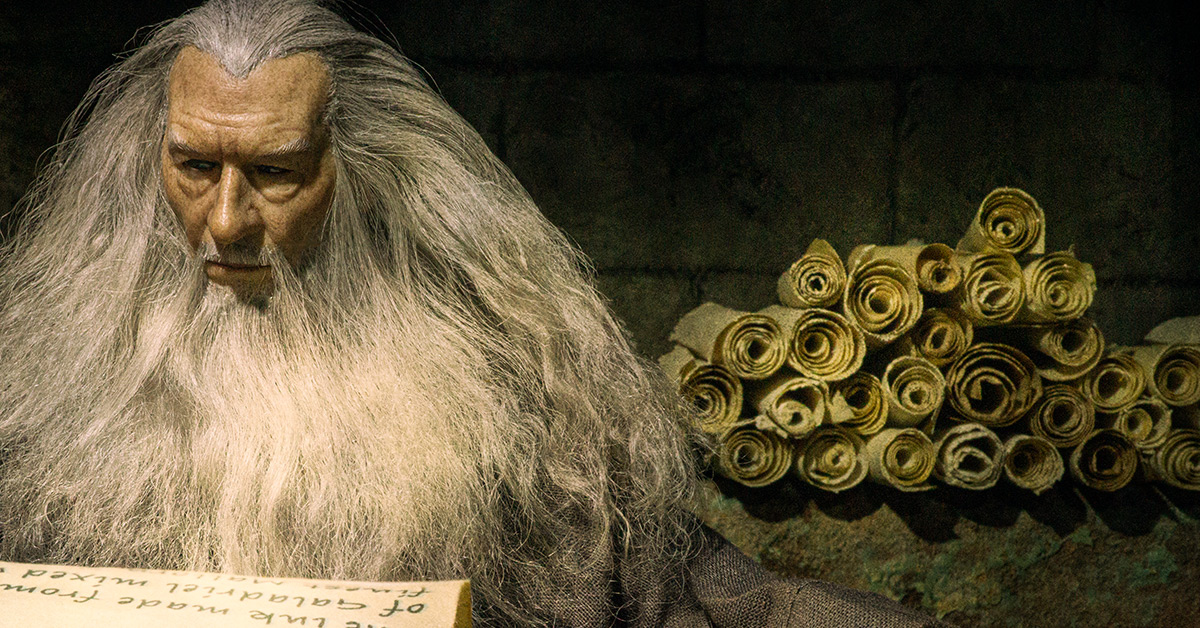
The shot I wanted to make is a redo of the scene from The Lord of The Rings, where Gandalf is researching the One Ring in a dusty old library in Minas Tirith. I just got an amazing 1/6 scale Gandalf figure, and it was perfect for this shot. The image was for a Photography Scavenger Hunt word “Ink,” and the hook was to have Gandalf reading a modern “10 reasons why” blog post about ink, but from a scroll. I needed ancient scrolls for Gandalf hold in his hands, but also to decorate the background. So my target scroll size was for a 12-inch figure. As with anything toy related, the first question one must ask when creating a prop is, “how big should I make it?”
I did some detailed and intensive research (read: I did a Google search for “width of ancient scrolls”), and the answer seems to be somewhere between 9–15 inches. Converted to the 1/6 scale, for a 12-inch figure, the dimensions are 1.5–2.5 inches (divide by 2 if you want 1:12 aka 6-inch scale). So to make life easy on myself, I took a standard letter-sized paper, 8.5 x 11 inches, and divided it into four sections, down the long side. This makes a 2.75-inch-wide piece of paper. That’s wider than the widest real scroll, but luckily I have a toy photography super power called “Meh, close enough.”
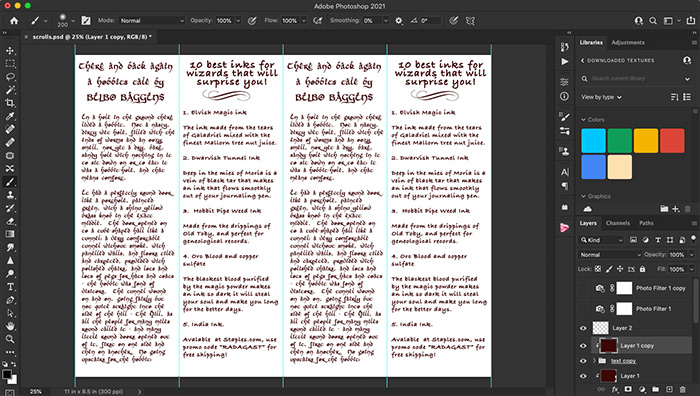
Now I wanted some ink on one of the scrolls, so I made some scroll-sized bits of text on letter-sized paper in Photoshop and printed it with my inkjet printer.
I actually needed more than just a single set of scrolls, plus some loose-leaf sheets. I also needed a library’s worth, so I grabbed a handful of blank sheets of paper and cut them all up into scroll-sized bits. For the loose-leaf sheets, I cut the scroll into 2.75 x 3-inch strips. I left the longer scrolls the length of the original paper (8.5 inches).
Note that while doing research on this technique there was some mention of inkjet printer ink smearing when it gets wet (as it will in the next step). I didn’t have that problem, but your mileage may vary. For the record though, I used an HP inkjet with standard inks. I did happen to let the ink dry for several hours though, so if you have an inkjet printer, you may want to let the ink sit for a bit before going on to the next step. If you have much better handwriting than I, you could also write out any scroll content you wish—just let it sit to fully dry afterward.
Also, if you note, the text is a little reddish. The reason for this is that old inks are iron based, so they tend to rust and get a reddish tone to them over time. I made some reddish and some blackish, and I think I ended up using the black for the final image, so we can pretend I didn’t mess that part up, OK? (Ssshhh… our little secret….)
Now lets add some age…
So at this stage I had strips of paper, but they were still perfectly white. Old paper is all yellowed and brittle and crumbly looking. This means the next step is yellowing the paper. For this, I went with the old standby—tea. I brewed myself a super strong pot of tea with four teabags instead of one. I also let it brew for much longer, getting a nice dark pot of water. I’m not sure if the brand of tea matters, but for the record I used Earl Grey. (Cue Captain Picard saying, “Tea, Earl Grey, hot!” here.)
Once I had the tea, I simply dunked the pieces of paper into it, and laid them flat on a baking sheet. It is a quick operation. The water just had enough time to get wet, but not completely soaked. If you take more than five seconds with the paper dunked in the water you’re likely soaking it too much.
After the paper is on the baking sheet, it needs to be left to dry. One could presumably let air do the job, which would likely take a few hours. However I am an impatient man, so I decided to bake it instead. Not only does this take the drying time from hours to minutes, it crinkles up the paper, giving it that “dang, this is old!” look.
I heated my oven to 240f (115c), and tossed in the baking sheets. A few minutes later I had some nice crispy bits of paper.
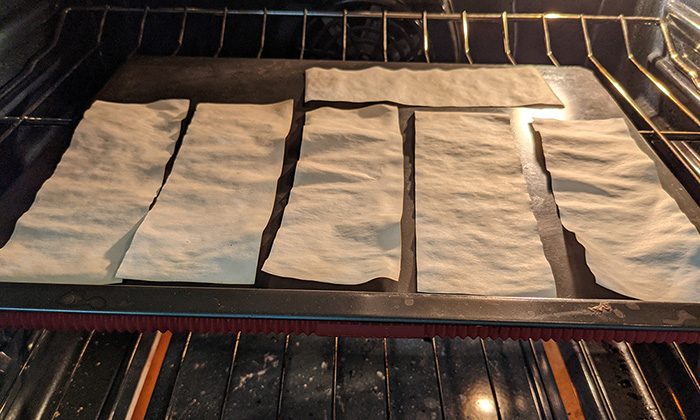
Note, now is a good time to point out that putting paper in an oven is a bit of a safety risk. Paper doesn’t burn until it gets to 451f, so there is not much of a risk of spontaneous combustion, but the heating elements are hot enough to light paper on fire. So don’t do this without adult supervision. Also, when wet, the paper sticks to the baking sheet but it becomes loose when it dries, so be careful removing the paper from the oven, as it has a tendency to fly around in any breeze made from opening the oven door and moving the baking sheet around.
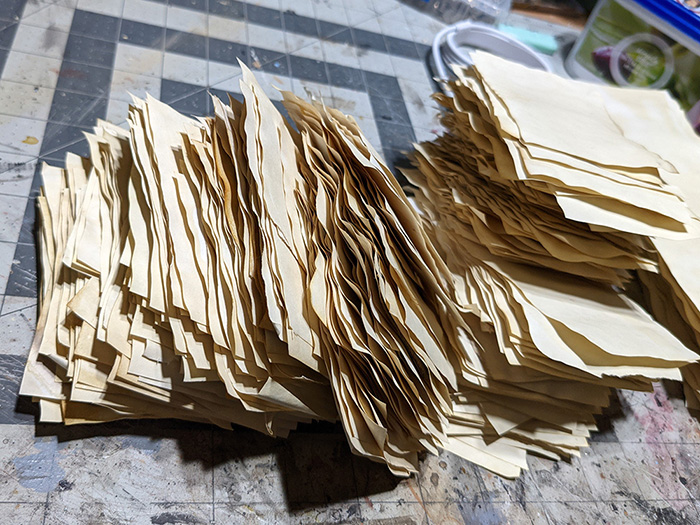
I repeated this process over and over until I got a library’s worth of old-looking paper. It took a while (actually a whole NHL game, and my team lost, dang it!), but soon I had a metric crap-ton of ancient paper.
Now, turn the paper into scrolls…
Once I had all the paper baked and prepped, it was time to turn them into scrolls. Start by rolling each bit of paper onto a BBQ skewer with a nice tight wrap.
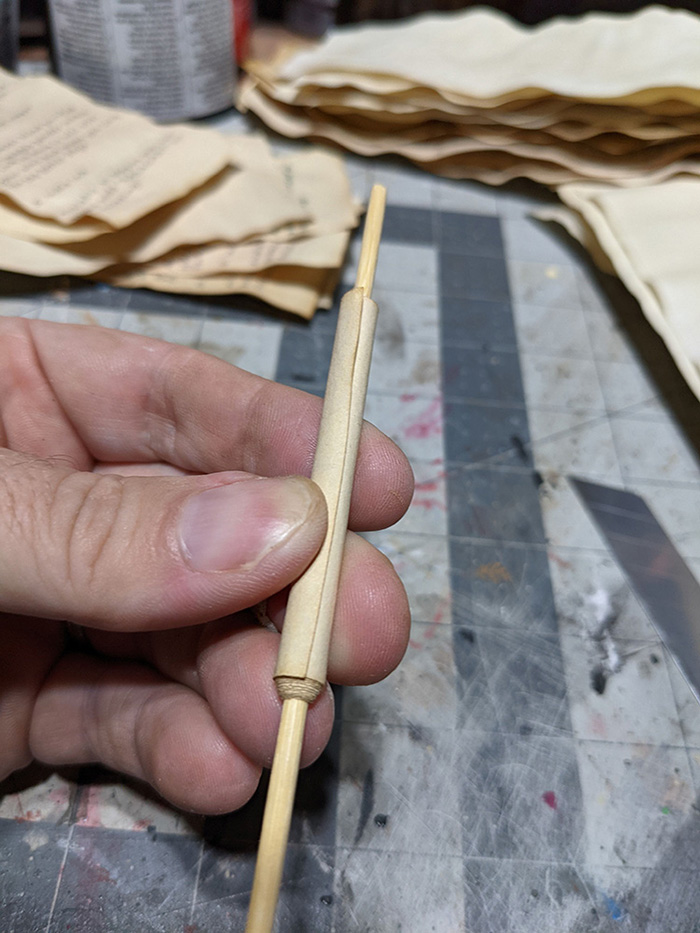
Once the paper is rolled, it can immediately be removed from the skewer. It tends to unroll a bit, but still maintains a fairly tight scroll-like curl. At this point you should have something that looks like a scroll.
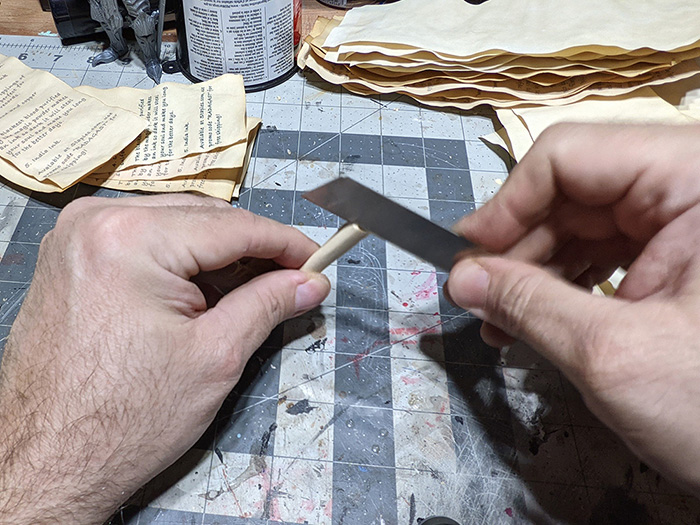
Now, when one thinks of ancient scrolls, one thinks yellowed brittle paper, but one also thinks of torn and crumbly edges. So adding those torn edges is the next step. I accomplished this by taking a discarded (read: used and dull-ish) blade from a utility knife, and pressed it into the edges of the scroll. This gave the edges that “dang I’m old and falling apart” look that scrolls are so famous for.
I repeated the wrapping and edge cutting step over and over until I had more than enough scrolls for my needs.
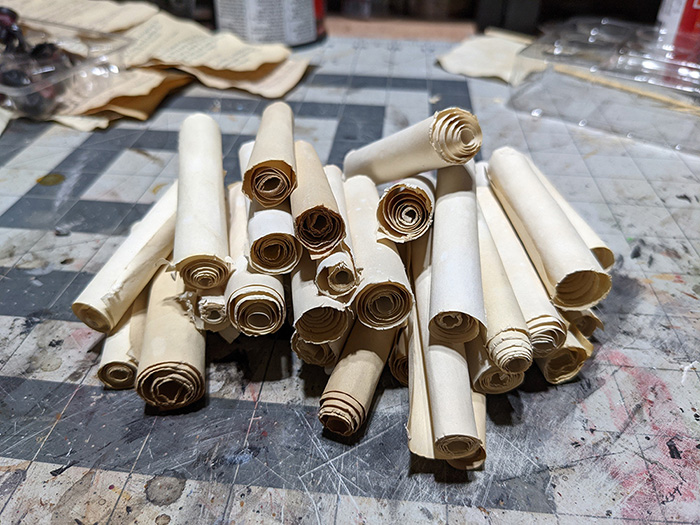
Un-pro tip: If you are making a bunch of items, like these scrolls, for a shot, and you are not really sure how many you need, it’s best to over-estimate and make way more than you need. It takes a lot less time to make extras you may not need than it does to restart the process again to make more. Plus, this way you can pick out the best stuff from what you made, so not every scroll needs to be perfect.
Putting the scrolls to use
They say knowledge is power, and this number of scrolls should contain a lot of knowledge, so I decided to exercise all that power by using it in a shot.
I set up a scene using some old diorama stone material for the back wall and real bricks for the back shelf. Then I strewed the ancient scrolls around the set, tossed in Gandalf and lit all in a pleasing manner.
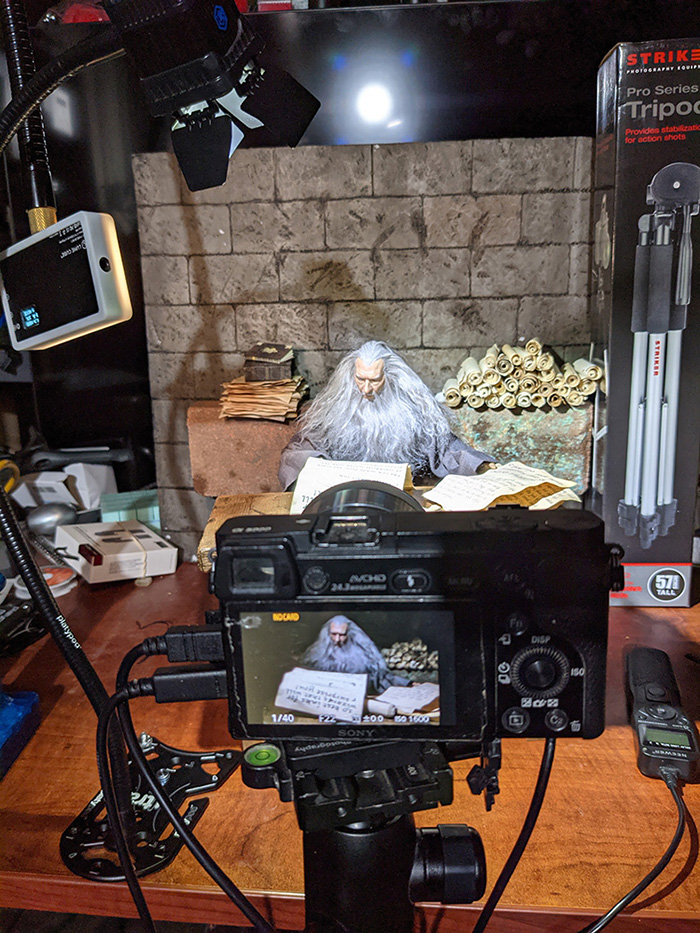
The finished shot looked like this:
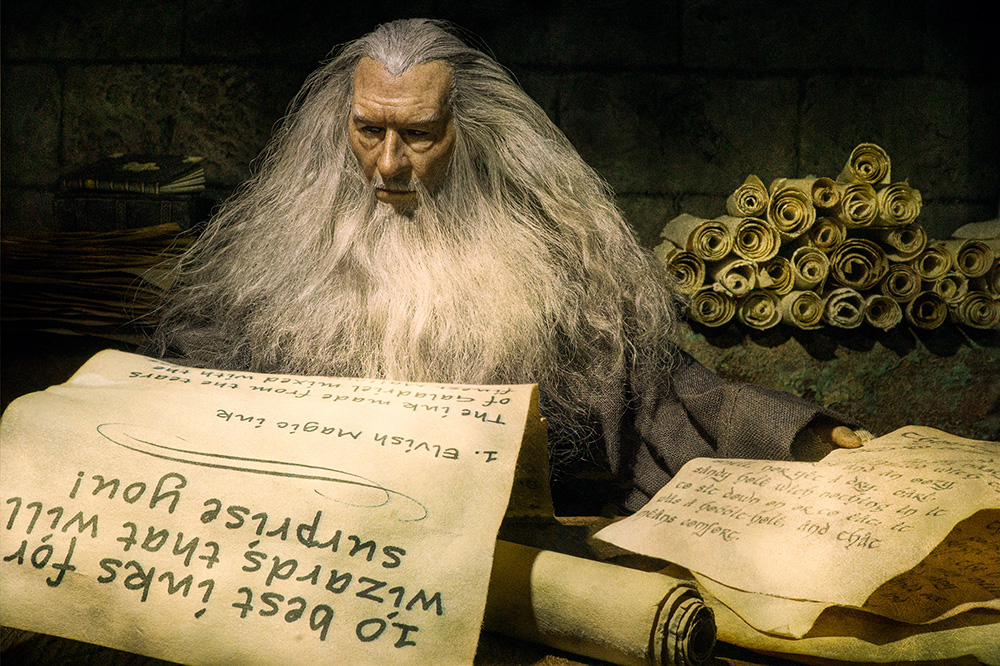
As you can see ancient scrolls are pretty easy to make, and they are well worth the effort to add that realistic aesthetic to your scenery.
[dave]
Want more toy photography goodness? Subscribe to our weekly email round up so that you never miss a post. You can also listen to episodes of the podcast! You can follow my work at @therealstudiodave.


Great article thanks!
You are welcome. Thanks!