Toy Photographers Virtual Meet-Up: June 27, 2021
This year, the Toy Photographers blog is holding monthly virtual meet-ups where we talk to photographers around the globe about how they make LEGO, action figures, miniatures, custom creations and more into fantastic works or art. It’s just like the podcast, except everyone is sharing in the experience together. Each month as a group, we choose the next topic, project or theme we want to hash out in our salon, reminiscent of the days of the renaissance.
To be able to talk to other toy photographers about framing and toy photography sounds very straightforward, but this turned out to be more enlightening than I thought. Not because I learned more about framing itself, but, more about how we as toy photographers can use framing.
Here’s the result of our discussion on framing.
Why talk about framing?
Our virtual meet-ups are always meant to be both be fun and educational. For some, toy photography is about the toys and photography is second. For others, it’s the photography first and toys second. Talking about framing is about growing as photographers to enhance our toy photography.
Photographers love to talk about how to compose better photographs. Framing is always listed among the top 10 tips to take better photographs. It is one of the most basic skills a photographer can learn to enhance his or her photography, and it’s free. And, yet it is also one of the skills many of us ignore. Sometimes, we as toy photographers can be so focused on story, the toys, the lighting and special effects, that we forget to frame. Other times we just don’t have a name for it, especially if you are new to photography in general. That’s why we decided to talk about framing.
Framing toys
As photographers we have to be aware of composition and framing in order to take interesting photos. As toy photographers, we have a chance to create, to build and to set up a photograph with our toys to our exact specifications. It’s what Shelly Corbett calls “Creating with Intention.” We have the ability to set up photos that look like they just happened. Toy photographers can frame their toys with a purpose. It’s so simple, but, when done right, framing can really enhance your photos. It can make a simple shot of a figure, a nuanced portrait. Framing is something we as photographers can just do. It doesn’t take any extra equipment it just take a little bit of extra time.
Examples of framing
During every monthly meet-up, photographers submit photos to be discussed and examined. These are the two I submitted.
The first photograph with Han Solo and Princess Leia demonstrates one of the most simple types of framing. Frame your subjects with objects. Looking for objects to frame your toys immediately raises the composition of your photograph. It takes what could be just two toys on a countertop and makes them two toys posing for their engagement photos. Framing allows you to draw the viewer’s eye to a focal point. It says this is what I want you to look at. In this case, the arch of the towel rack frames Han and Leia.
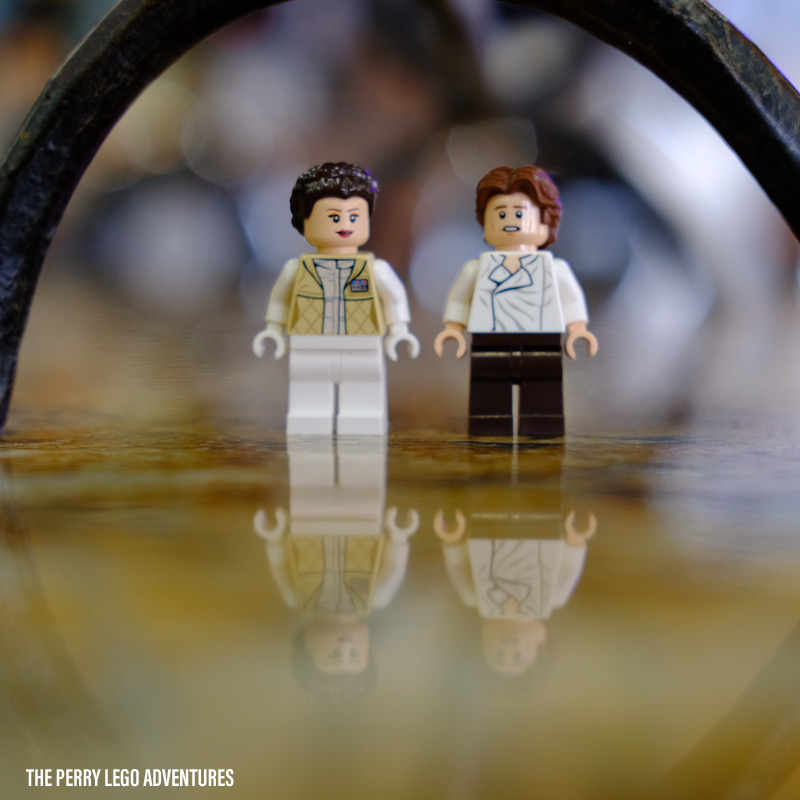
Han And Leia – “Wedding Photography” 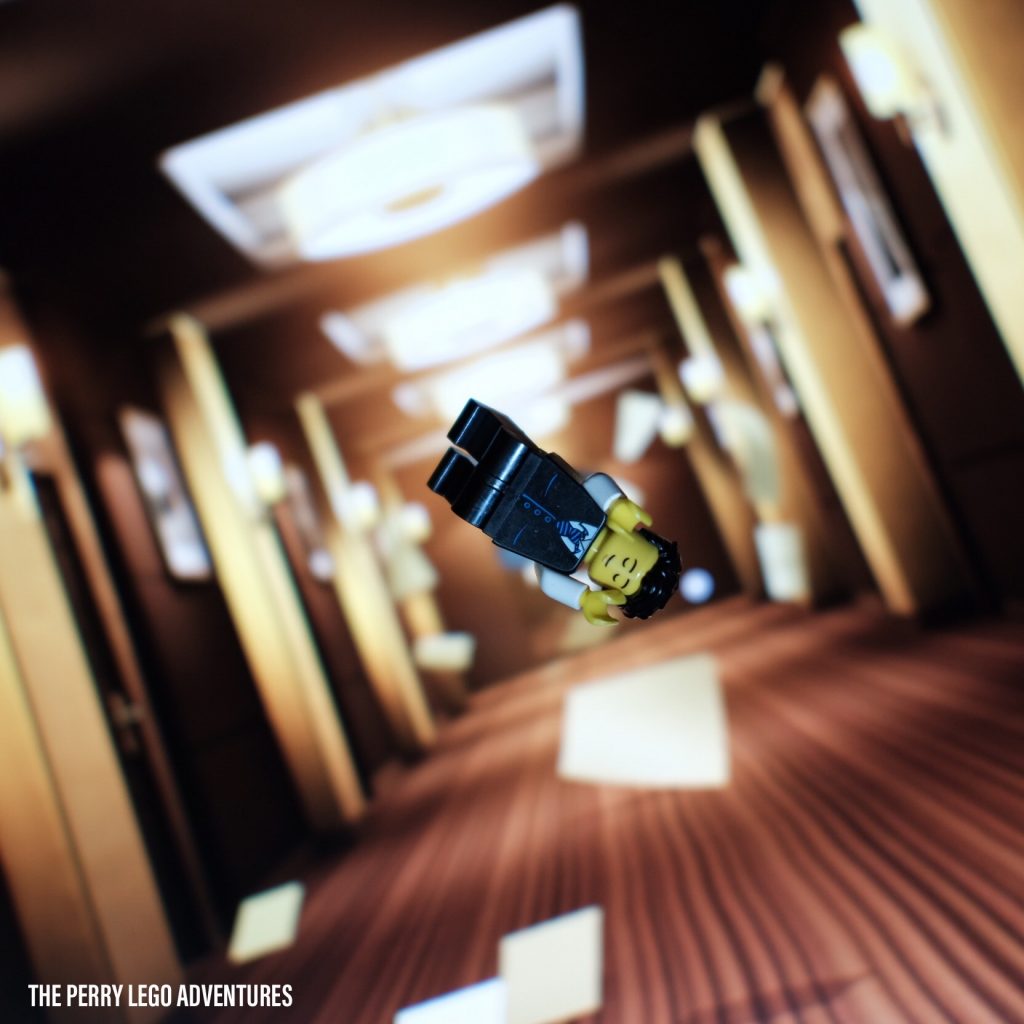
Inception
The second photograph was inspired by the movie Inception. The walls, paper, lights, and floor all frame the minifigure. Sometimes, the way your subject is framed can change the tone of the photo. Once you draw your viewer in towards the subject, the frame you created can keep them there longer. When you create interest using framing in your photograph, it will keep the viewer there, staring at your photo longer. You can also create a sense of depth in your photographs. The second image plays with this concept. Is the minifigure falling forward or backward?
Anything can be a frame
At first glance, you might not think the photo below uses framing, but I assure you it does. Before I dive deep into an explanation, I first invite you to find the frames for framing your objects. Take your time, and when you are ready, meet me in the next section.
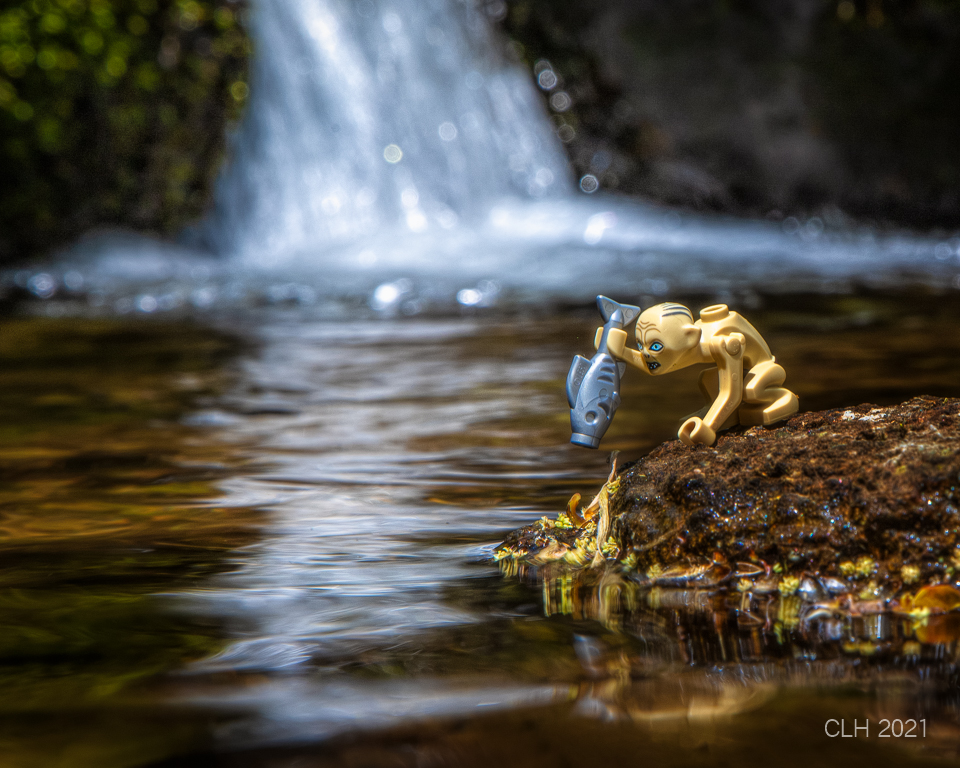
Remember when I said framing was free? No matter where you are, you can find a frame. @littleplanetchell reminds us of this with the above photograph. Back when I was taking art classes as a child, my teacher told me that when you are trying to find the subject of a photo or drawing, you should close your eyes and open them. The first thing you see is the main subject, the focus. A good photograph leads your eyes to the focal point. A good photographer can direct your focus. In this photograph, even though Gollum is not centered he is the focal point.
This is achieved by using, you guessed it, framing. The reflection of the waterfall is a natural divider. It divides the photograph into sections. The foam bubbling up at the top splits the photograph into thirds. The ground Gollum is standing on juts out into the water like a peninsula and he is surrounded or framed by that water. There is also a little bit of extra light highlighting Gollum, framing him with light. This photograph is a complex example of framing, and an even better example of using the rule of thirds, which I will not get into here. But, if you want me to write a post on the rule of thirds, let me know in the comments below.
Framing with light
Sometimes you don’t need to use objects. You can use light. Using the contrast between the dark parts of your photo and the light parts can frame your subject as well.
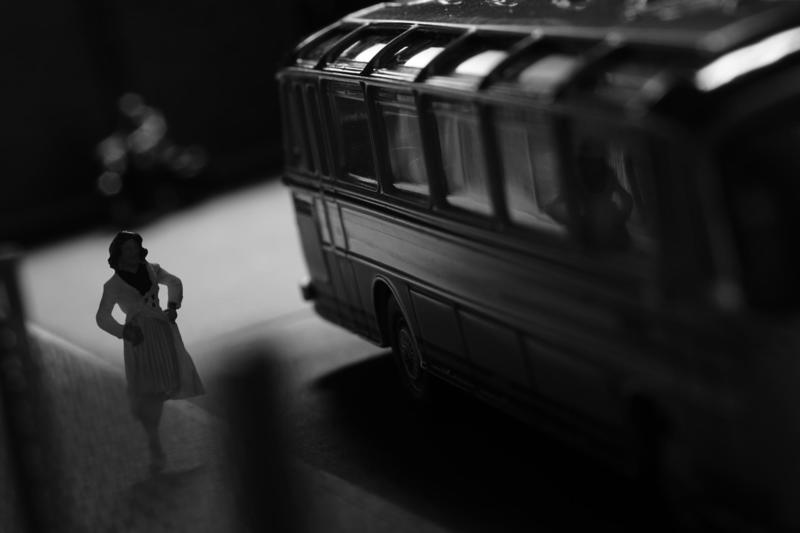
In the photo above Tobias Schiel‘s use of light and shadow helps to frame the photograph. The woman waiting on the sidewalk is framed by the moving bus, the fence posts and the light splitting the photograph. The figure in the background biking across the frame adds elements that also help frame the subject. The fact that the woman is at the bottom third of the photograph and the bus is in, essentially, a darker negative space, helps draw the viewer’s attention to the woman on the sidewalk. Night Liner is part of Tobias’ six-image narrative New Noir Suites.
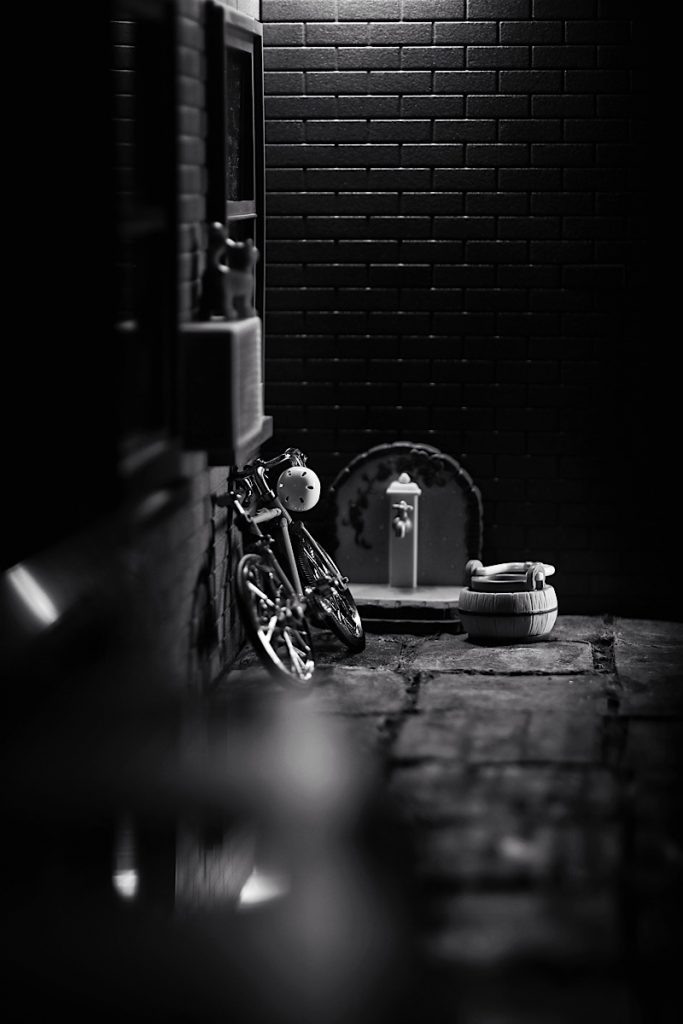
As a street photographer, you have to wait for that decisive moment to take that shot. As a toy photographer, you can take the time to build that same scene at home. Create the frames yourself. Form the story you want to tell. In the second photograph, Janan created a street corner. Almost every single object is framed in this photograph. The cat framed by the window, and the air conditioning unit, to the water tap framed by the arch, to the bucket on the side, framed by the fence posts in the foreground. The bike is framed with light. Using multiple frames in a shot gives the viewer an opportunity to choose the frame they find most interesting at the moment. It allows the viewer to create more than one story in their head for this street corner.
Creating frames
Frames can create a more interesting photograph. @toddretired uses the foliage to frame the subject but also add interest. The branches, leaves and banana were added with a purpose. They guide the viewer through and around the photograph, and lead them back to Stuart who is the main focus. As toy photographers, we should never underestimate the power of adding foreground and background elements into our shots. It can give the viewer more context and a frame of reference. In Todd’s case, he frames Stuart in a jungle setting, pulling the viewer into the story and enhancing the photograph.
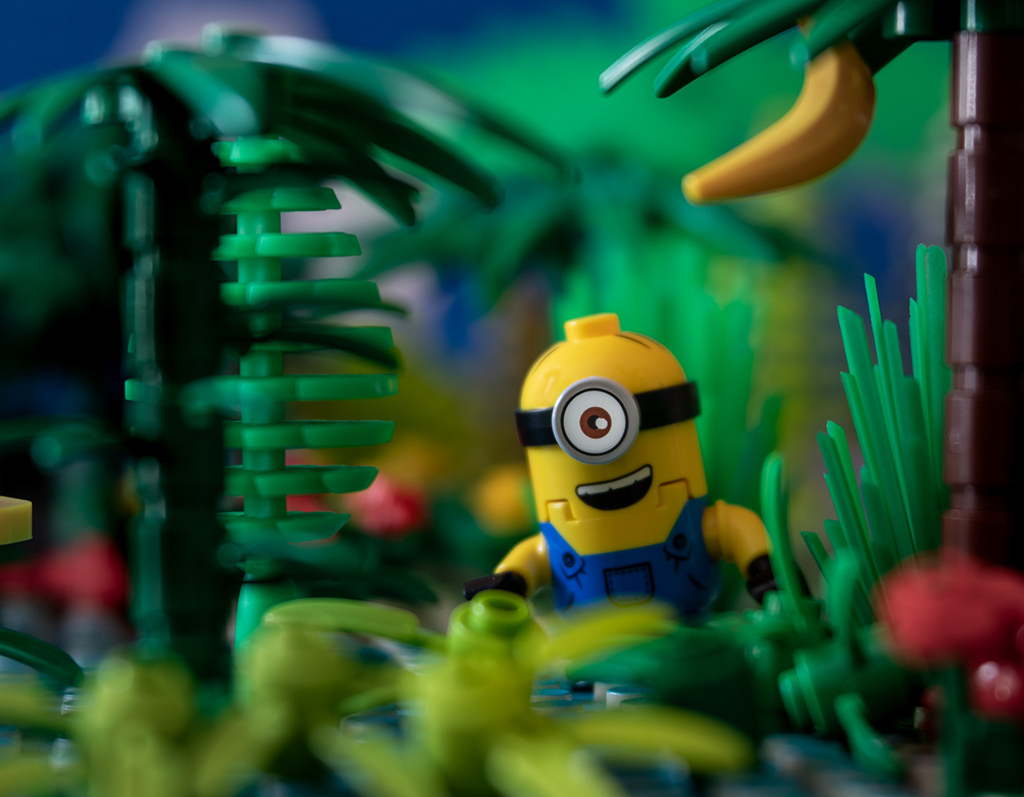
Stuart searches the jungle hoping to find the perfect banana. Could this be it? @toddretired 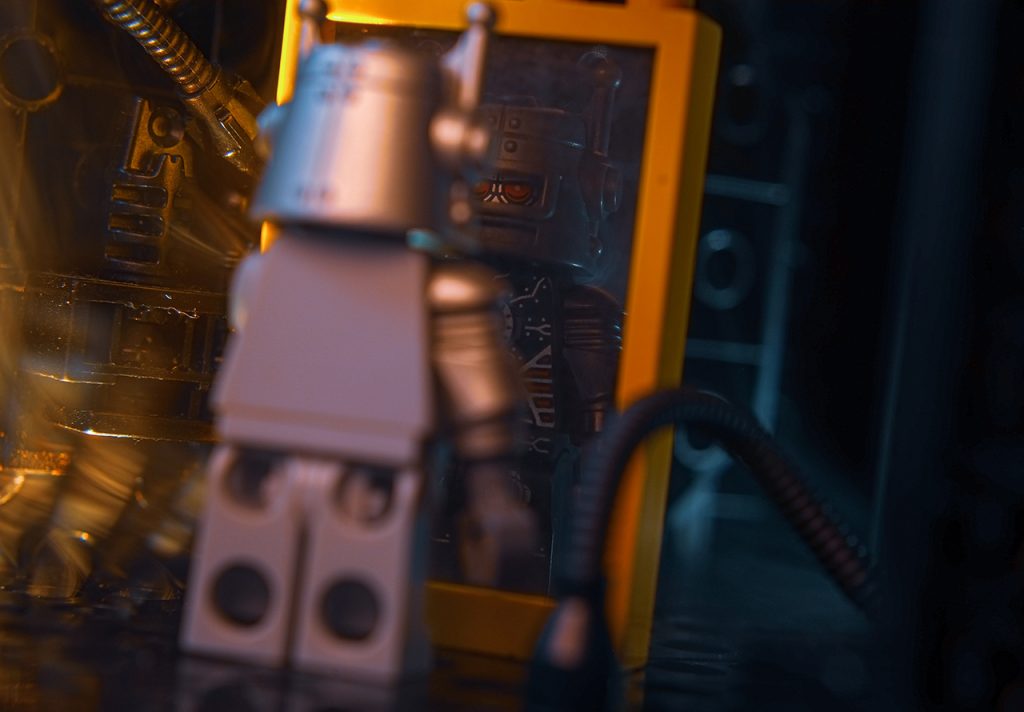
Evil eye @tomekskog
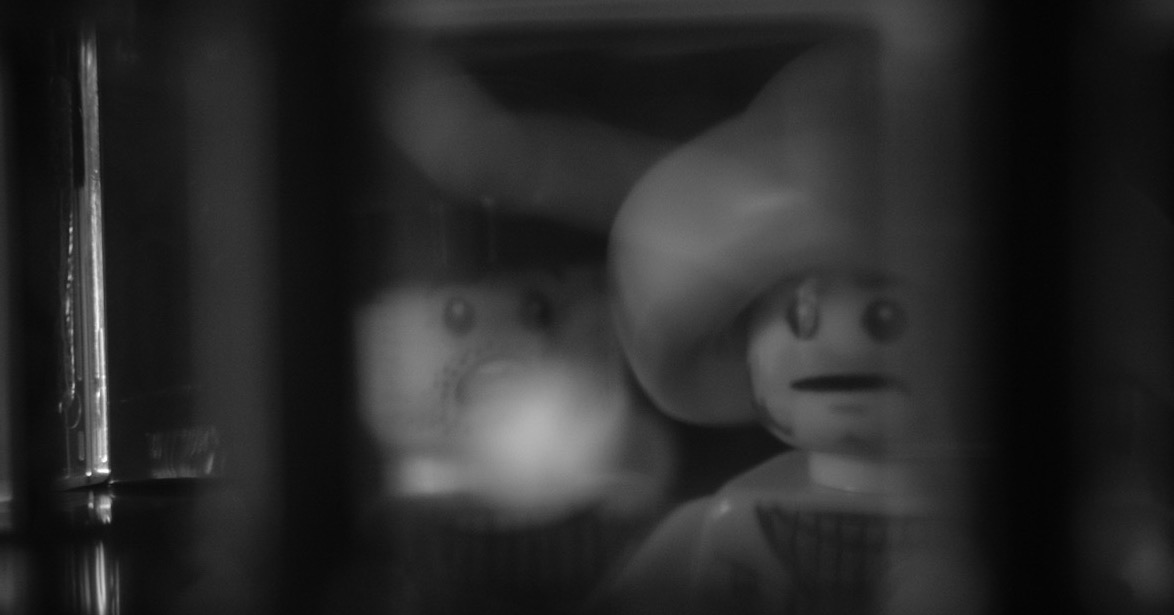
Not only does @tomekskog use background and foreground elements to frame his subject. He also uses color to frame his subject and draw the viewer’s attention. He has the light and the dark side, which complement the use of an actual framed mirror. The viewer not only sees the subject, we see the machine’s reflection “framed” reflection. Because he uses brighter colors on the left side and a darker hue on the right, he creates a sense of duality in the photograph. It forces the viewer to wonder about the subject’s struggle with light and darkness.
Framing the world
Inspired by the song “My Dear Helen” by Andy Shauf, @morriswhyadd reminds us that the classic frame-your-subject-between-two-pillars works just as well in toy photography as it does in the movies. It invites the viewer to see the world exactly how the subject of the photograph does. Framing your subject in a doorway or a window invites the viewer to be in that same space, the same location as the subject.
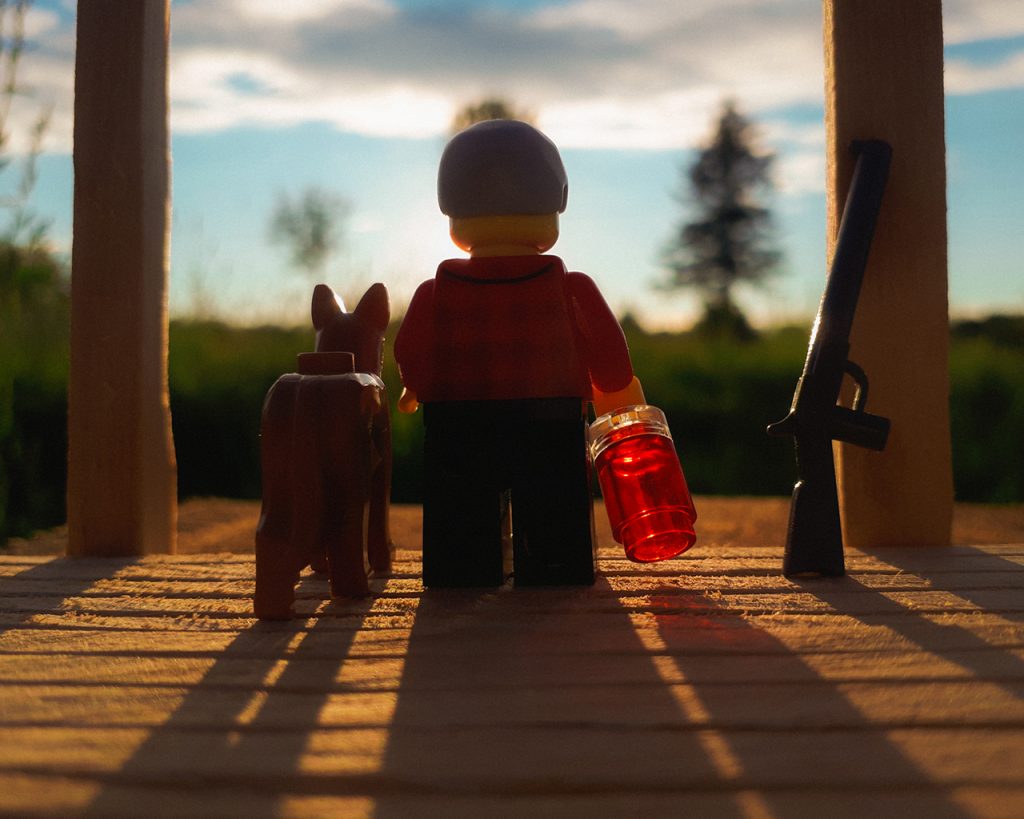
“My Dear Helen” – Andy Shauf by @morriswhyadd 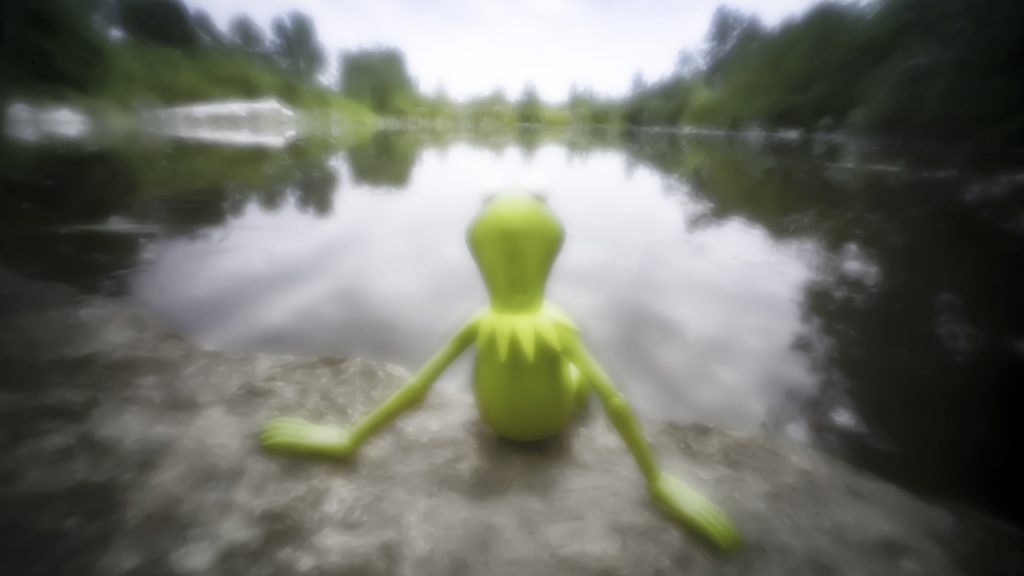
“If life were easy, it wouldn’t be difficult” – Kermit the Frog by @shellycorbettphotography
Shelly frames Kermit the Frog with the location he’s in. He’s framed by the trees, the trees’ reflections and the rock he’s perched on. Kermit is engulfed by the vastness of the nature that frames him. It’s inviting. It gives the viewer a place to sit and relax at the water’s edge, as Kermit does. It can be hard to find frames in such and open environment with such a wide field of view, but if you move around, you can find them.
Types of frames
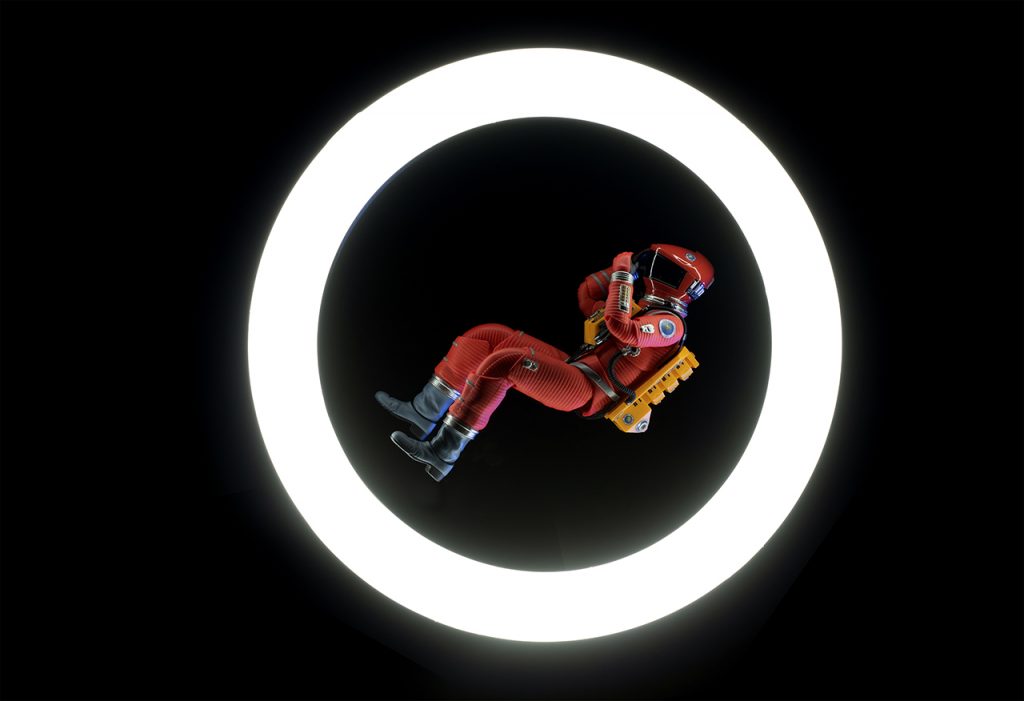
Finally, @zekezachzoom was inspired by the movie Gravity to create this shot. The subject is essentially framed in light, and that light creates a circle around the astronaut. Sunny draws a circle around the astronaut and says to the viewer, look here. It’s simple, well executed, and even though there is only one person in it, this photo is not boring. This is because of the type of framing he used. If the astronaut was framed in a square, the viewer would have a different experience. They might feel like they were looking out of a spaceship. Instead, Sunny chose a circle, which can instead make the viewer think of a baby in a mother’s womb, or an eye. Sunny’s photograph shows us that the frames we choose can change the meaning of our images.
Framing enhances toy stories
Taking a step back, returning to the basics of photography and really analyzing framing in toy photography opened my eyes to toys’ photographic potential. It reminded that simply using the concept of framing can elevate a toy photo into something more. If we as toy photographers, take the time to remember that we are not just toy enthusiasts but photographers as well, we can show the world this isn’t just a silly hobby—it can be true fine art.
I invite you all to find frames in your toy photo backlog. Really dive deep into how framing elevates, changes and enhances your photographs. I invite you to look for frames in your everyday life, too. Look for objects that can frame your toys. I invite you to build frames around your toys so we can all tell our stories better, one frame at a time.
And finally, I invite you to join our MeWe community where you can find out when we’re hosting our next virtual meet-up so you can join the conversation instead of just reading about it.
Find more tips and tricks about framing.


![AI is ruining toy photography [a personal viewpoint]](https://toyphotographers.com/wp-content/uploads/2026/03/Together-As-One-Ultra-Magnus-revealed-scaled-500x383.jpg)
Leave A Comment