Fun fact time: If you take two hydrogen atoms and one oxygen atom and combine them together, you will get a water molecule. If you get a bunch of water molecules together you get damp. If you get a whole lot more water molecules, say 10 gallons worth, you get a resource. That resource can be used for hydration, bathing, breeding seahorses and making toy photos. Conveniently, this post looks at taking a toy photo with water.
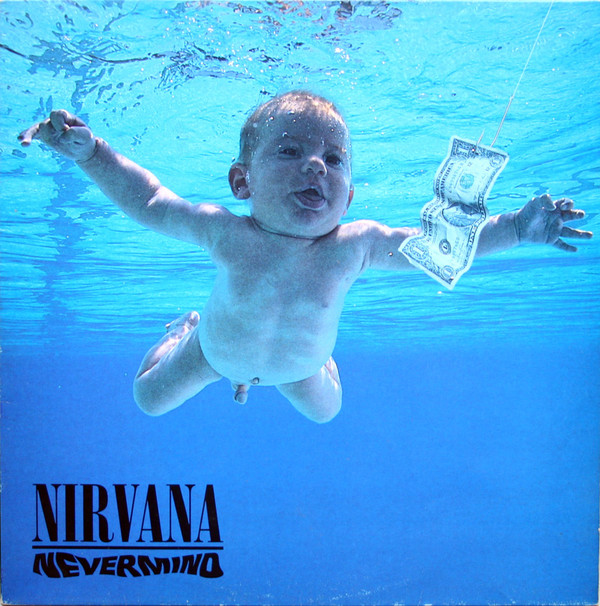
Specifically, I found myself recently wanting to chase down a shot I’ve had in the back recesses of my mind for a while—a recreation of 1991’s Nirvana Nevermind album cover, but with Deadpool instead of the baby (because Deadpool). If you were alive in the early 1990s I would be shocked if you were not familiar with this seminal album cover in question. However to refresh your memory, it looks like this:
Note that there is a comic cover with Deadpool in this same pose, but if you allow me to put on my trust-me-I’m-Canadian hat, I will say I’ve been wanting to do this shot before I stumbled across that comic. Also, that cover was highly stylized, and I wanted a more real-life interpretation of it. However, as with all things Deadpool, and life in general, there is nothing new under the sun (which is why I am writing this post at night—see what I did there?). Anyhoo…
In search of how to shoot underwater without an underwater camera
The biggest challenge to this, or so I thought when I started, was how I would shoot underwater? To get that real-to-life interpretation of this shot, I wanted to actually shoot Deadpool under the water. If you look at Nirvana’s album cover, you will notice reflections in the ripples above the baby. That would be super hard to recreate in Photoshop. Doing it practically, or for real, seemed like the best way to get the results I wanted.
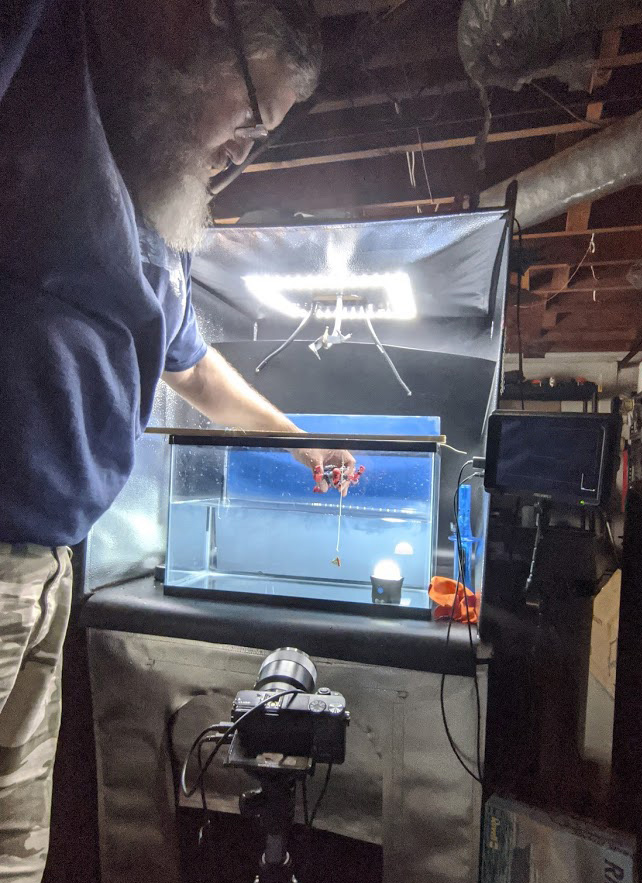
The problem I faced was that I lacked a waterproof camera I could dunk into a tank of water. While I am not opposed to getting new equipment (yay toys!), underwater housings for cameras are on the order of “Heck no!” expensive. So waterproofing my camera was out. The next logical solution was to get a see-through container and shoot it from outside. This would allow me to use real water but keep my gear nice and dry.
A fish tank would be perfect for this shot. One problem: The only fish tank I had was full of fish.
Art, however, finds a way.
Spoiler: It doesn’t end well for the fish
So the tank I do have, like the header says, was full of fish. When I moved to a home office during “these unprecedented times ™” I bought some fish, and the requisite tank, to act as replacement office mates. (Note: Fish are not nearly as fun to hang out with as my real office mates, but they’re definitely quieter.)
One morning I came down to my office to find that sometime during the night all the fish in my tank had become sushi. I don’t really know what happened exactly, but I was having issues with algae blooms and was trying to get it under control. I suspect I failed. Regardless, my first thought was, “Well, crap! Guess I need to clean out the tank and get new fish!”
My second thought was, “But… I now have an empty tank—to the studio!”
Setting up the shot
My largest problem was sorted. I now had a tank for my nefarious needs (read: recreating Nevermind). All I had to do was to set up the tank, drop in Deadpool while simultaneously triggering the shutter, and I’d be done!
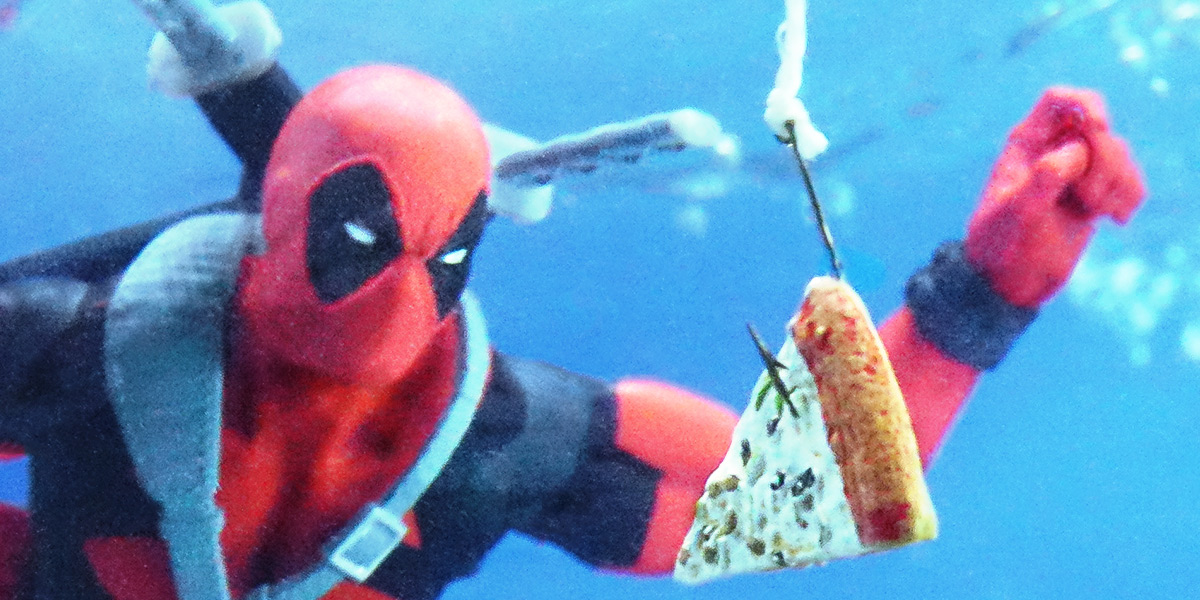
I set up the tank in my lightbox and filled it with water. Next, I needed something to act as the dollar bill from the original cover. I was going to use a chimichanga that came with one of my action figures, but as I was setting up the shot I somehow misplaced the chimichanga (don’t you hate it when that happens?). So, reluctantly, I replaced it with a slice of pizza.
Being that I am not a fisherman, I didn’t have a fishhook handy. I went to Walmart to pick one up, and found it really hard to locate a suitably sized hook. I eventually settled on ripping one out of a beetle-shaped lure. I tied that to a string and suspended it into the tank.
I then set up my camera, got focus, and set fast-shutter mode at 14 frames per second to guarantee I’d get the money shot. Then I dropped Deadpool in the water, and triggered the shutter with a remote.
First impressions and fine tuning
The first shots were… unimpressive. The background was black, Deadpool was in shadow, and it was all just a super bright shade of meh. I rectified this in a couple of ways. For the background, I quickly painted up a piece of foam core with blue paint. I painted it from darker to lighter shades, as that seemed to be what I saw on the album cover (I would switch to a single darker shade for later shots.)
For lights I did something I was always afraid of doing—testing the waterproof claims of Lume Cube. I straight up tossed it into the corner of the tank and crossed my fingers while eyeing the replacement price on amazon.com. Thankfully it is as waterproof as they claim! Worked like an absolute charm.
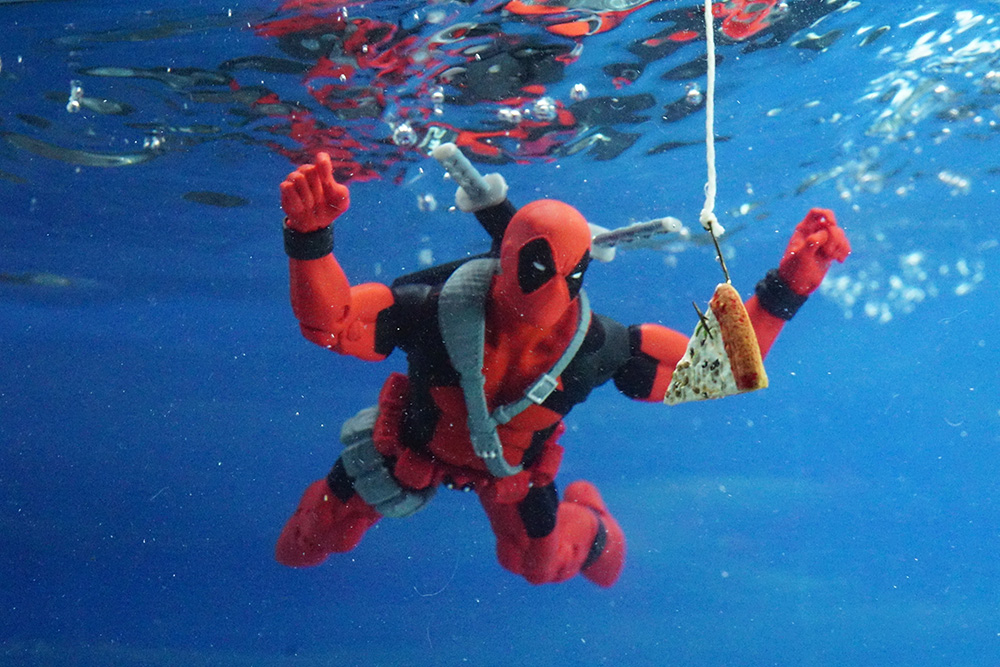
My next test shot looked like this:
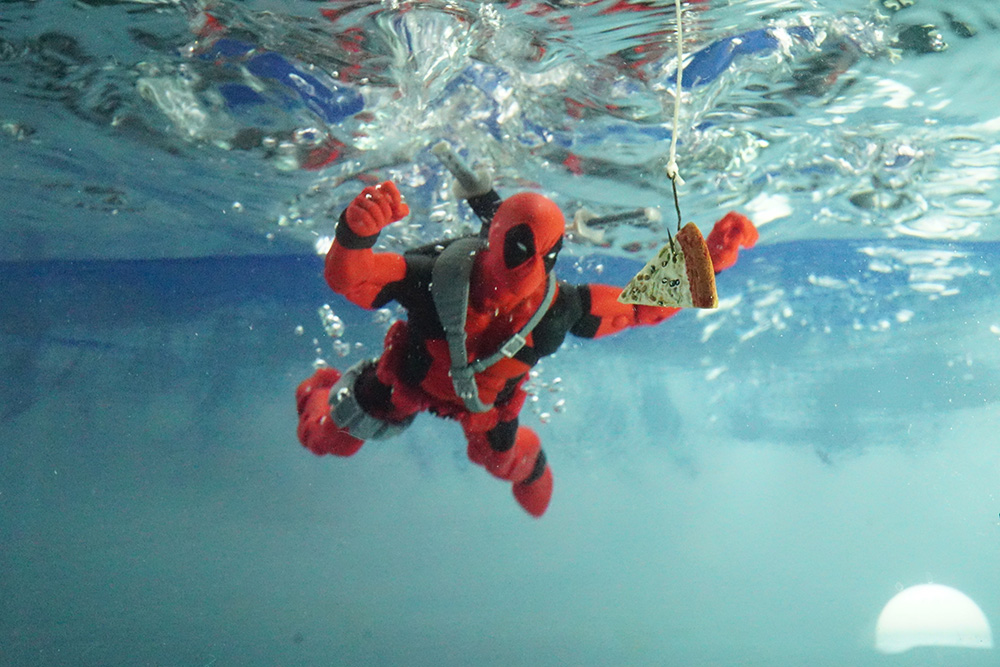
This was definitely getting closer to my vision. I relocated the Lume Cube to a different corner of the tank to get rid of the reflection. Then it was a simple matter of perfecting my technique of dropping Deadpool into the water at the right spot.
What could be easier?
Dropping Deadpool into water over and over (and over) again…
As I started dropping Deadpool into the water, two things became readily apparent. First, Deadpool did not fall straight down. He tended to twist to the right and go immediately sideways and off course.
Second, it was tricky getting the water splashes and bubbles right. I initially dropped him in from 3–4 inches above the surface, which gave the water that wavy look I needed. However, when I did that, bubbles formed around him. I didn’t mind a few bubbles, but these bubbles almost hid Deadpool entirely from view. This was definitely not what I was looking for. The obvious solution was to set him at the very top of the water, and then release him. This stopped the bubbles from forming, but it did not give the nice wavy look.
After many, many (many) tries, I finally got my technique down. The secret was to hold Deadpool at the top of the water, which reduced the bubbles. I had to hold him leaning to the left, to counteract the tendency to flip to his right as he sank in the water. Finally, as I released him with one hand (the other on the remote camera trigger), I would violently fling my fingers wide open, which agitated the top of the water and gave me that sweet satisfying wave look I so desperately craved.
Along the way, I also tweaked the lights and the background. It took me over 120 attempts, and over 1,400 frames, but the photography fates finally smiled on me and everything fell into place for one gloriously perfect image.
Well, almost perfect…
Along the way I kicked up some sediment from the bottom of the tank, so I spend a fair amount of time playing every toy photographers favourite sport: Hunt the dust spot. My weapon of choice: the Photoshop spot healing brush.
Once I had the spots cleaned up, I simply lightened the image, and made a few minor colour grade adjustments. When I was done, I had the exact image I was hoping to capture:
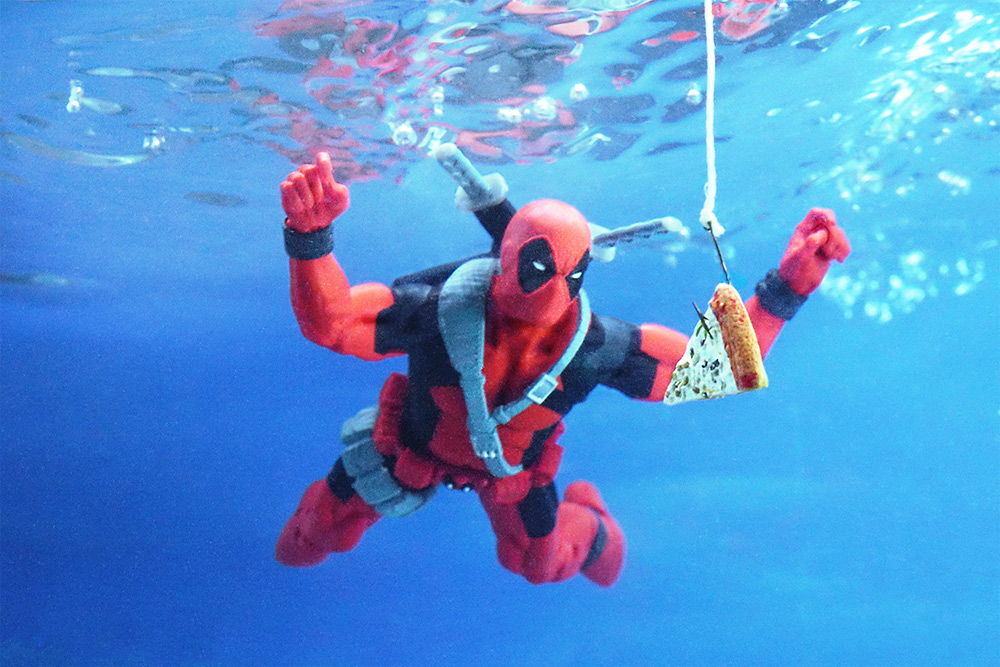
Was it worth the effort? Yep! Totally.
Epilogue
Now that I was finished with the tank, I set it up again and am happy to report that I have four new fishy office mates gleefully swimming around, oblivious to the previous inhabitants’ sacrifice for my art. Isn’t that always the way it goes?
[dave]
Want more toy photography goodness? Subscribe to our weekly email round up so that you never miss a post. You can also listen to episodes of the podcast! You can follow my work at @therealstudiodave.


Great article as always!
Might have to find a fishtank now to try a few thing. . . .
Did you have any issues with glare on the side of the tank?
Thanks Joshua!
I didn’t have many problems with glare at all. I did clean the glass right in front of the lens well. The light inside the tank did cause annoying reflections if placed to close to being in frame, but it was easy to find a place to stick it where it didn’t reflect anymore.
I think cleanliness of the glass and clarity of the water are the important bits.
Great article Dave! I love the pizza slice in place of the cash.
Thanks Sabrina!