
The post I should have written a long time ago
I genuinely don’t know why, but I’ve been putting this post off for a very long time. And in truth I can’t really say why that is. When I talk to other photographers about my work it’s almost guaranteed that my camera setup is going to come up in discussion. I appreciate that I do something that many people find intriguing and different. Perhaps that’s part of why I haven’t wanted to talk to it specifically as a post. It comes up a lot, and perhaps there was a feeling of expectation on my part.
What is anamorphic
Before I go into what I do and why, and how I setup my camera. I guess we need to do a tech talk about anamorphic, and what it is. For those that don’t know anamorphic is a type of lens, used mainly in cinema. It’s got many different qualities including a wide aspect ratio, chromatic qualities (especially if you go vintage), a unique oval bokeh and a tendency to create pretty and dramatic lens flares.
One of the regular questions I get is how (and why) I have the aspect ratio I have in my photos. The answer is not a crop, or a panoramic, but anamorphic. When shooting anamorphic, the most obvious difference is the shape of the resulting images.
An anamorphic lens gives what we know as a very cinematic quality by having a wider aspect ratio: being wider along the bottom of the image than along the side. And as you can see from the diagram below the wider an image gets whether in video or photography, the more movie like it becomes. This is really important to me and I’ll come back to it quite o lot. Apologies if I get repetative.
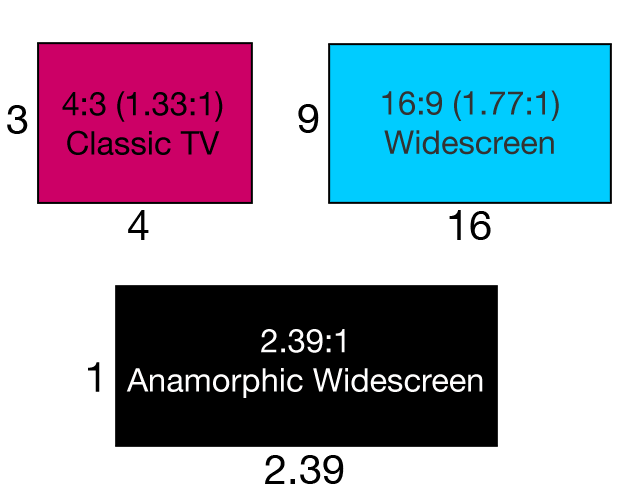
Aspect ratios for cinema and in turn anamorphic lenses are not set solely to 2.39:1. But these are the typical measurements. And as you can see they are a dramatically different shape from a typical 4:3 or 3:2 format that most cameras use.
For anyone is interested in the specific details and some of the science, check out the video below from Studio Binder. They give a much clearer description than I could offer on the history and construction of an anamorphic lens and how it compares to a typical spherical lens. Also, good luck with the quiz at the end of the video, tell me your scores in the comments.
So it’s different in the camera than it is on the computer?
Yep. As explained in the video the image in camera is narrower than the resulting photo as the lens works its magic and squeezes what it sees. Remember that the camera itself isn’t anamorphic. So like my Sony a7, it still has a traditional sized sensor.
The photos actually need to be resized once exported. As you can see in the examples below the 3:2 image is as the file is saved by the camera. Where as the 2.39:1 image is how I have “desqueezed” the photo in Photoshop.

Being honest, I don’t actually stretch the image width but actually reduce the image height. It was a conscious decision I had to make when I started taking anamorphic images. But unlike film you cannot increase a digital file in size without losing quality. So I decided to sacrifice the pixel count of the height instead of stretching the pixels in the width. As a result a 6000 x 4000 pixel image in camera becomes a 6000 x 2255 pixel image in Photoshop. The numbers are specific to the squeeze of the lens, with mine being a x2 lens. I can’t remember the specifics as to why this number, it’s been a long time since I started shooting this way and now it’s just kind of how I work.
Lets talk kit and why I have a camera lens that’s as complicated as a spaceship
Thanks for the spaceship line Tomek, I told you I’d use it from now on.
So, how do you take an anamorphic photograph. Well it’s all rather complicated as you can see from my camera setup below. And the key thing is if you are not able to afford cinema level lenses then you actually need to use two lenses at the same time. Let me walk you through the bonkers situation I’ve now ended up in when it comes to my camera.
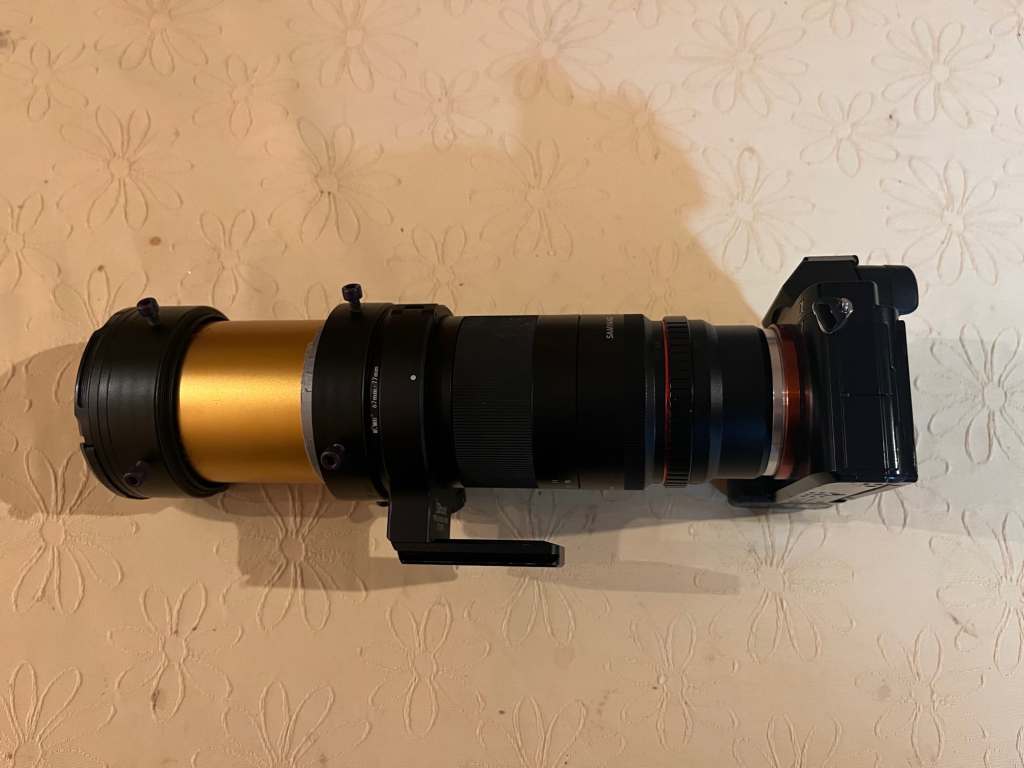
My two lenses are a Samyang 100mm Macro lens and a Super Cinelux 2x Anamorphic lens from Schneider. An important fact about each lens:
- The Samyang is a manual focus prime lens (you cannot do this with an autofocus lens)
- The anamorphic lens is an old projector lens and not a camera lens (it does not mount to a camera setup in an easy way)
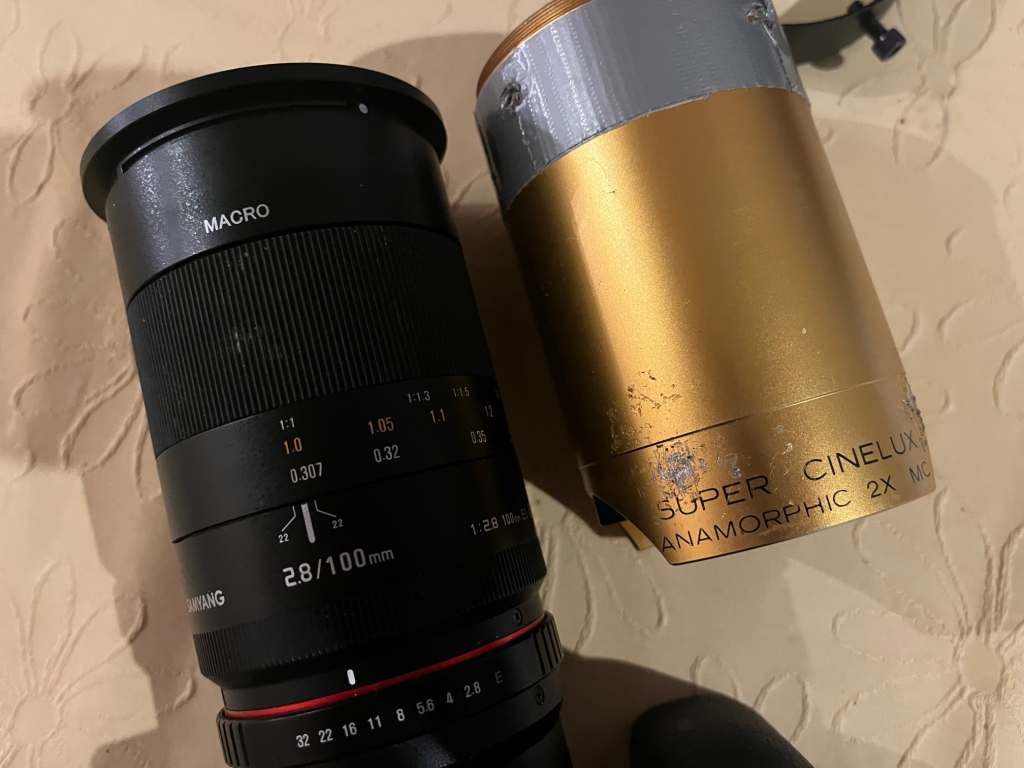
As you can see below, the lens setup when taken to pieces is no easier to get to grips with. But I’ll try my best to explain. It must also be noted that the original state of the anamorphic lens was never in the poor standard it is now. Unfortunately having a golden metal lens does not lend itself to surviving odd mounting needs or any kind of travel. And my efforts to save it with duct tape never really solved the issue.
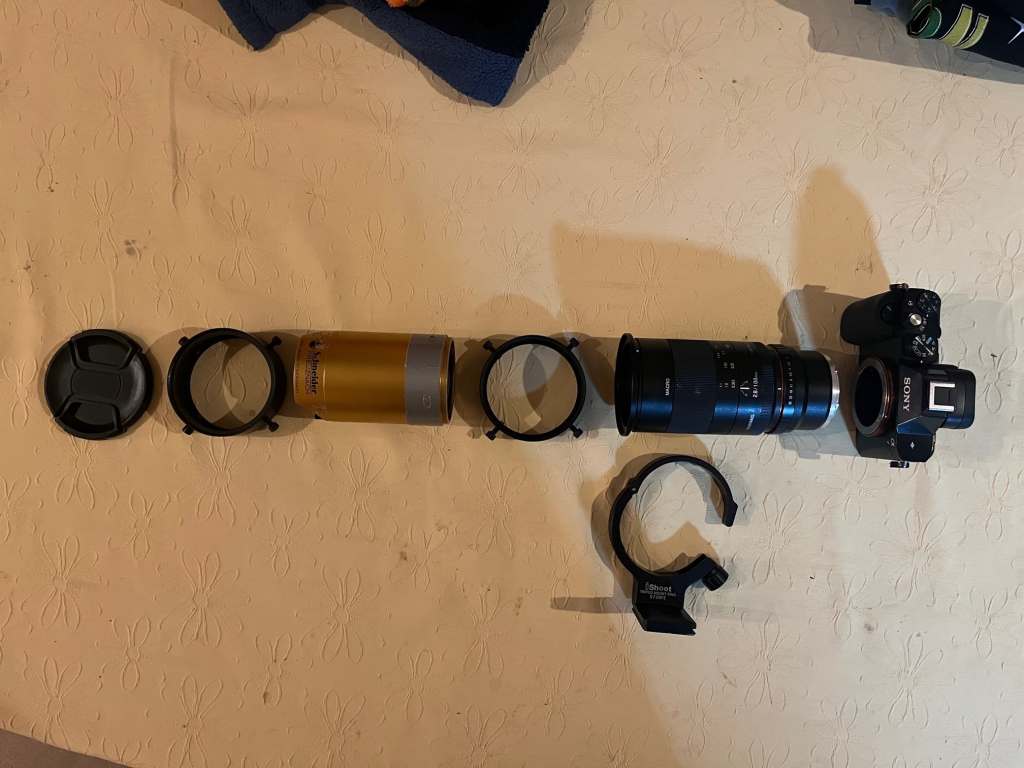
Left to right:
- Lens cap
- Filter threaded mount (fixed to lens with bolts to tighten in position)
- Anamorphic lens
- Bolted mount as before but this end is threaded to fit to another lens
- Macro lens
- Below the lenses you can see a tripod mount support bracket
- Camera
Because the whole setup is so long and very weighty with all that glass, i cannot attach the tripod to the camera anymore. Instead i bought a mount support to sit in the middle and create something of a telephoto lens setup to distribute the weight more evenly.
Why have one lens when you can have two
You can get anamorphic lenses that will act and behave like any regular lens with aperture and shutter speed changes. But those are for people making actual movies, and as a result they come with actual movie prices. And that is not something I can afford any time soon. I mean I could, but that would mean selling all of my toys, and that isn’t going to happen is it?
So the alternative to a super expensive lens is this dual lens setup. Using a standard camera lens and a projector lens as the anamorphic component. As mentioned in the video above when shooting anamorphic the wider image is squeezed by the lens into the camera sensor. Then when projecting the film it is desqueezed by the projector lens back on to the screen. As a result both lenses are doing the same thing, “in different directions”. So with some jiggery-pokery an old projector lens can become a photography lens.
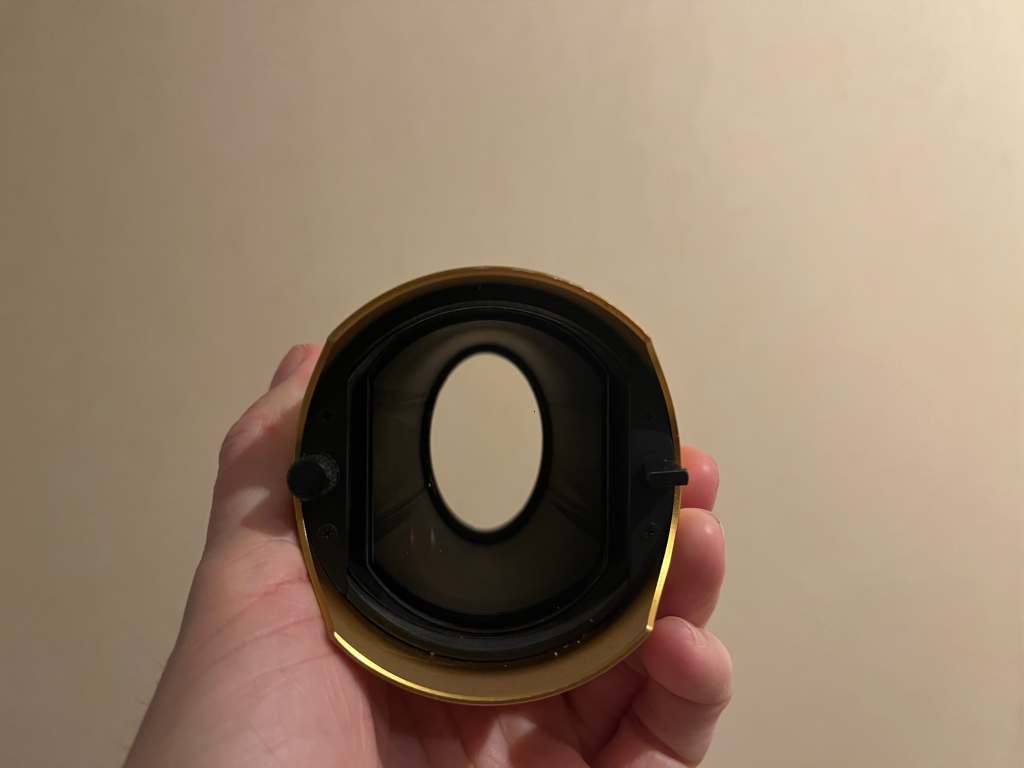
It must be said this old projector lens does come with a lot of limitations. Especially when it comes to controls. In fact it only has one. A single focus dial that you can see on the left of the image above, next to my thumb, just nest to my thumb. It gets even worse, in that I can’t use the dial when I have any filters or diopters attached to the lens as it’s covered by the filter mount. I generally set it to its shortest focal point and it stays there. And I go with the shortest because I take photos of small things, which are generally close to the camera.
The other lens and how to stay focused
I mentioned before that the actual photography lens is a manual lens. And this is really important with this dual focus setup. Because an auto focus lens will never work with the second lens. It would never be able to find its focus point. It’s also advised to only really have this setup with a prime lens as the weight of the anamorphic would break any mechanism in a zoom lens.
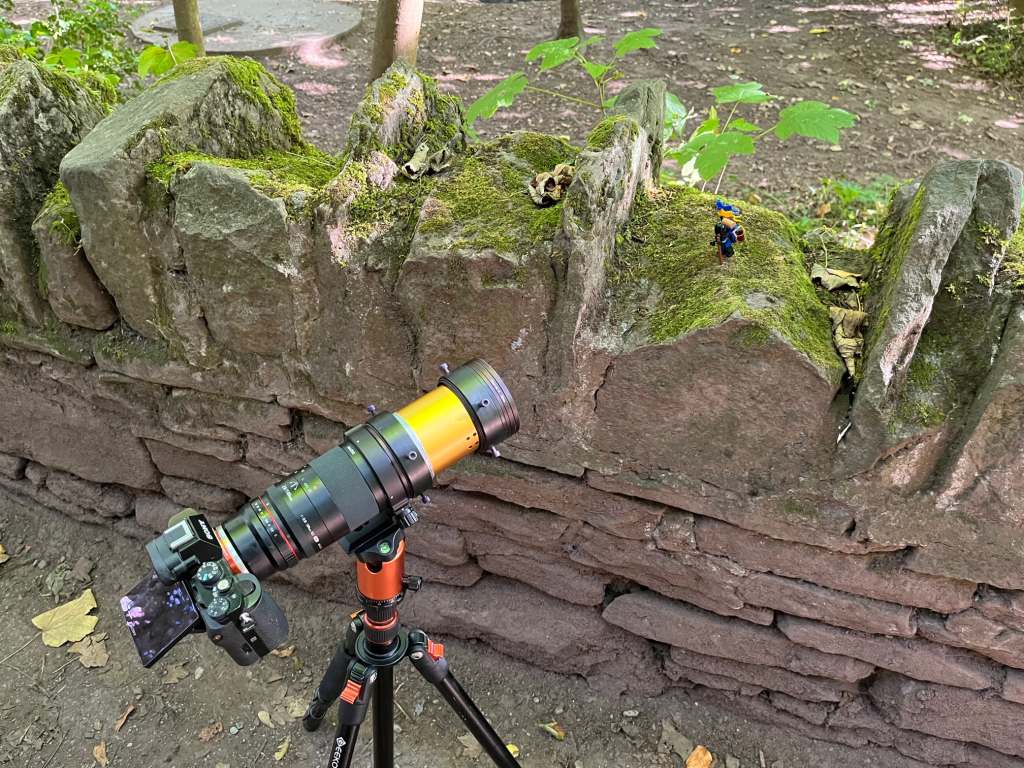
This can limit your choices of shot through distance to your subject, but as you can see I clearly don’t make easy choices for myself. In fact I carry a cheat sheet in my camera bag which tells me the distance to subject needs to be depending on whether I am using a macro diopter/filter and how strong it is. I also carry a tape measure to spot the camera in the right place when setting up. In the example above I’m using both a 1x and 2x macro filter combined together, so I know the front of the lens needs to be 23cm away from the minifigure. Practice makes perfect when it comes to this.
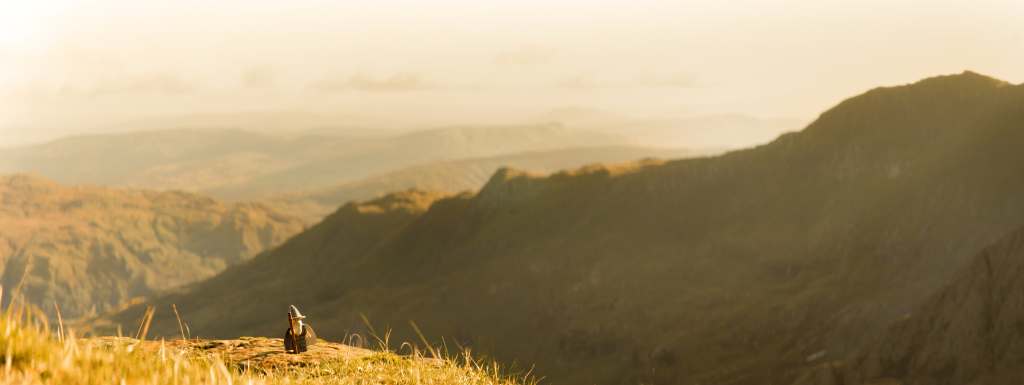
It must also be said that using two lenses does some odd things to the focal length of the “lens”. An anamorphic lens will generally have a wider field of view than a standard spherical length with the same focal length. And when combined with a second lens the focal length needs to be calculated together. I tried to find my original calculation for this blog post, when it comes to the resulting focal length for this setup, but I couldn’t find it. From memory though my 100mm macro and my 2x anamorphic give me something in the region of a 30mm wide angle. But this is not such a bad thing when you like taking wide open shots of figures in the landscape.
But why?
Now that we’ve covered some science and the tech behind my setup I guess I should tell you why I make things so complicated for myself. And trust me it gets very complicated.
- It weighs a lot, this thing is not fun to carry around, and it’s not small either.
- Its impossible to use the camera handheld.
- Dual focussing specifies what distance I need to be from the subject and is a very slow process to setup and shoot.
- Desqueezing means I lose nearly half of my image quality in my finished photo.
- The camera viewfinder is showing a squashed version of the final photo, and I have to imagine what it will eventually look like.
- Did i mention it’s really heavy.
I take the attitude that all of these things are sent to test me, but I still persevere with what I do.
And that is because in my own way I want to make movies and anamorphic lenses are synonymous with cinema. I think for any 80s/90s kid like myself we were raise in part by Steven Spielberg. Along with Star Wars, genre and fandoms of all varieties.
When I’m taking photographs I genuinely feel like I’m making movies in my own little way. Telling stories, just with actors who for the most part stand still. As long as it isn’t too windy that is.
In a nutshell that is my simplest explanation as to why I use this lens and take the photos I do. But lets look at some of the details and break it down a little further…
Lens flares and JJ Jr
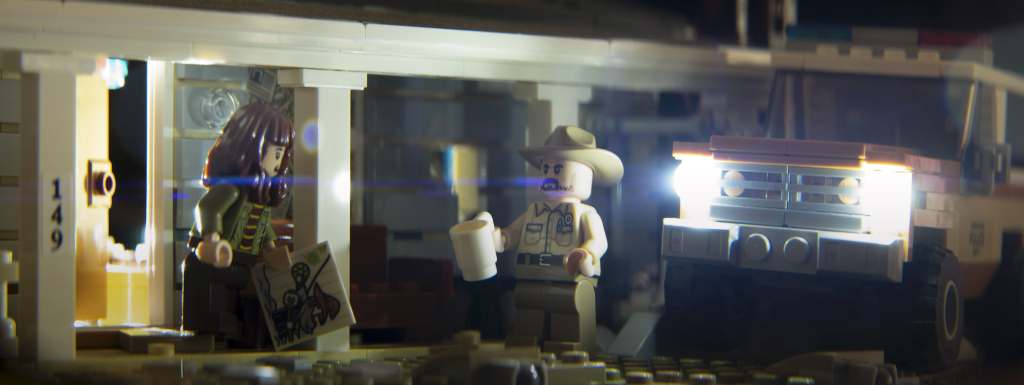
I know they are not to everyone’s taste, and that many photographers aim to remove any kind of evidence to them. But I just love a good lens flare. And when it comes to achieving a cinematic look a lens flare is an easy marker. The image above is the first ever anamorphic shot I took, At the time I didn’t even have the mount to join the two lenses, and they were just lined up inline with each other, propped on a folded towel. The lights are real, with some LED studs acting as headlights and creating the blue streaks of the flares.
Since getting into photography I have always had the attitude of, if in doubt of what to do, shoot into the light. I would say it’s because something interesting will likely happen with the light in that scenario. It’s easy to say from this post that I might be a little bit interested in the science of photography. I also think it is about an honesty in the act of using a camera. By which I mean that lens flares are like brush strokes in a painting. They might not be the direct intention of creating the image but they tell the story of how the image was made. A lens flare is an artefact of the camera being in that place, at that time and capturing that particular light. It’s like it tells the story behind the story.
It is also why I accept JJ Abrams choice to go into super lens flare mode with his Star Trek movies. I know it annoyed many, but he wanted things to be so gleaming and bright in the future and the lens flares would be how a camera reacted to that. It is ironic for a movie about alien planets and faster than light travel but it actually grounded it in a reality.
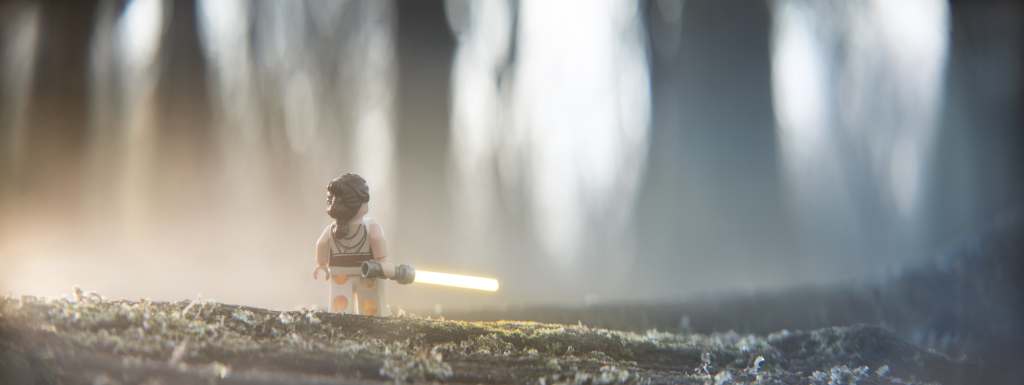
A funny shaped bokeh
Because of the fact we are all taking photographs of very small things, bokeh is usually present for a lot of us in our photography. When it comes to anamorphic its signature bokeh is oval to match the shape of the lens itself. As a result it is a type of imagery synonymous with cinema. And as a result it is also very rare in still photography.
I don’t think there is much more to it than that for me. I like it because of where it comes from, but also because it makes my photos a little different.
Chromatic aberrations and making mini rainbows
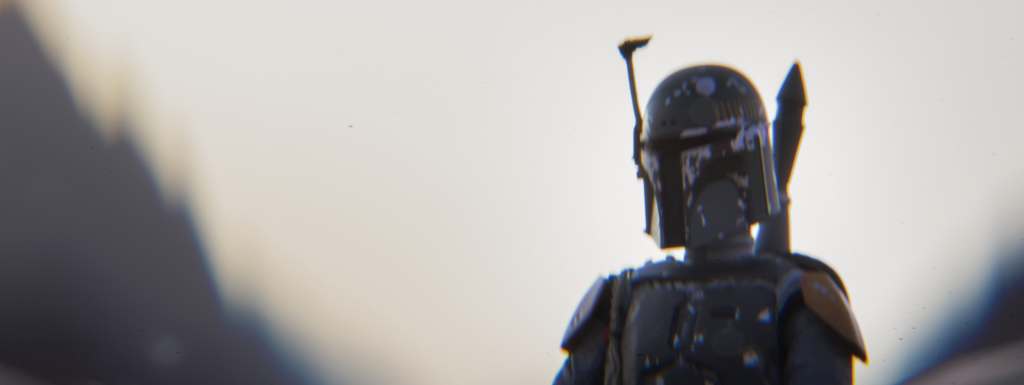
This one is a small one but something I’ve come to love as a tell on the type of lens I use. If you look to the left of either Boba Fett or to the left of the mountain behind him you can see a blue edge. Now do the same to the right side and you’ll see an orange edge.
Again lots of photographers will attempt to get rid of this type of edging caused by the different coloured light passing through the prisms of the lens glass. But for me it’s just another honesty of it being a photograph taken by a camera. And even if it is such a subtle thing it was important enough that Denis Villeneuve and his team digitally put colour aberrations back into the shots of Dune to make it feel more film-like because their cameras were too good and stopped it from naturally occurring.
Sabotaging your own social media
Whether it’s a visual style, or the science behind it, or the act of story telling. I am well aware of the corner I’ve painted myself into when it comes to the photographs I take. None more so than creating super wide landscape photographs in a world dominated by square images. Living in a world of Instagram and news feeds, we digest content so differently than we ever have. It’s amazing how easy it is to share our artwork and find likeminded people. But it does come with limitations.
For me that biggest limitation comes in the form of my photographs not fitting the “Instagram format”. It is something I have had to come to terms with. And I’ll honestly say I am at peace with it. By having an aspect ratio and style so polarising I can choose to either conform or rebel. And a little tip about me, I’m always up for some rebellion. Make 10 men fell like one hundred (sorry for the side track, but damn Andor was good). I decided a while ago that: 1. I’m too far down this anamorphic path to change. 2. Why should I change, this is what I like to do and no algorithm should tell me otherwise.
Now I have to accept my choices mean it’s harder to see my photos in certain apps or on certain devices. But they are my choices and I’m happy with them as I like to feel my artistic vision is based on the barriers I give myself and not those given to me by others.
Think inside the box
When it come to barriers or limits, they come to define you. And the same goes for the act of creating art. Some limitations are not bad things. Some give us the challenges to define who or what we are. I have been shooting anamorphic photographs for three years now. And before that, pretending to take them for a few more before. I can safely say it has been a journey, and that journey was driven by a desire for an aesthetic, to stop pretending to take photographs this way and to learn how I could do it for “real”.
Below you can see the first toy photo I ever took, back in 2015. Now if you’ve made it this far into my ramblings about lens shapes, aspect ratios and colour aberrations thank you for sticking around. But hopefully you can see that the types of stories I was telling nearly 8 years ago aren’t that different from the ones I’m telling today.
I feel what has changed is knowledge. A knowledge about how to take the photos I want. And that knowledge has come from the play, experimentation and learning I have done over the years. Working at it and refining a style.
I must say love my bonkers camera setup. I love that I do something I can consider a bit different to many others. And I love the path I have taken to get here. What I have learnt along the way and how it shows in my photographs.
When you think about it, it’s not really any different from a lens flare coming from your camera pointing at the sun. It tells a truth, a subtext of how it came to be.


![AI is ruining toy photography [a personal viewpoint]](https://toyphotographers.com/wp-content/uploads/2026/03/Together-As-One-Ultra-Magnus-revealed-scaled-500x383.jpg)
Thank you Tom for explaining what an anamorphic lens is and for revealing the process of creating photos with it. It is quite an interesting setup. I like how you embrace imperfections like chromatic aberrations and flares to set mood and make them part of the story in your photos.
Thanks Zoran. I think it’s why people are drawn to vintage lenses. They have qualities and aesthetics that might not be perfect technically, but they bring a certain charm and character to the photographs they capture.
This was very interesting. I like the cinematic aspect ratio, I use it all the time (or something thereabouts), but this brings it to a proper level of authenticity. The bokeh is just sublime.
Thanks Vesa. I like the idea of authenticity, it probably explains why I’m always trying to capture lighting effects and motion blur in camera too. Not to bash post production (I do a lot of it), but there’s something to be said for the practical production of photographs. And yeah the bokeh the lens creates is just wonderful.
Nice to learn something new, Tom! I don’t think I’d want to try your lens setup, but I *am* intrigued by the idea of taking an image with the intention of cropping it to an aspect ratio like this. It’s definitely very cinematic. Even if it doesn’t work on social media posts, it could make a great profile cover (depending on the platform) but most of all… I’d really like to try doing a super-wide canvas print to put on the wall. This is the sort of size that would really lend itself to home decor!
I started with cropping my photos. I remember the days I’d have masking tape on the screen on my camera to make it look like the cropped image. I did sell a super-wide print in the past to a friend. We got it mounted on a board to look slick. But it was very cool to see a photo that big.
Like Teddi. I love learning something new. There’s no way I could handle your equipment but I love that it’s what you choose to do. And it’s important to follow your own path. Thanks for the post – I like the fact that I can now understand how you get the effects you get in your images which I watch for.
Thank you Mary. I was glad I finally shared what I get up to. It has taken me way too long to write this post. Thanks for always keeping an eye out too.