One of my favorite things about toy photography is the complete freedom you have in bringing your ideas to life. If you can envision the image in your mind’s eye, chances are you can translate it into a photo utilizing a variety of techniques. Forced perspective photography is one such technique to make your figures appear larger than life.
What is Forced Perspective photography?
Forced perspective photography is a camera technique where you make objects appear bigger, smaller, closer or farther away than they actually are simply by how you compose your shot. Objects that are higher and closer to the camera will appear bigger while objects that are lower and farther away will appear smaller. This technique was used in movies like ‘Elf’ and Disney’s “Darby O’Gill and the Little People”, but perhaps most famously in the Lord of the Rings trilogy. A properly arranged shot can create very convincing results.
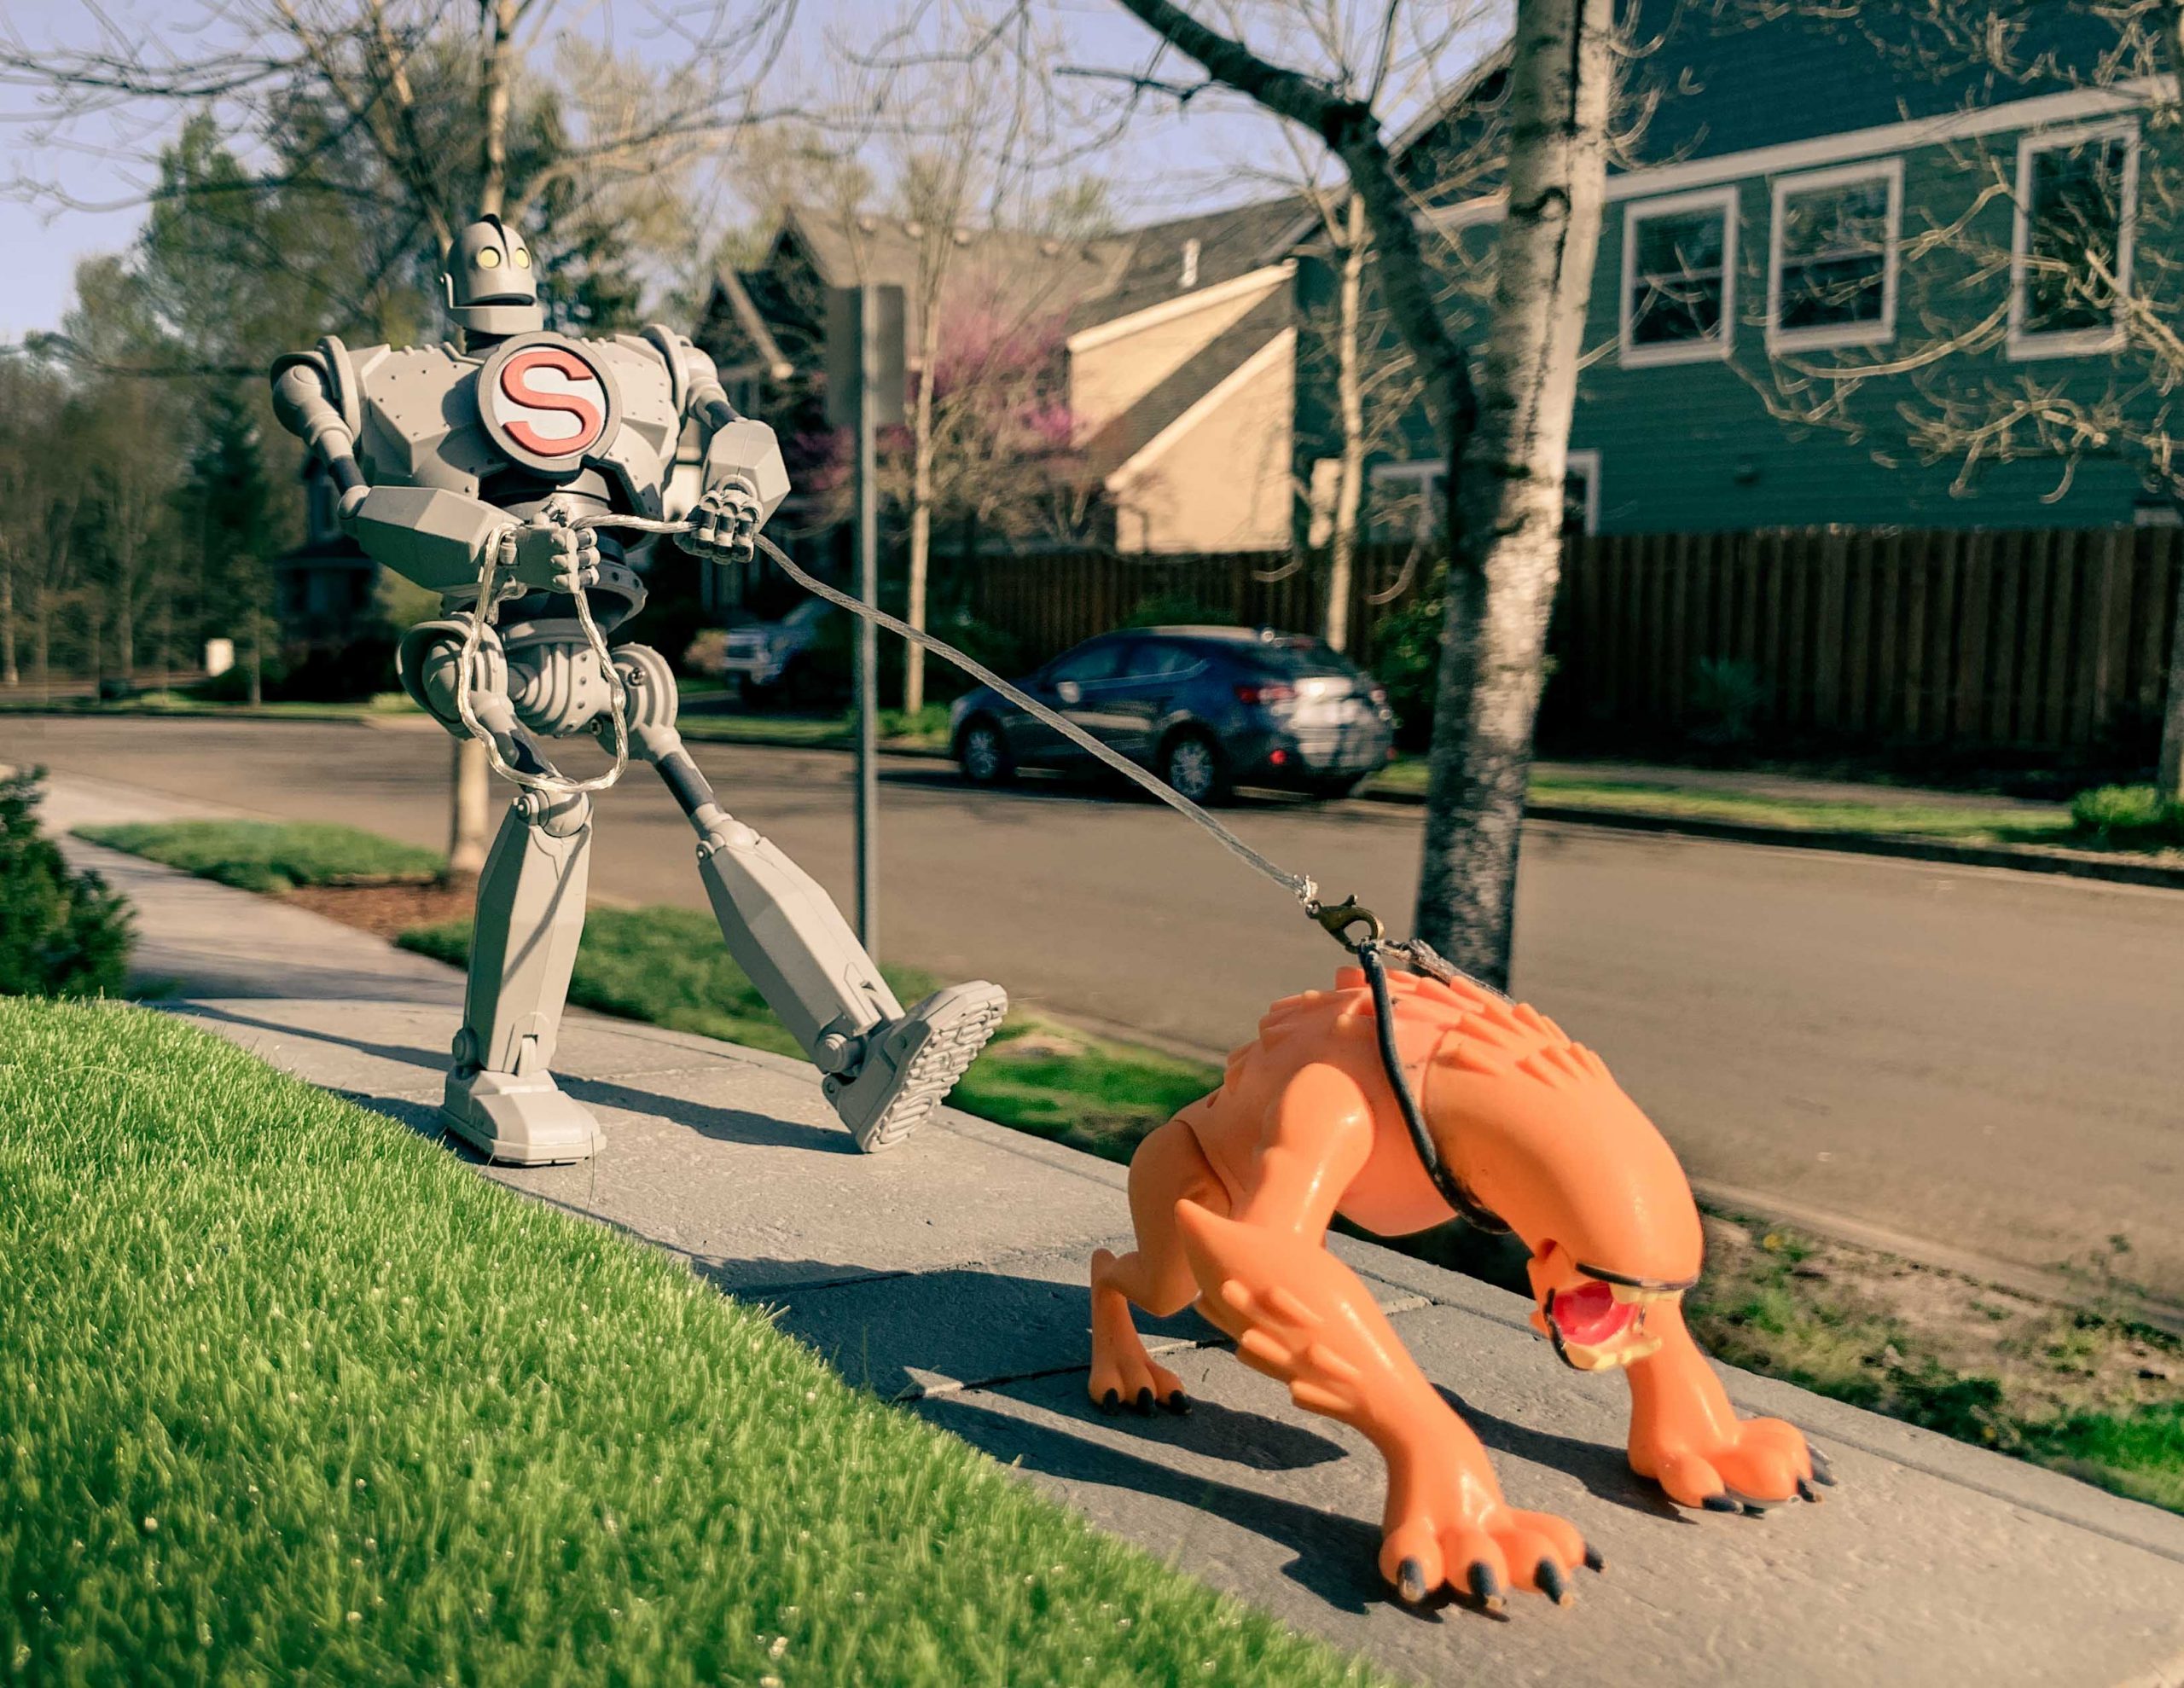
To illustrate this, I decided to challenge myself to take three separate shots of an Iron Giant figure using forced perspective techniques: one where he is at his canonical 50-foot height, one where he is at human height and one where he is waist-high to a Lego Minifig.
Before I get to the challenge, let’s go over four basic guidelines to improve your forced perspective photography.
1. Proper Distancing
In order to make your figures look like they are full scale, you’ll need to adjust their distances to the camera in relation to the real world objects in the scene. Most of the time you can just “eye-ball it” as you move the figure around in the frame and at some point it will just look and feel right. But there is a more precise way to estimate distances using the figure’s scale.
Hold on tight because we’re about to do some math! A figure’s scale is represented as a ratio, like 1/12 or 1/18. As we all remember from grade school that a ratio is comprised of a numerator and a denominator. Okay, maybe I didn’t exactly remember that either.
Let’s look at the example below. Say the Iron Giant is 1/8 scale (where 1 is the numerator and 8 is the denominator) and we want to make him look life size, standing beside a car. We need to make him appear 8 times bigger to pull off the illusion. If the figure is one foot away from your camera (numerator), then the car would need to be about 8 feet away (denominator), maintaining that 1/8 ratio in relation to the camera.
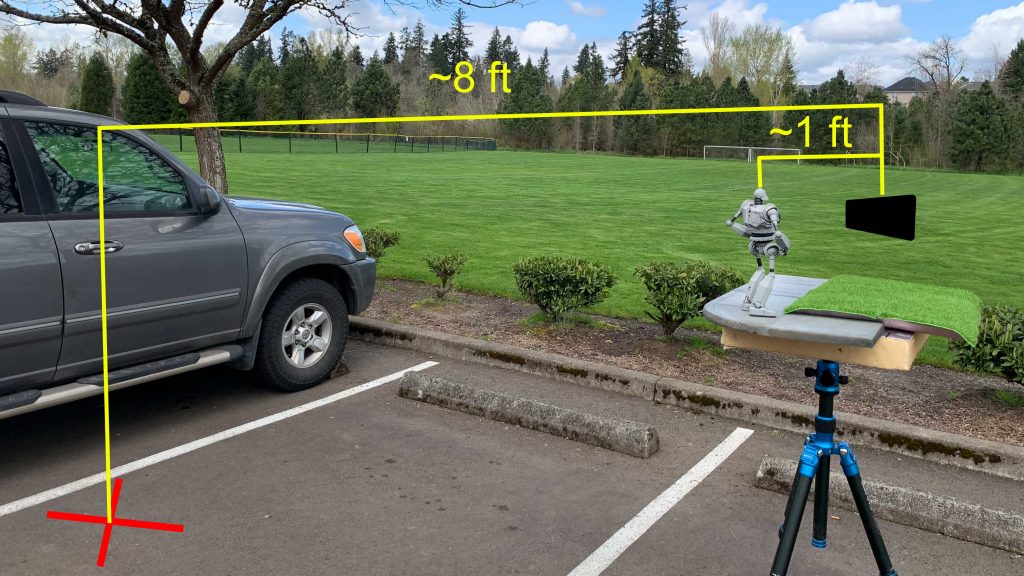
Essentially the distance between the toy and camera is multiplied by the denominator of the toy’s scale to estimate how far the camera should be from real world objects. So a 1/12 scale figure that is 8 inches away from camera would need to be about 96 inches from the car (8 x 12). Remember, the math is just there to take away some of the guesswork. You can still set up a shot just by how it looks in frame.
2. Get your figures up off the ground.
While it is possible to only rely on distance to get a decent forced perspective shot, you usually have to elevate your figures or diorama up into frame. The illusion is created by having objects that are at two different elevations appear as though they exist on one singular plane. The real trick is finding a natural line to hide the point where the two different planes blend in the shot. You can use almost anything to elevate your scene. I’ve used an upturned log, folding tables, and garbage bins, before I eventually settled on a lightweight foam board secured to a quick-release plate that attaches to my tripod.
3. Use a wide-angle lens.
When doing forced perspective toy photography, you usually have to place the toy very close to the camera. Using a wide angle lens allows you to do this while still showing a great deal of the background scene. Wider lenses also have a greater depth of field, allowing you a bigger margin to keep your foreground and background objects in focus.
4. Max out your f-stop.
To enhance the illusion that the toy and background elements are occupying the same space, they should both be in focus. Higher f-stops increase the depth of field so that a figure that is only a few inches away from your lens matches focus with objects several feet away. I tend to use aperture settings ranging from f/16 to f/22. Too much background blur will give away the fact that the figure is actually very far away from background elements. Matching focus makes them appear to be much closer together than they really are.
Be aware that smaller aperture settings demand much more light for proper exposure, which is a big reason why I like to shoot outdoors. In lieu of more light, you may need to run longer exposure times.
The Challenge
Shot 1: True Iron Giant-Sized
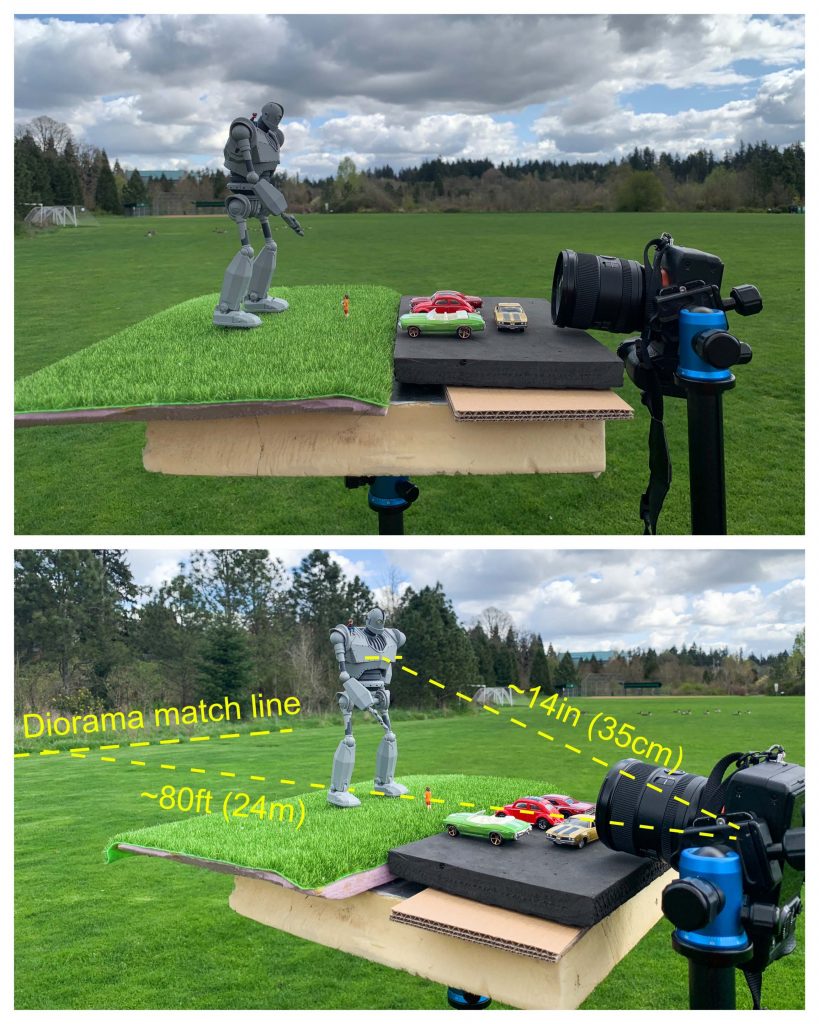
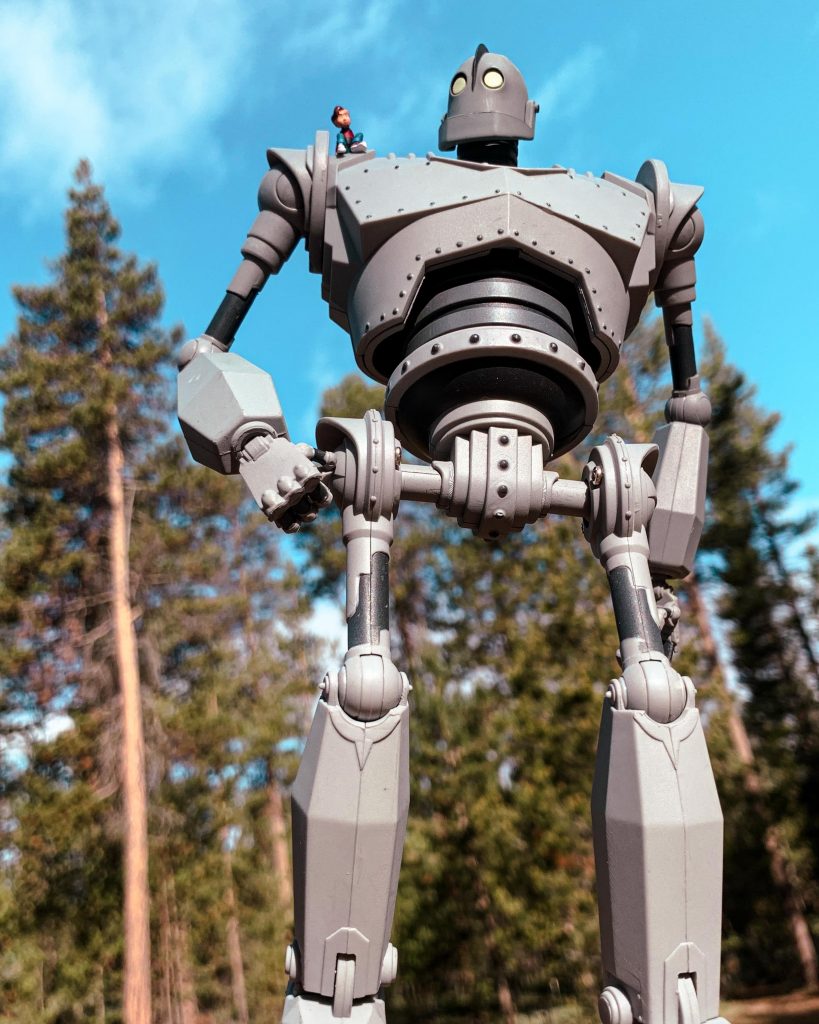
Now that we have our general principles down, let’s apply those to the Iron Giant challenge. For this first shot, I wanted the 9-inch tall figure to appear to be the full 50 feet tall. That would make him about 1/67th scale. You know what else is close to 1/67th scale? Matchbox cars! I knew that I wanted to incorporate them into my scene.
My dioramas tend to be pretty simple and are usually just different iterations of “the ground”. Here I’m using some pieces of dollhouse grass glued to foam-board and a piece of EVA foam for asphalt. I went to our local soccer fields where there was a tree line that would be the perfect spot to hide the transition from my diorama to the real world. The Iron Giant was about 14 inches in front of my camera, so if I wanted him to appear as though he’s walking just in front of the trees, I needed the tree line to be about 80 feet away from the camera (960 inches ÷ 14 inches = 68 or 1/68th scale).
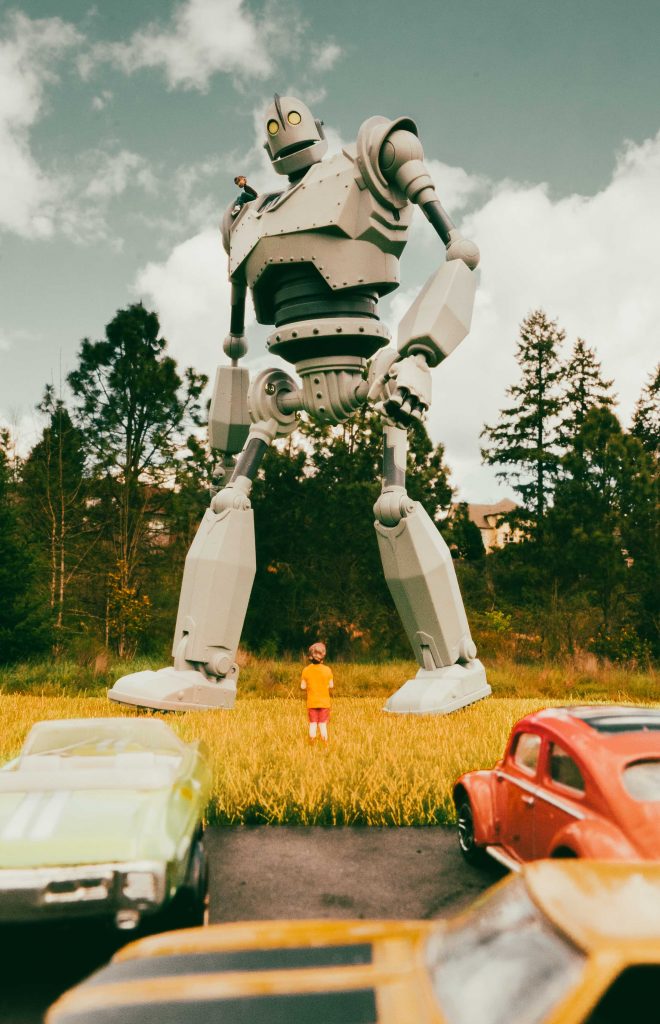
Here’s the final image with some color-correction in Lightroom:
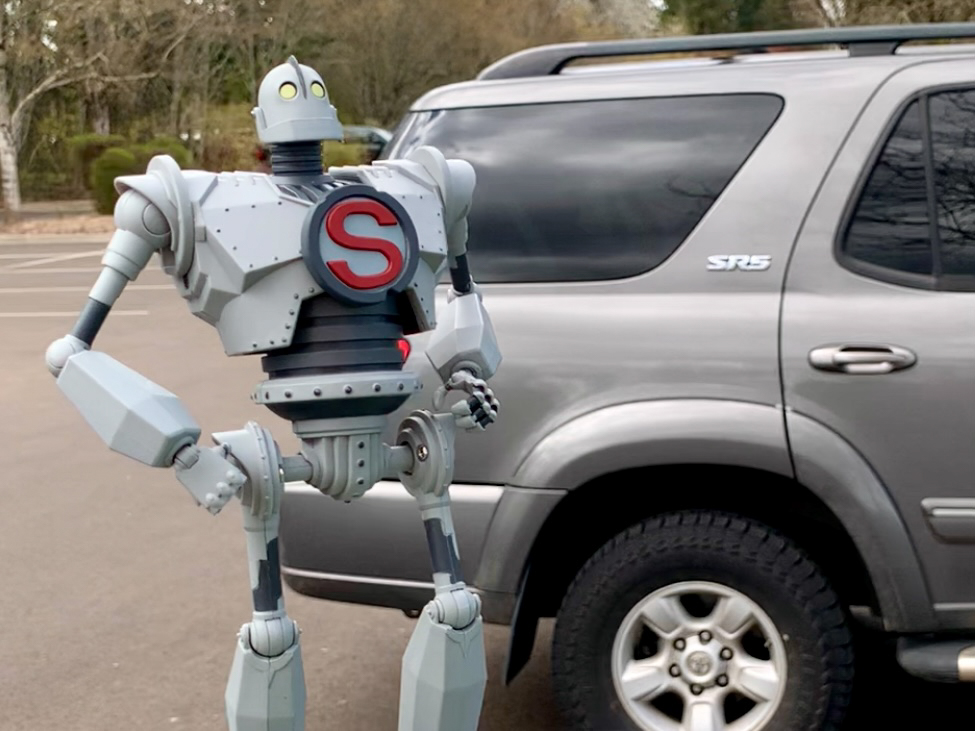
Shot 2 – Human-sized Iron Giant
As in my previous example, a human-sized Iron Giant would be about 1/8 scale. I used my iPhone here for a hand-held shot. Since my phone was held about a foot away from the Iron Giant, the edge of the diorama was about 8 feet away from the edge of the real sidewalk. I used the same dollhouse grass along with a 1/12th scale sidewalk that I made for a previous project.
Here is the resulting shot with some color correction:
Shot 3 – Tiny Giant
Lastly, I attempted to make the Iron Giant look like he is about 1/2 inch tall. I’m not going to lie, this shot made my brain hurt trying to figure out how to do it. I wanted to seamlessly match a large, brick-shaped Lego storage bin with actual Lego. To pull this off I used all the same principles I discussed in this article, but there were far more adjustments, repositioning and nudging here and there to get everything to match correctly. Math went completely out the window and I was just eye-balling it until I got it right.
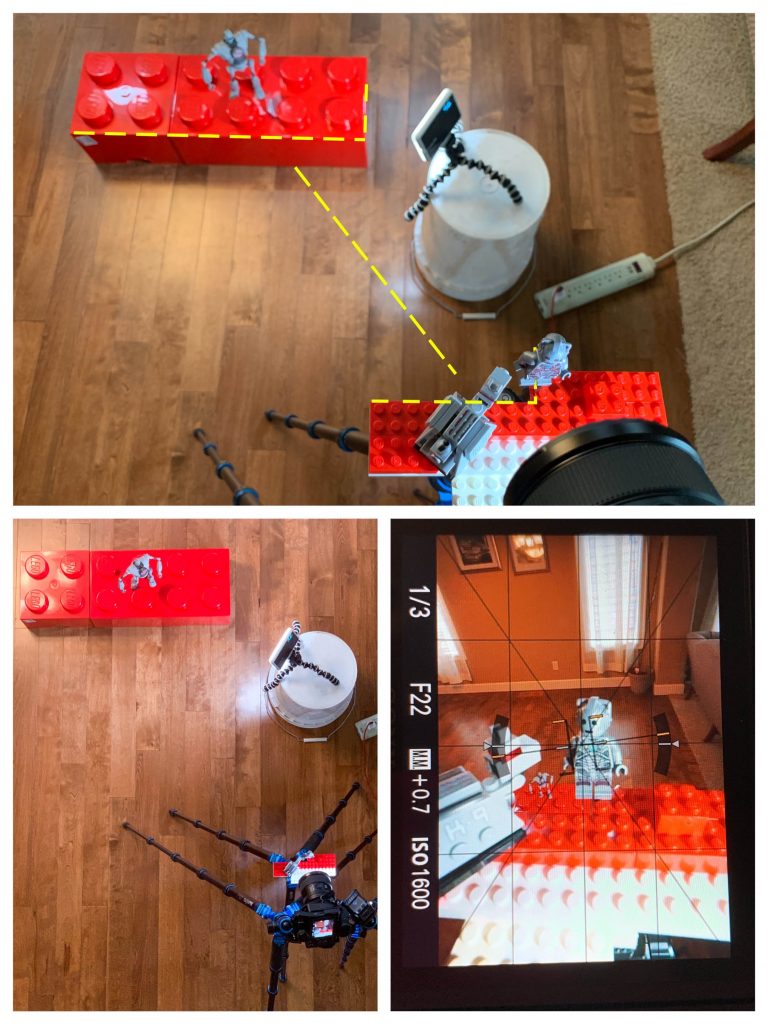
Working at such a small scale there was inevitably a lot of blur between the Iron Giant and the Cyberman so I did have to do a bit of focus-stacking in Photoshop. Other than that, I only color graded and cropped for the final image.
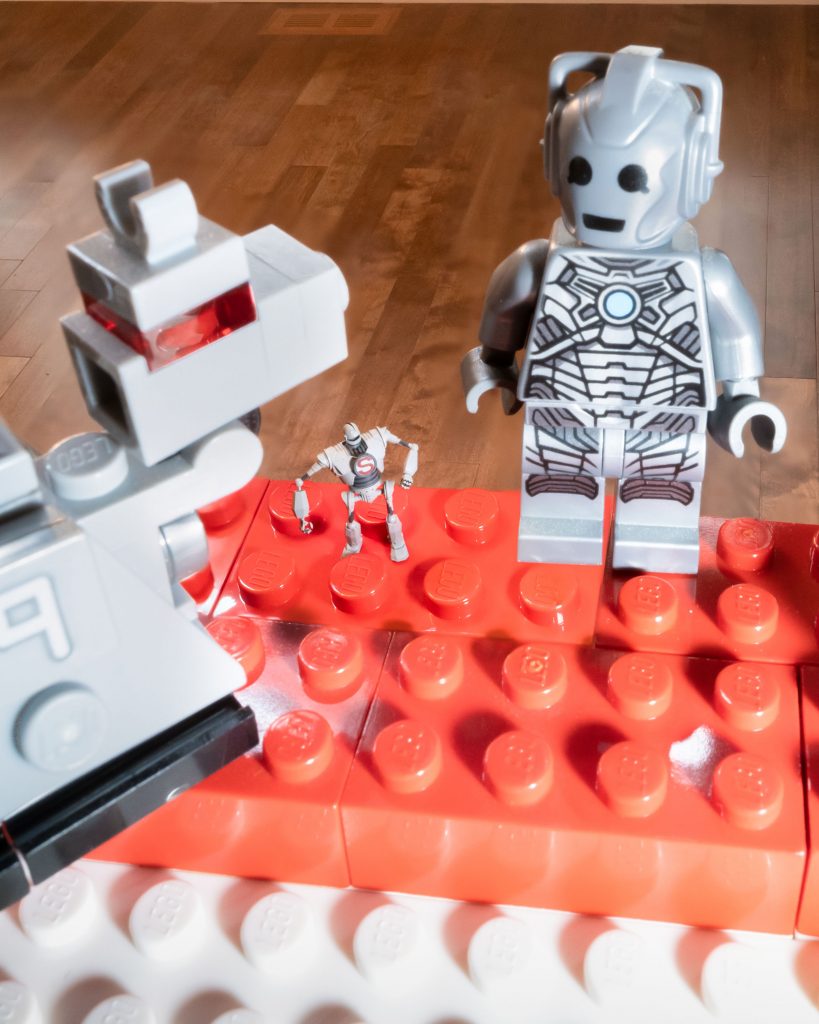
Honestly, I think I may have made him too small as he’s almost unnoticeable in the shot. The real question is, did I make the Iron Giant look small or the Cyberman look big? I guess it’s a matter of…perspective. See what I did there?
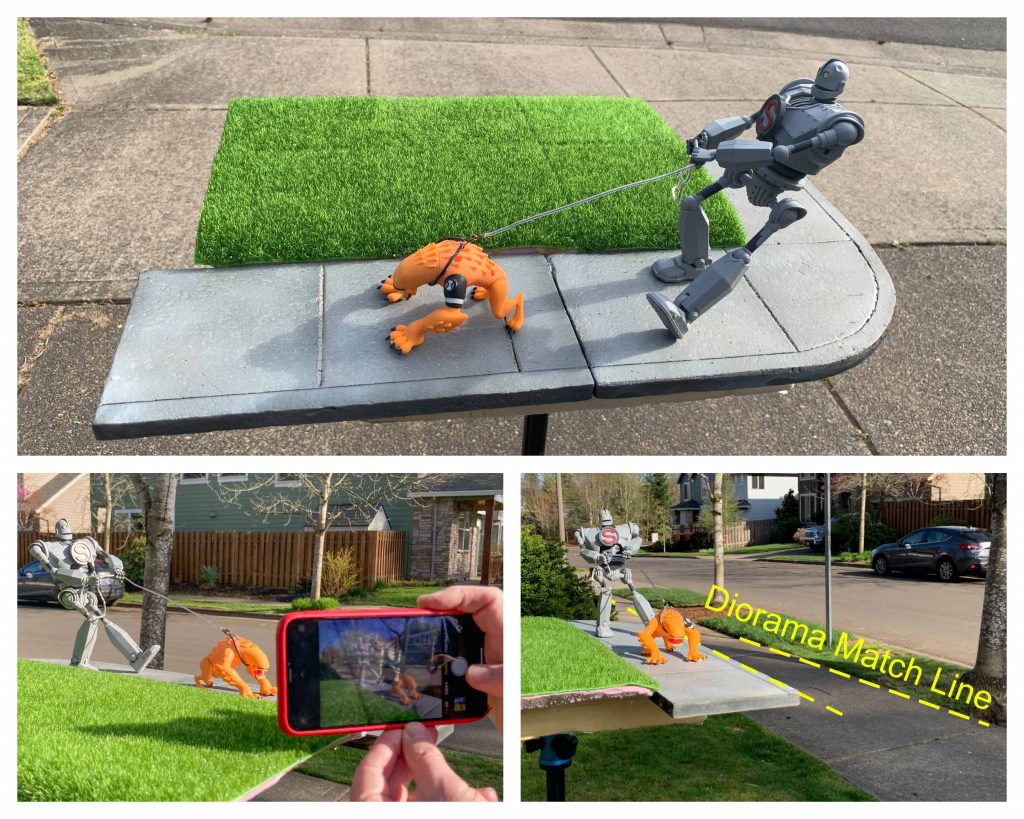
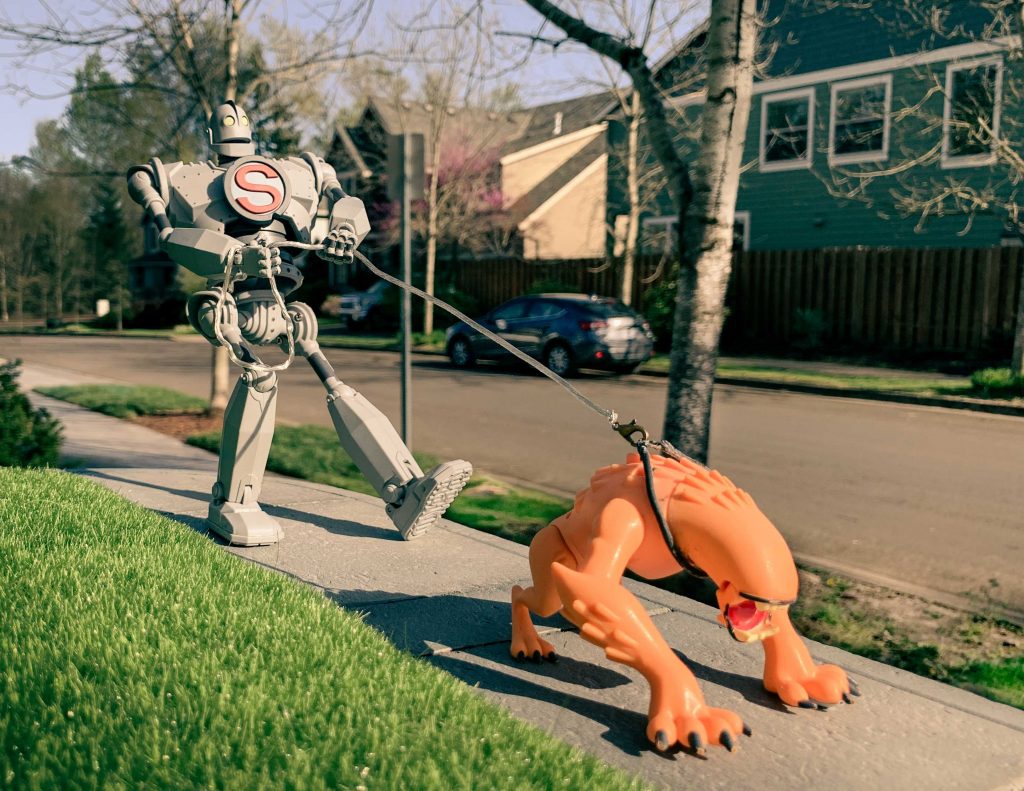
If the thought of making dioramas is a deal-breaker for you, you don’t need them. Just don’t show the figure’s feet meeting the ground! Here are a couple of examples where no diorama was used.

I’ll be the first to admit that all of these images could have been accomplished through the use of compositing elements in Photoshop or using digital backgrounds. But for those of you who enjoy the challenge of “getting it in-camera”, forced perspective photography may be for you.
Chris Whitlow
If you would like to see more of Chris’s work, check out his Instagram page @cawhitlow and give him a follow!


Incredible work. Thanks for all the useful info!
Thanks so much! I hope you can put it to good use!
Awesome write-up! Very detailed and easy to digest. I’m a huge fan of your work and it’s really great to know what goes on in your mind when you took those incredible shots.
Thanks Ken! I’m glad it was easy to follow. I felt like I could write a guidebook on it but self edited down to this!
Great job explaining the setups and math.
I’ve done some of this, but usually just eyeball it, so it’s great to read how to do it right!
Thanks Wade. Honestly, I eye-ball it most of the time because the background is so far away anyway. But yeah, if I’m really lining up a shot to perfect scale, I break out the old slide rule!
I’ve never succeeded with forced perspective but after reading this I may have to try again!
Absolutely, Mary! My journey doing forced perspective has certainly been one of trial and error! Can’t wait to see what you come up with!
Great post and tips! Thanks for sharing.
Fabulous work, Chris! Seeing the behind-the-scenes really helped me visualize what you’re talking about, and your diagrams with the angles drawn on were very helpful, too. Thanks for sharing your experience with the community here.
Awesome ideas! forced perspective photography with toys is the most fun part of learning photography! thanks!!