
Apart from being a toy photographer, I am also an animator and full-time Lecturer in animation at LASALLE College of the Arts. When I take toy photos, I often find myself applying the same skills and techniques I use in animation. For this article, I will be sharing what I have learned as an animator that helps me immensely in posing my action figures.
In animation, we bring our characters to life by giving them personalities, often reflected by the way the character looks, acts and behaves. To understand the actions and behaviors of a character, the audience must first be able to recognize its pose. When they recognize the pose, they can understand the intention of the character; this will help us communicate our story more clearly to our audience.
The same applies to toy photography. When a viewer looks at your photograph, he or she must understand what your toy figure is doing in the scene by reading its pose. If they can’t figure that out, then they won’t be able to understand and appreciate the story you are trying to tell. The viewer must also find the pose appealing and believable. If the pose appears to be unnatural or not convincing enough, it will break the illusion of life.
Here are three posing techniques that I often apply to toy photography.
Line of action
Line of action is a figure drawing concept commonly used in comics and animation. In his book Cartoon Animation, American character animator Preston Blair, most noted for his work at Walt Disney and Metro-Goldwyn-Mayer studios, defines “line of action” as:
“An imaginary line extending through the main action of the figure is the line of action. Plan your figure and its details to accentuate this line. By doing so, you will strengthen the dramatic effect. The first to draw when constructing a figure is the line of action.”
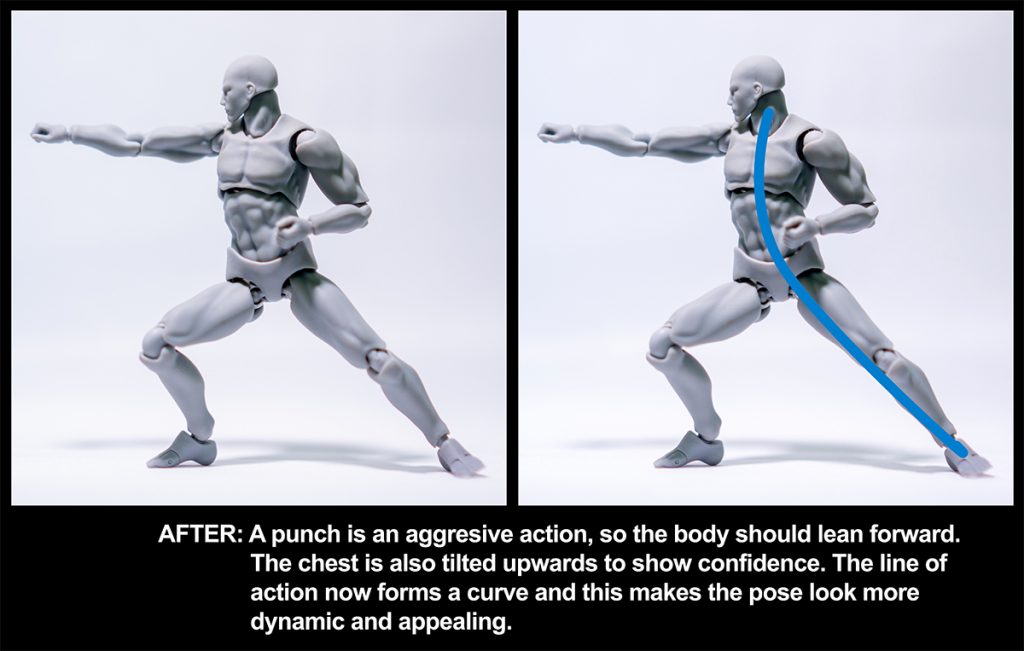
To elaborate the concept more, if you pose your figure with the line of action forming a curve, it will give a sense of flow and rhythm to the pose, and makes it look more dynamic and appealing.
Consider the following example:
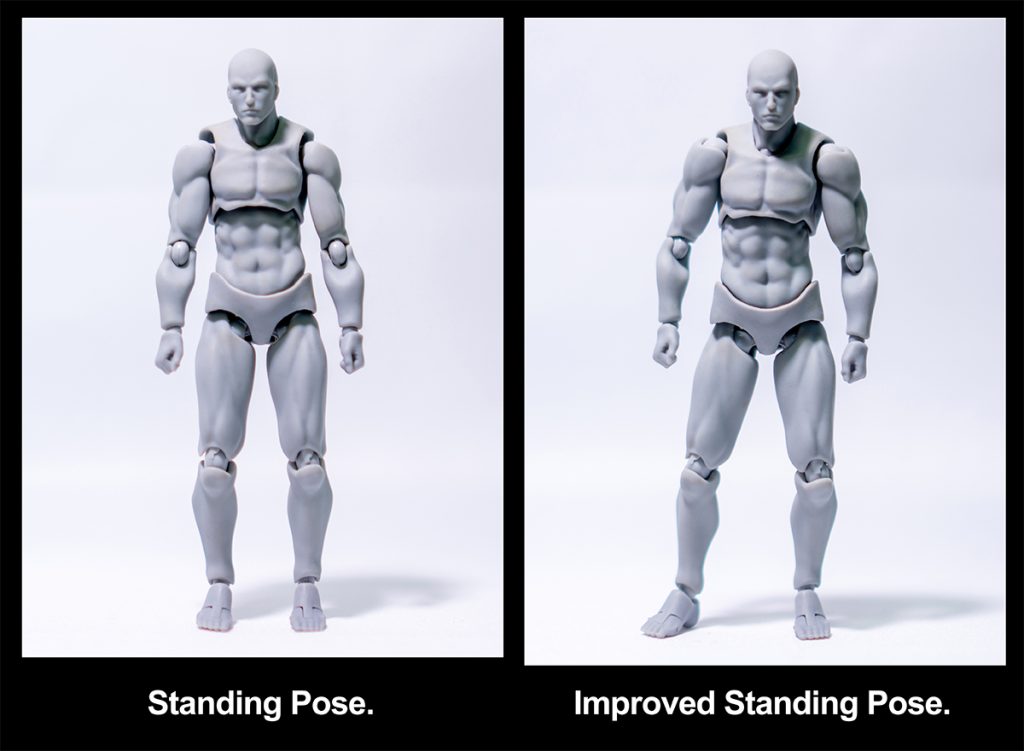
Both images above show a standing pose. However, the standing pose on the right is more appealing than the one on the left. To see why this is so, we can trace the line of action through the centre of the figure and do the same across its shoulder and hip, as shown below:
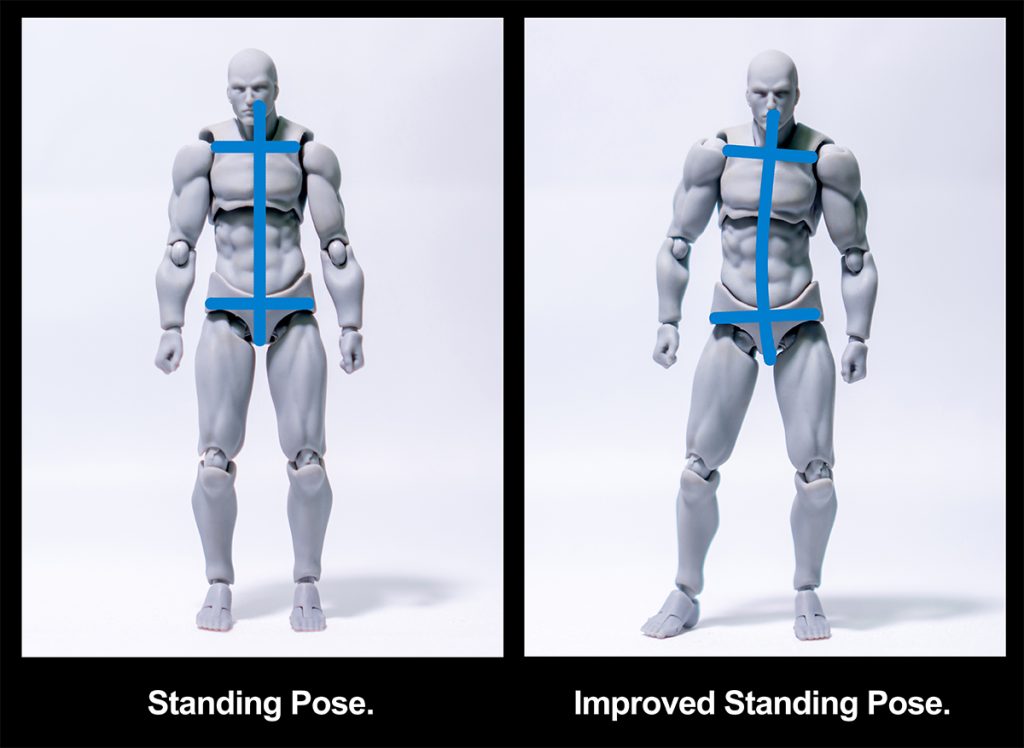
In the first image, the vertical line of action is straight, and the horizontal ones are parallel to each other. It looks very symmetrical. Symmetry is often associated with calm and serenity, so it can make the pose look very stiff and dull. In the second image, however, its line of action on the body forms a curve and the ones across the chest and hip are angled opposite each other. The curved line of action and the contrast of the angles between the shoulder and the hip make the pose look more appealing. The pose is also asymmetrical, and this makes it less stiff and more natural.
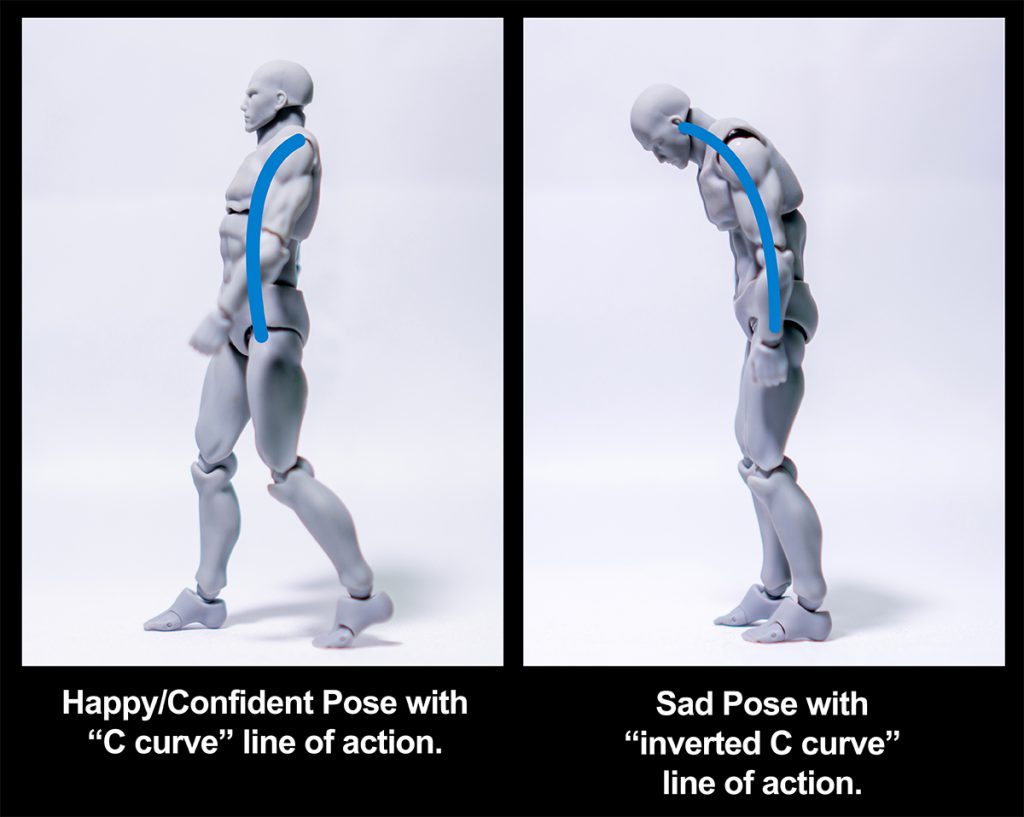
We can also apply the same concept to make a convincing happy / confident pose vs. a sad pose. For a happy / confident pose, the chest and head should tilt upwards to form a line of action in the shape of a “C curve.” This makes sense, as happy and confident are positive and uplifting emotions. For a sad pose, the opposite should happen: the head and body should be tilted downwards. Its line of action should be an “inverted C curve.” The image below illustrates this.
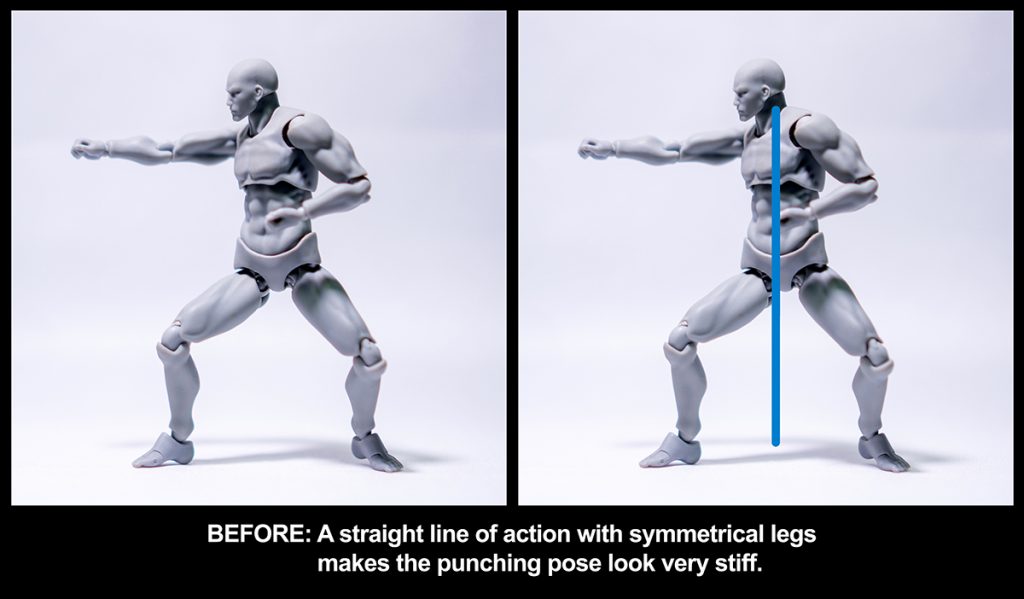
Now, let’s apply the “Line of Action” principle to improve a punching pose:
Body mechanics
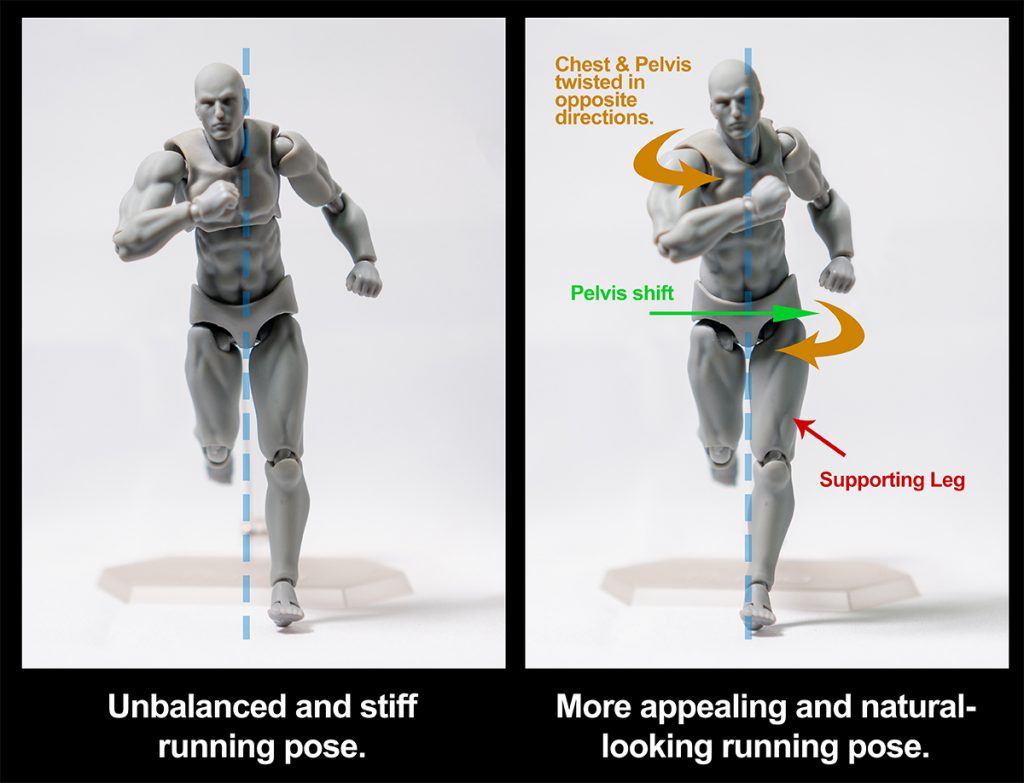
When posing a figure, we should not focus on certain body parts and ignore the rest. Our body parts are connected to each other. When one of them moves, the rest of the body parts are also affected. For example, when we are running, as our arms and legs swing forward and backward, our chest and pelvis will rotate along with them. The chest will rotate towards the side of the arm that swings forward, while the pelvis will rotate towards the side of the leg that swings forward. Since our arms and legs move in an alternate manner, the chest and pelvis will twist in opposite directions of each other. As we lift one of our legs above the ground, our pelvis will also naturally shift to the side of the supporting leg to keep us balanced. The image below illustrates this concept:
Asymmetry and recognizable silhouette
When we pose our figures, we should avoid having the left and the right side of the figure look too similar. A pose that is symmetrical lacks contrast and will often look very stiff. We should also make sure that their silhouette is clear and recognizable. Consider the poses in the image below:
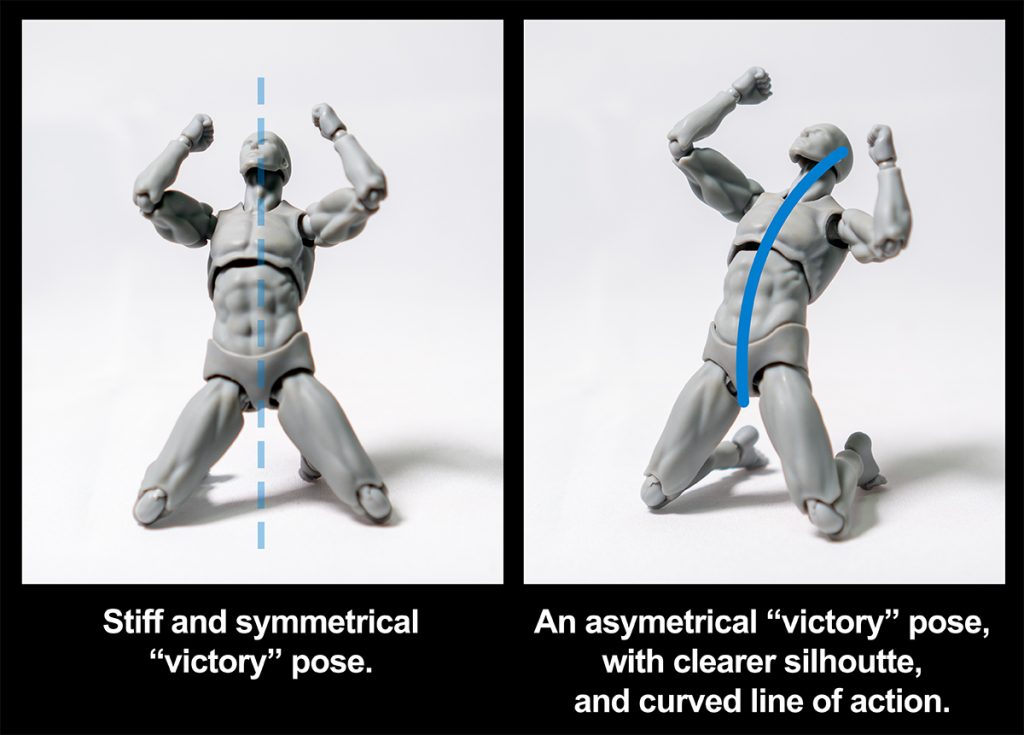
The image shows two different “victory” poses of a soccer player celebrating a goal. The pose on the left looks very stiff and symmetrical. The feet are also hidden behind its thighs. Its silhouette is not as recognizable as the improved version on the right, where its feet are clearly visible. This makes it more obvious that the figure is in a kneeling position.
To create the second pose, I have merely rotated the figure to face a different angle, lifted the right arm and lowered the left arm slightly. With these small adjustments, I have improved the line of action, and made the silhouette more recognizable. The pose no longer appears symmetrical.
The three techniques discussed above are specifically focused on posing your figure. You can also make use of composition and lighting to direct your viewer’s eyes to your figure and enhance the readability of a pose. I will leave these topics for a future discussion. For now, I hope you’ll find these posing techniques helpful!
~ Ken Loh
You can find more information about Ken Loh on his previous Feature Friday post as well as on his Instagram account: @kentoyphoto.


Thanks for the wonderful posing tips Ken. The article is very well written and presented with the comparison images driving the point home on how to make the toys come alive. I tend to do what a number of toy photographers do which is strike the pose myself and try to copy it with the figures. I like the last tip on asymmetry. It definitely gives me food for thought and practice!
Welcome Janan, it’s my pleasure! I’m very glad you like the article. Yes, striking the pose is a great way to see if it works, and have a feel of how the different body parts would move. Animators make video references of themselves too, acting out scenes to see if the poses work. They would often study the video references and push the poses more by applying the techniques I’ve discussed in the article to make the poses more appealing.
Marvelous article! I appreciated all of the figures you used to demonstrate your points.
Thank you Mary, very glad that you like it!