“If all the world’s a stage then I want better lighting” – Rob Coles
If you have not yet read part 1 then this post may not make a lot of sense. Feel free to pop on over to part 1 then return here. I’ll wait, I promise.
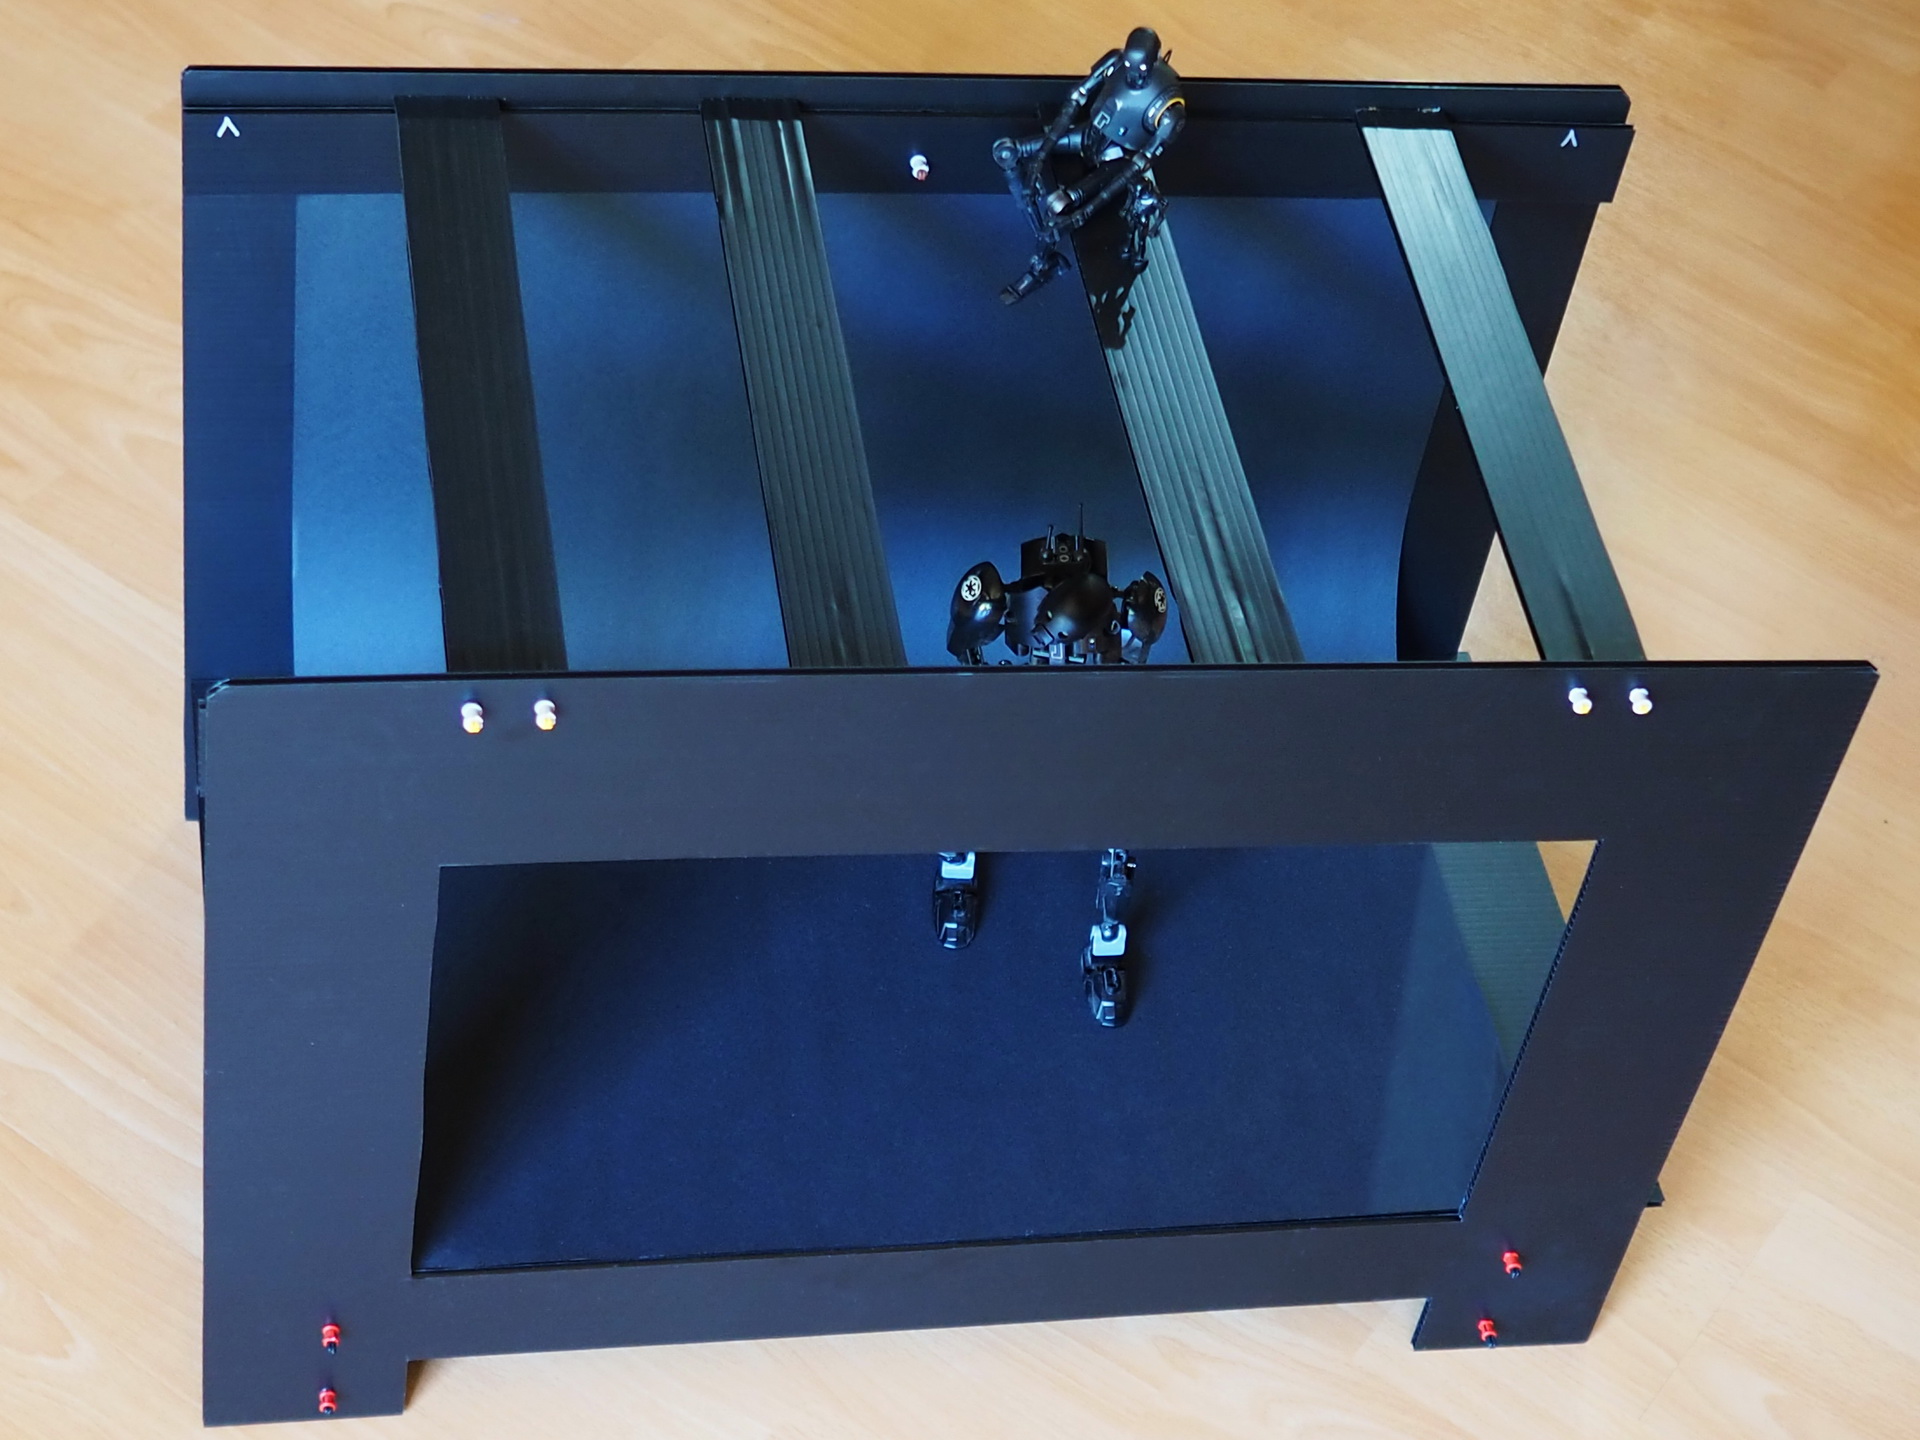
Lighting Stage – complete with background card
If the skeleton of this project is the lighting stage, then the Lego built lighting rigs are the muscles that allow the project to stay upright. But the heart and lungs of this project are the lights themselves. The placement of the lights breathe life into the images, and the types of lights are the lifeblood of the mood and feeling of the images. Of course that makes you, the photographer, the brain of the outfit.
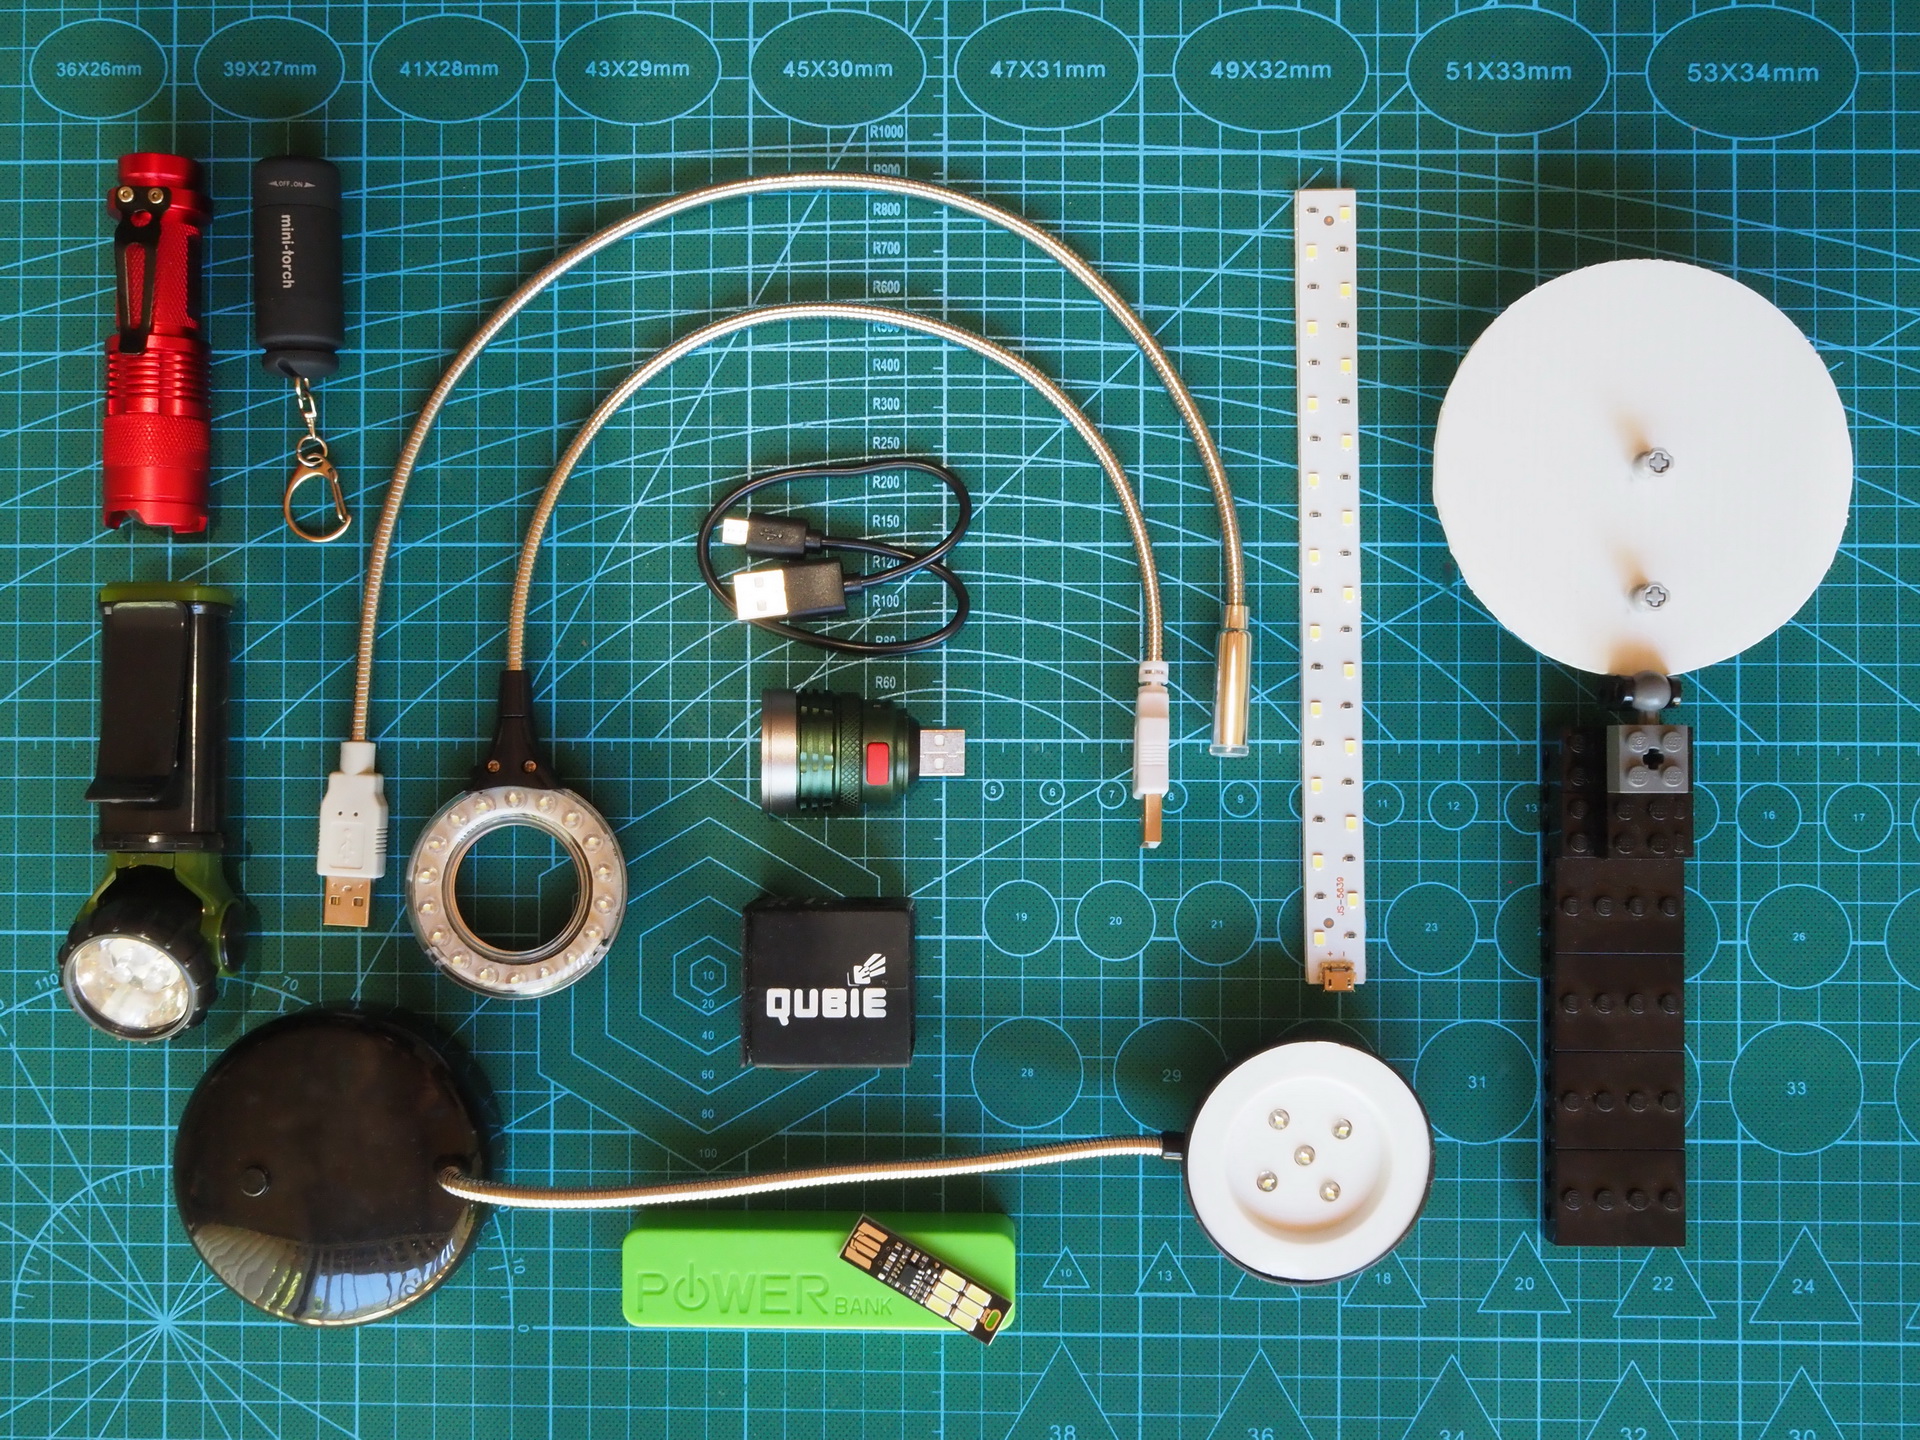
Lighting options with 2200mAh power bank and The USB LED Card bottom centre (I even threw in a reflector for good measure)
The following post is based around a small USB powered card which provides dimmable cool, or warm white light through 6 LEDs (details below). I chose to power mine through 2200mAh power banks, but you can also use AC adapters such as phone chargers. I made the lights to replicate the look of both stage and studio lights, but on a smaller scale. You may not wish to do so, and you are spoilt for choice of ready made USB powered lamps, or self powered lights such as Qubie, Lume Cube, or Litra. I have personally found the three latter options too bright for my purposes and they also come with substantially more cost than the cards I have used. There is also the option of desk lamps, LED coloured bulbs, etc, but they have limited flexibility with the stage I have designed. However, I would suggest you try whatever you have (or can borrow) and test them out. For the rest of this post I will only be referring to the USB powered cards (aka USB LED card), power banks, and Lego built lighting rigs. Part 3 of this trio will only be lit by these units as well.
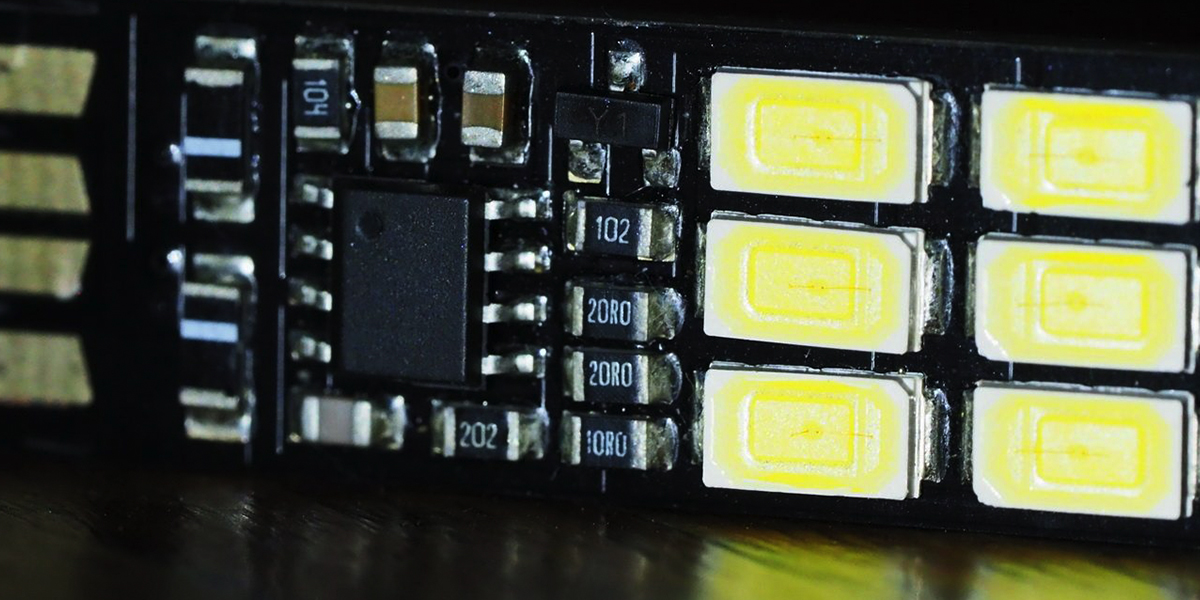
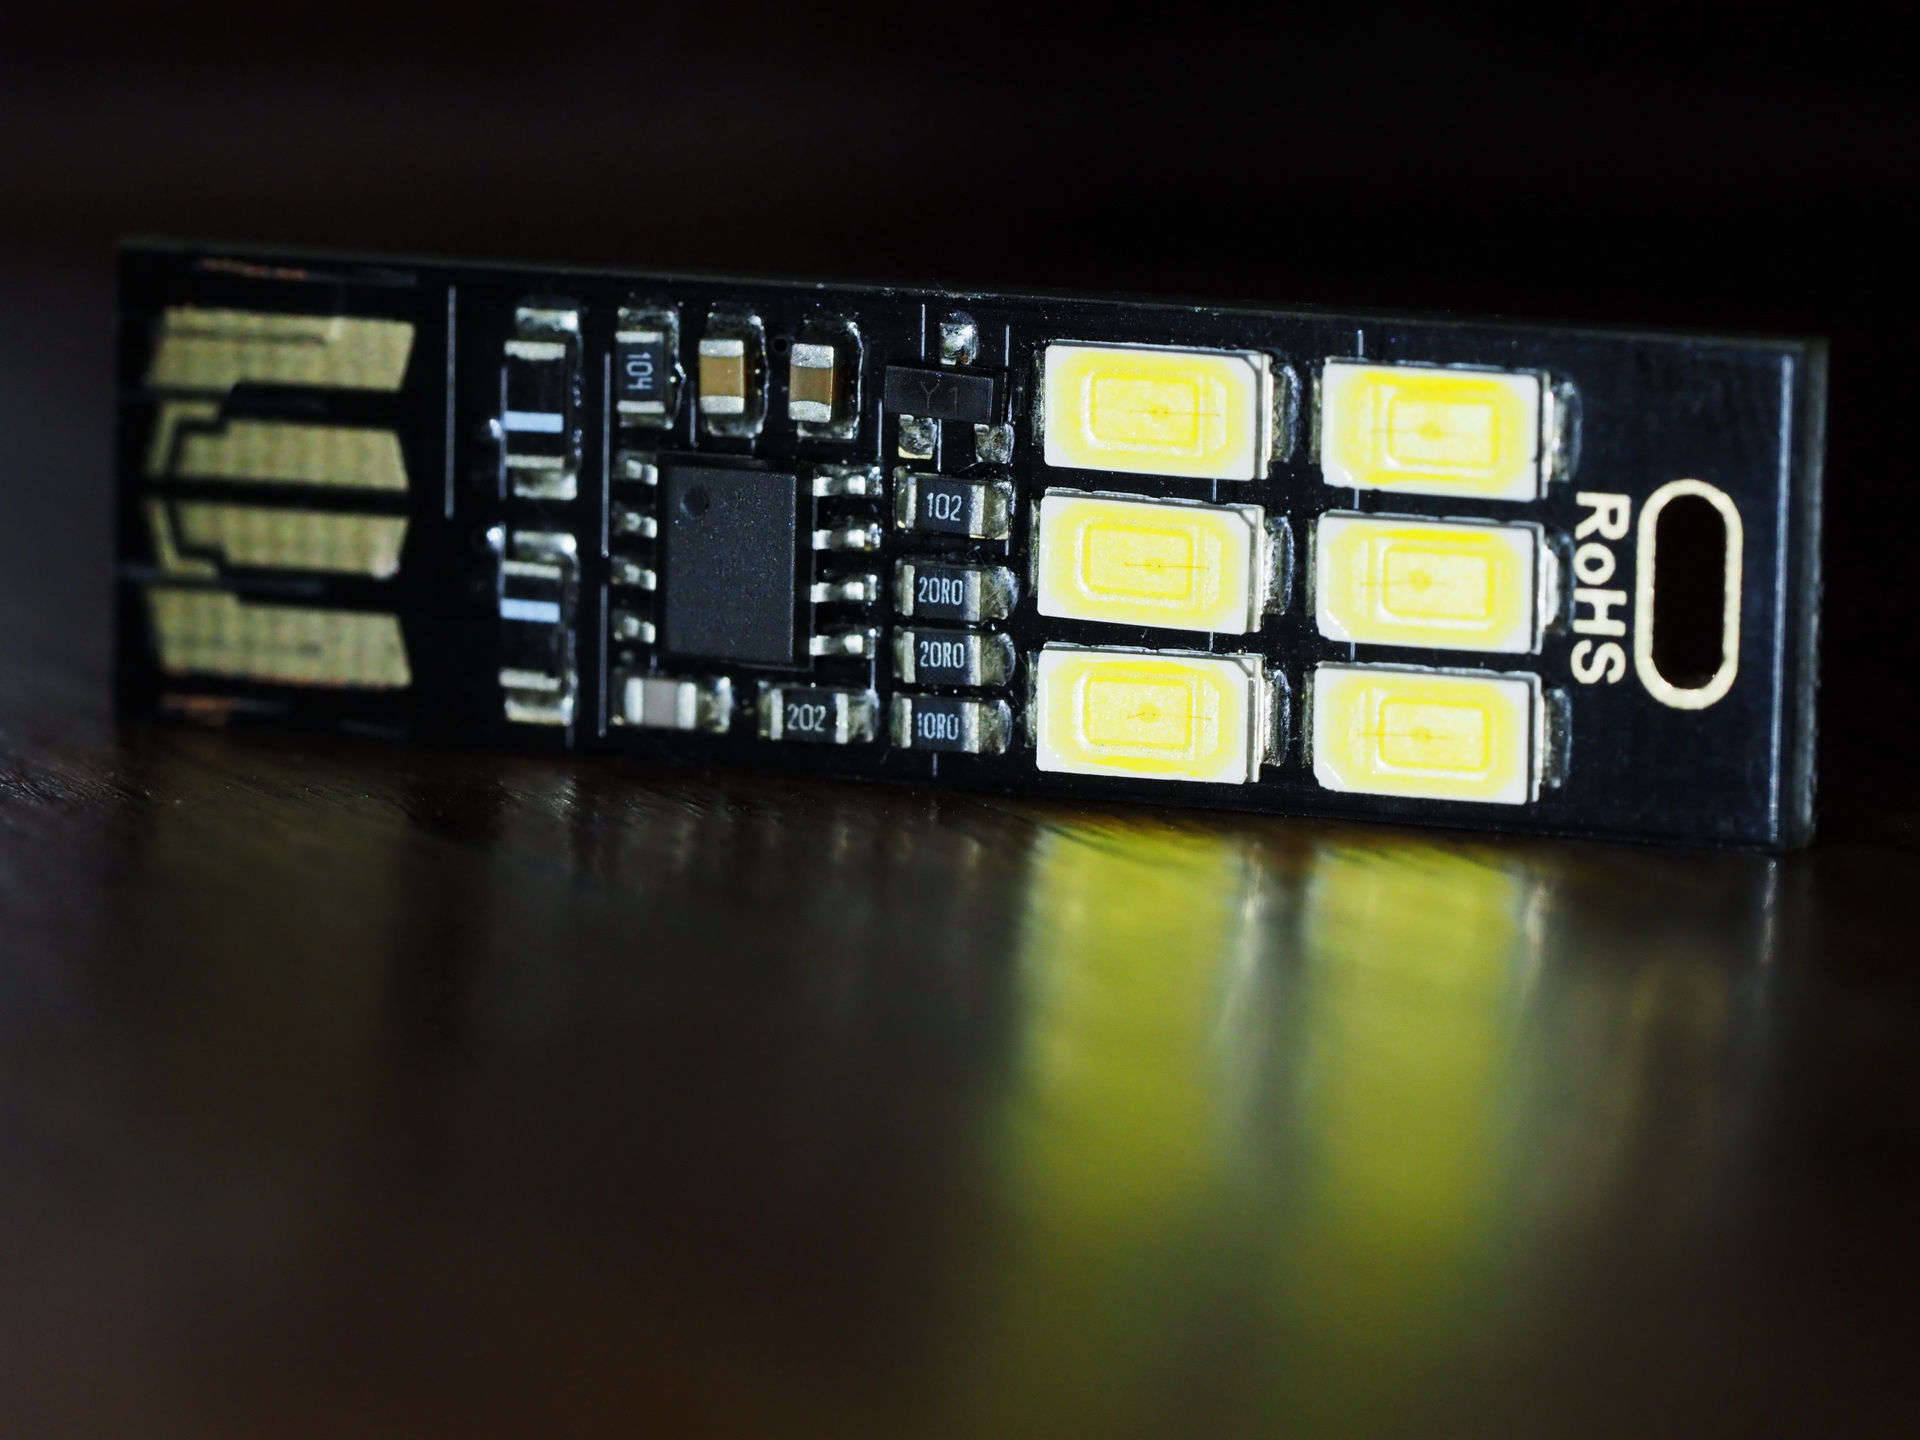
The USB LED Card
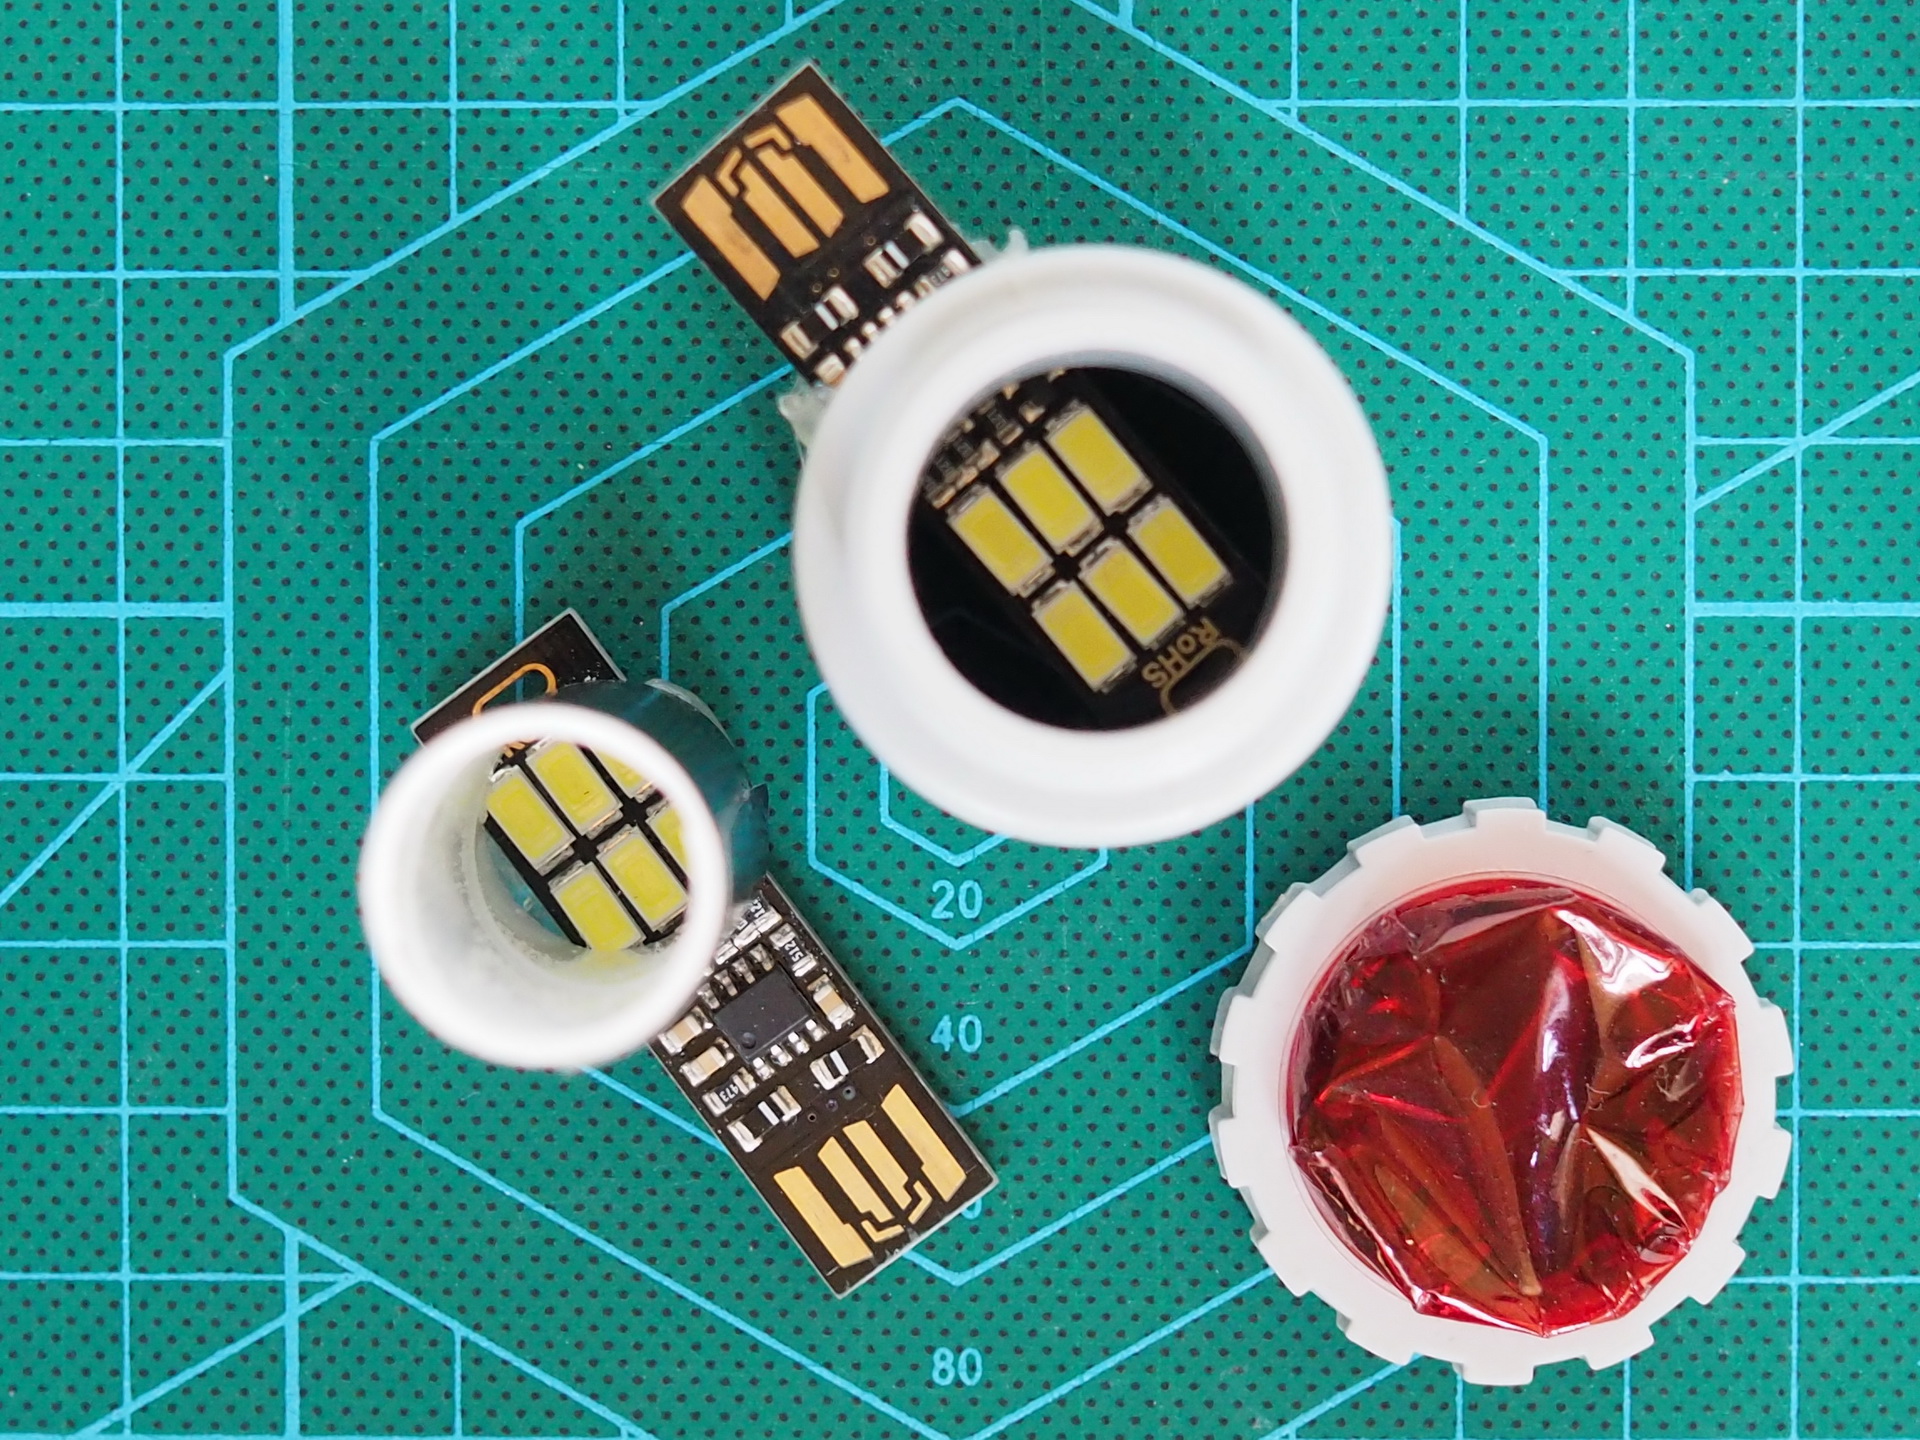
This USB LED Card is a cheap and versatile self-contained lighting unit, powered any USB power supply,and controlled by the capacitance of a finger pressed against the back of the card. The first touch will brighten the light to maximum in seemingly analog fashion (and you can stop part way). The second touch will dim the light to minimum. A quick tap at minimum luminance will turn the card off; however, I tend to remove the cards from the power source to make sure.
The USB LED Card
The USB LED Card has 1W of power from 6 dimmable LEDs. You will find them online under such searches as USB Card LED, Mini USB dimmable, or 6 LED card. Beware: there are other options out there, including 2, 3, and 4 LED models. Some of the limitations with these are size, brightness, and the fact they cannot be dimmed. The last is not a showstopper, but dimming allows a whole lot of flexibility in your shooting. Be aware that you have a choice of cool white (around 6000K) or warm white (around 3200K). Either is fine, provided you use the same colour balance in all lights in a particular image. You also have options in camera/phone/software to change white balance of the output. However I find cool white is the better option. If you pay more than AU$4 (US$3, €3, £2) for each of them, then you are paying too much. They are cheaper direct from China, but I have found shipping to Australia is patchy and too many parcels just don’t make it to my address. I try to buy locally to avoid this problem (and the shipping is only a few days wait).
The main limitation of the USB LED Cards is that they can get quite hot and may cause damage to plastic modifiers, and loosen glueing if left on for more than a few minutes at a time. It is even possible to feel burning discomfort from them when touched. The other limitation is that they are low power; which means that, even at maximum power, shutter speeds will be erring to low, and a tripod or high ISO may be required. Many of my images are shot around 1/20s at 400 ISO. I tend to use mini tripods and a self timer setting to avoid motion blur. Otherwise, I have found them excellent little bases to put my crafting skills on to (also known as MacGyvering).
The Lighting Rig
In part 1 you saw four battens across the top of the lighting frame. The two outside battens are used to strengthen the frame, but all four were designed to take lighting rigs. I have cut the battens to be 48mm wide to accommodate a rig six Lego studs wide (again with the Lego). The lighting rigs are made mainly from Lego Technic parts and are used to hold a lighting assembly consisting of the USB LED Card, modifiers (barn doors, softbox, etc) and a USB cable.
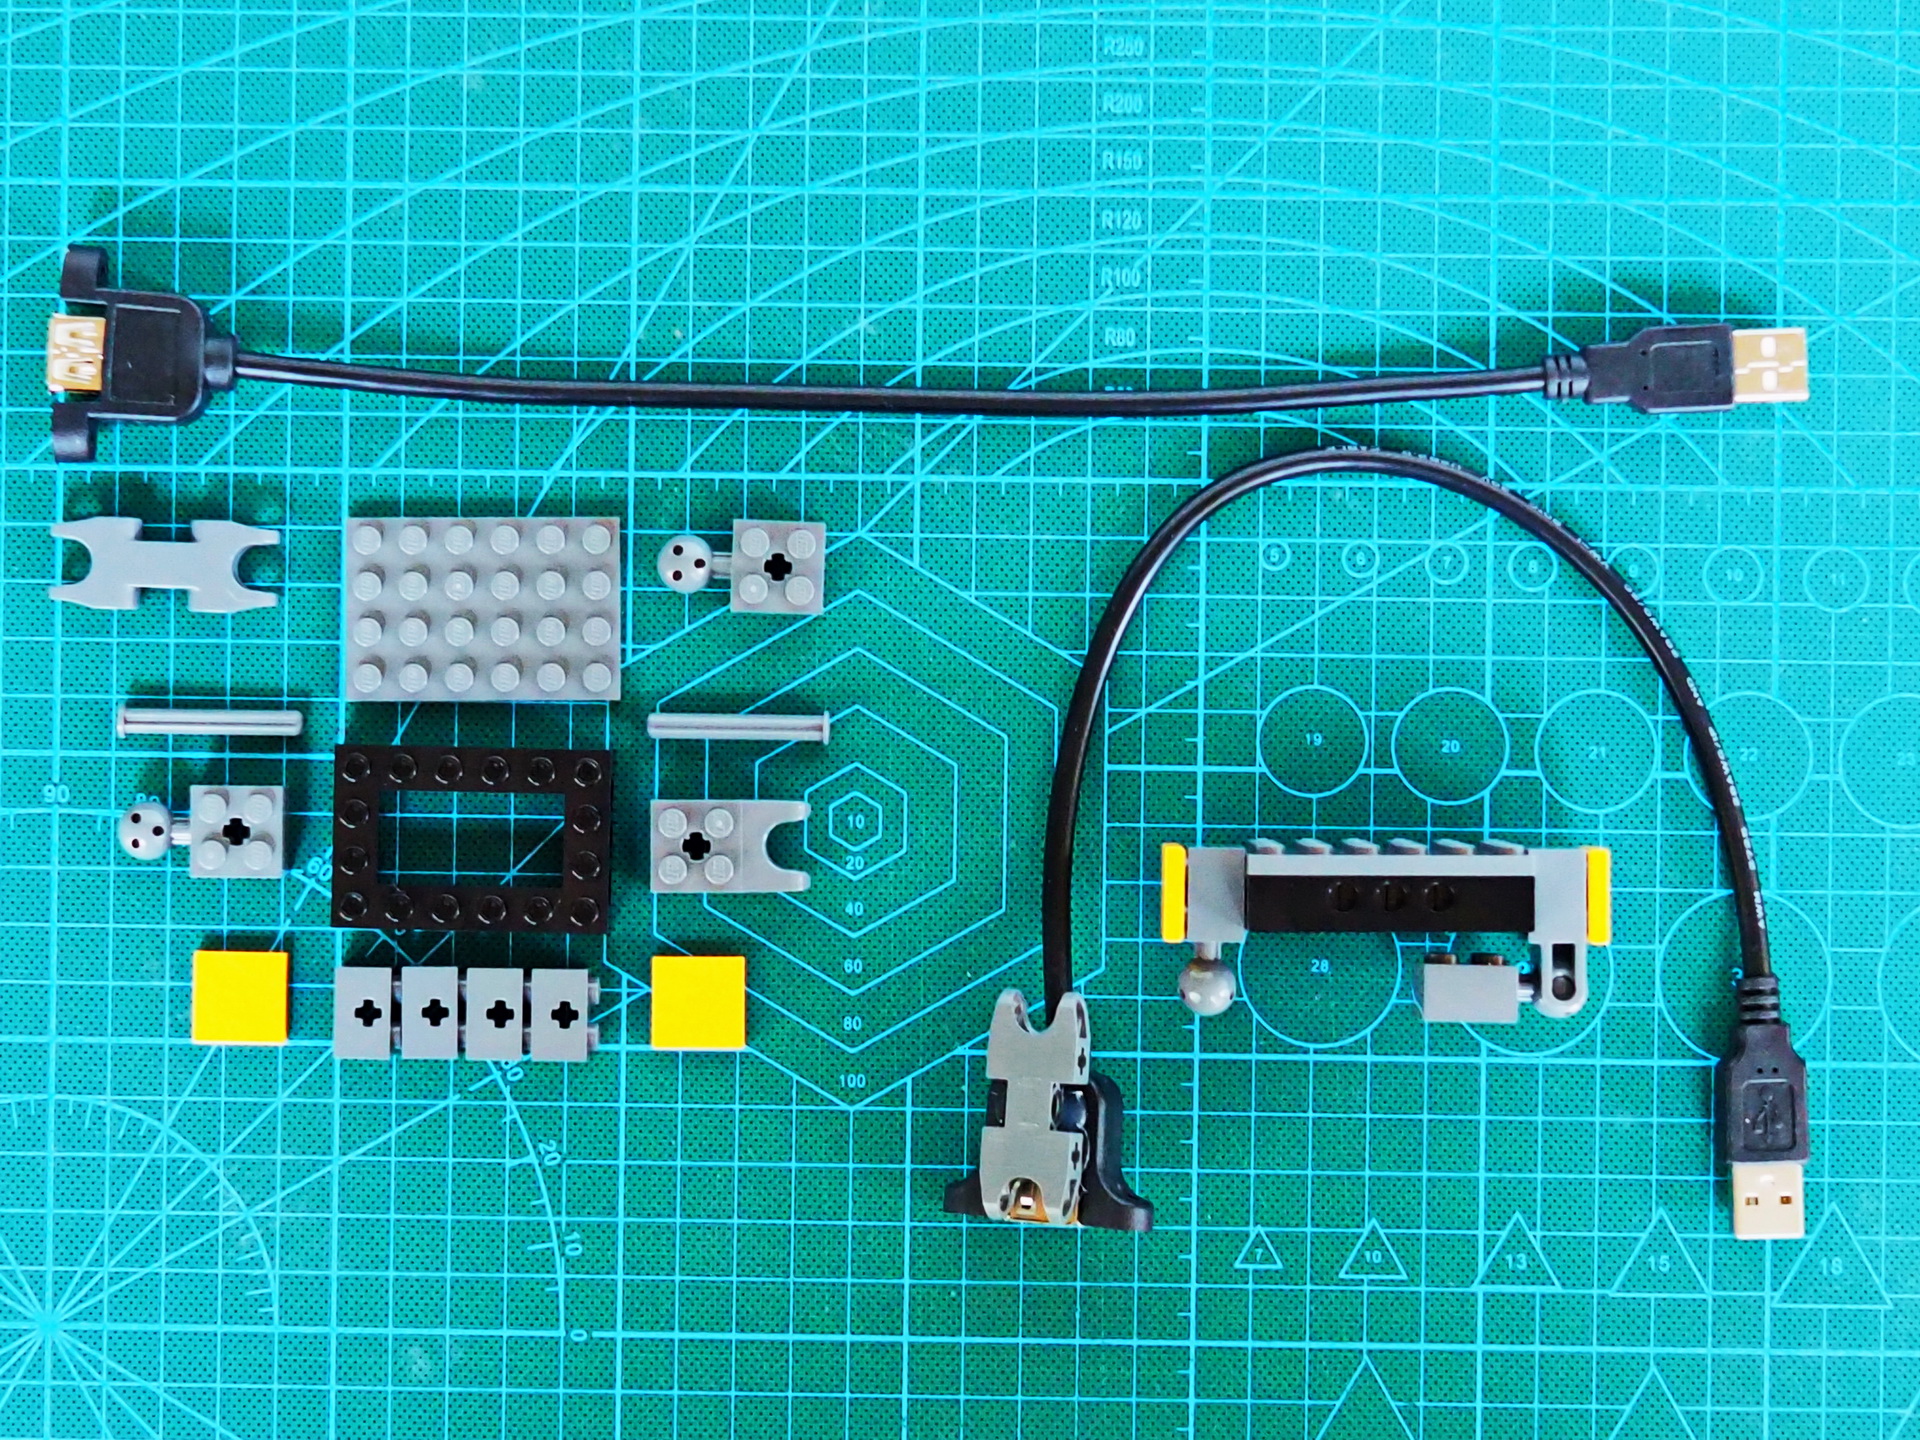
(L) Lighting Rig parts; (R) Lighting Rig assembled
The suggested parts list for each rig consists of (Bricklink item numbers in parentheses):
- one Plate 4 x 6 (3032);
- one Technic, Brick 4 x 6 Open Center (40344);
- four Technic, Brick 1 x 2 with Axle Hole (32064);
- two Technic, Axle 4 (3705) [axle with stop shown];
- two Technic, Brick Modified 2 x 2 with Ball and Axle Hole with 6 Holes in Ball (57909b);
- one Technic, Brick Modified 2 x 2 with Ball Receptacle Wide and Axle Hole (92013);
- two Tile 2 x 2 with Groove (3068b).
I have also used the following to extend the lights on the rigs:
- one Technic, Brick Modified 2 x 2 with Balls (retired 57908);
- one Technic, Axle and Pin Connector 2 x 7 with Two Ball Joint Sockets (retired 50898).
NB: any Bricklinks items marked ‘retired’ will need to be sourced in a used condition. If you would rather use new parts, a little research will find other Technic parts that will give you similar flexibility.
I would suggest two or three lighting rigs, but space-wise you could probably extend the number to eight, with two on each batten. I have designed the rigs to take one light, but you can mount two if you replace:
Technic, Brick Modified 2 x 2 with Ball Receptacle Wide and Axle Hole with Brick Modified 2 x 2 with Ball and Axle Hole with 6 Holes in Ball. Even though I have been inspired by stage lighting, which is renowned for the number of lights they use, I feel that less is more in the case of lighting for toys. Even with only two lights and a few subjects, with accessories, things can get a little awkward and you need to be careful that you don’t bump anything.
The Lights
This is where some people may like to jump to The Conclusion. You can use the reading time to order some ready made USB powered lamps, as here I will be sharing with you some thoughts on building modifiers to suit the USB LED Cards.
Overall I found making modifiers for the USB LED Cards both frustrating and satisfying. Frustrating because they are finicky to work with, and satisfying when you get to use them. The two studio lights that I couldn’t replicate were the umbrella, and the snoot. In the end I didn’t worry too much as the umbrella sits somewhere between the beauty light and softbox in effect, and the snoot has been covered closely with the small spotlight. Below I will outline five lights with modifiers that I have built, which will require various degrees of handyperson skills. However, if you only use the two simplest to build (small spotlight and the softbox) you will still get great flexibility from the Lighting Stage. If you are not too sure what you want to build, then why not just buy two or three of the USB LED Cards and get used to them before you decide what modifiers you will need for your photography.
Small and Large Spotlights (and red cellophane gel)
Small Spotlight
A spotlight is great for strong light in a small area. It can be a little harsh, so it is effective for dramatic looks of sharp accuracy and dark shadows. The build is simply the white shaft of a chapstick holder stuck on the USB LED Card with cloth tape. Of course, any small cylinder that will surround the 10x13mm (3/8×1/2″) 6 LED array will work. Make sure it is white or silver for reflection (but make sure no metal touches the card). This is where the small spotlight deviates from a snoot, as some of the light will ‘spill’ out of the opening, at various angles, as the light bounces off the lightly coloured walls. Use a black cylinder if you want the snoot effect, but you will lose luminance as some of the light is absorbed by the black. Stretch a small piece of black stocking over the end for a quasi-grid look, or use cellophane for gels. Attach with a small rubber band.
Large Spotlight
A large spotlight will cover a larger area than the small spotlight and the light will be slightly less harsh (but negligibly). The main benefit of this particular build is that thin diffusers or cellophane can be easily and sturdily attached via the screw ring on the front. It is formed from a 25mm(1”) electrical connector designed to take pipe at one end and has a screw thread and ring at the other. If you decide to make one of these you will need to cut/rout/drill a slot to fit the USB LED Card. A couple of dabs of glue from a hot glue gun will hold the card in place.
(L) Softbox; (R) Beauty Dish
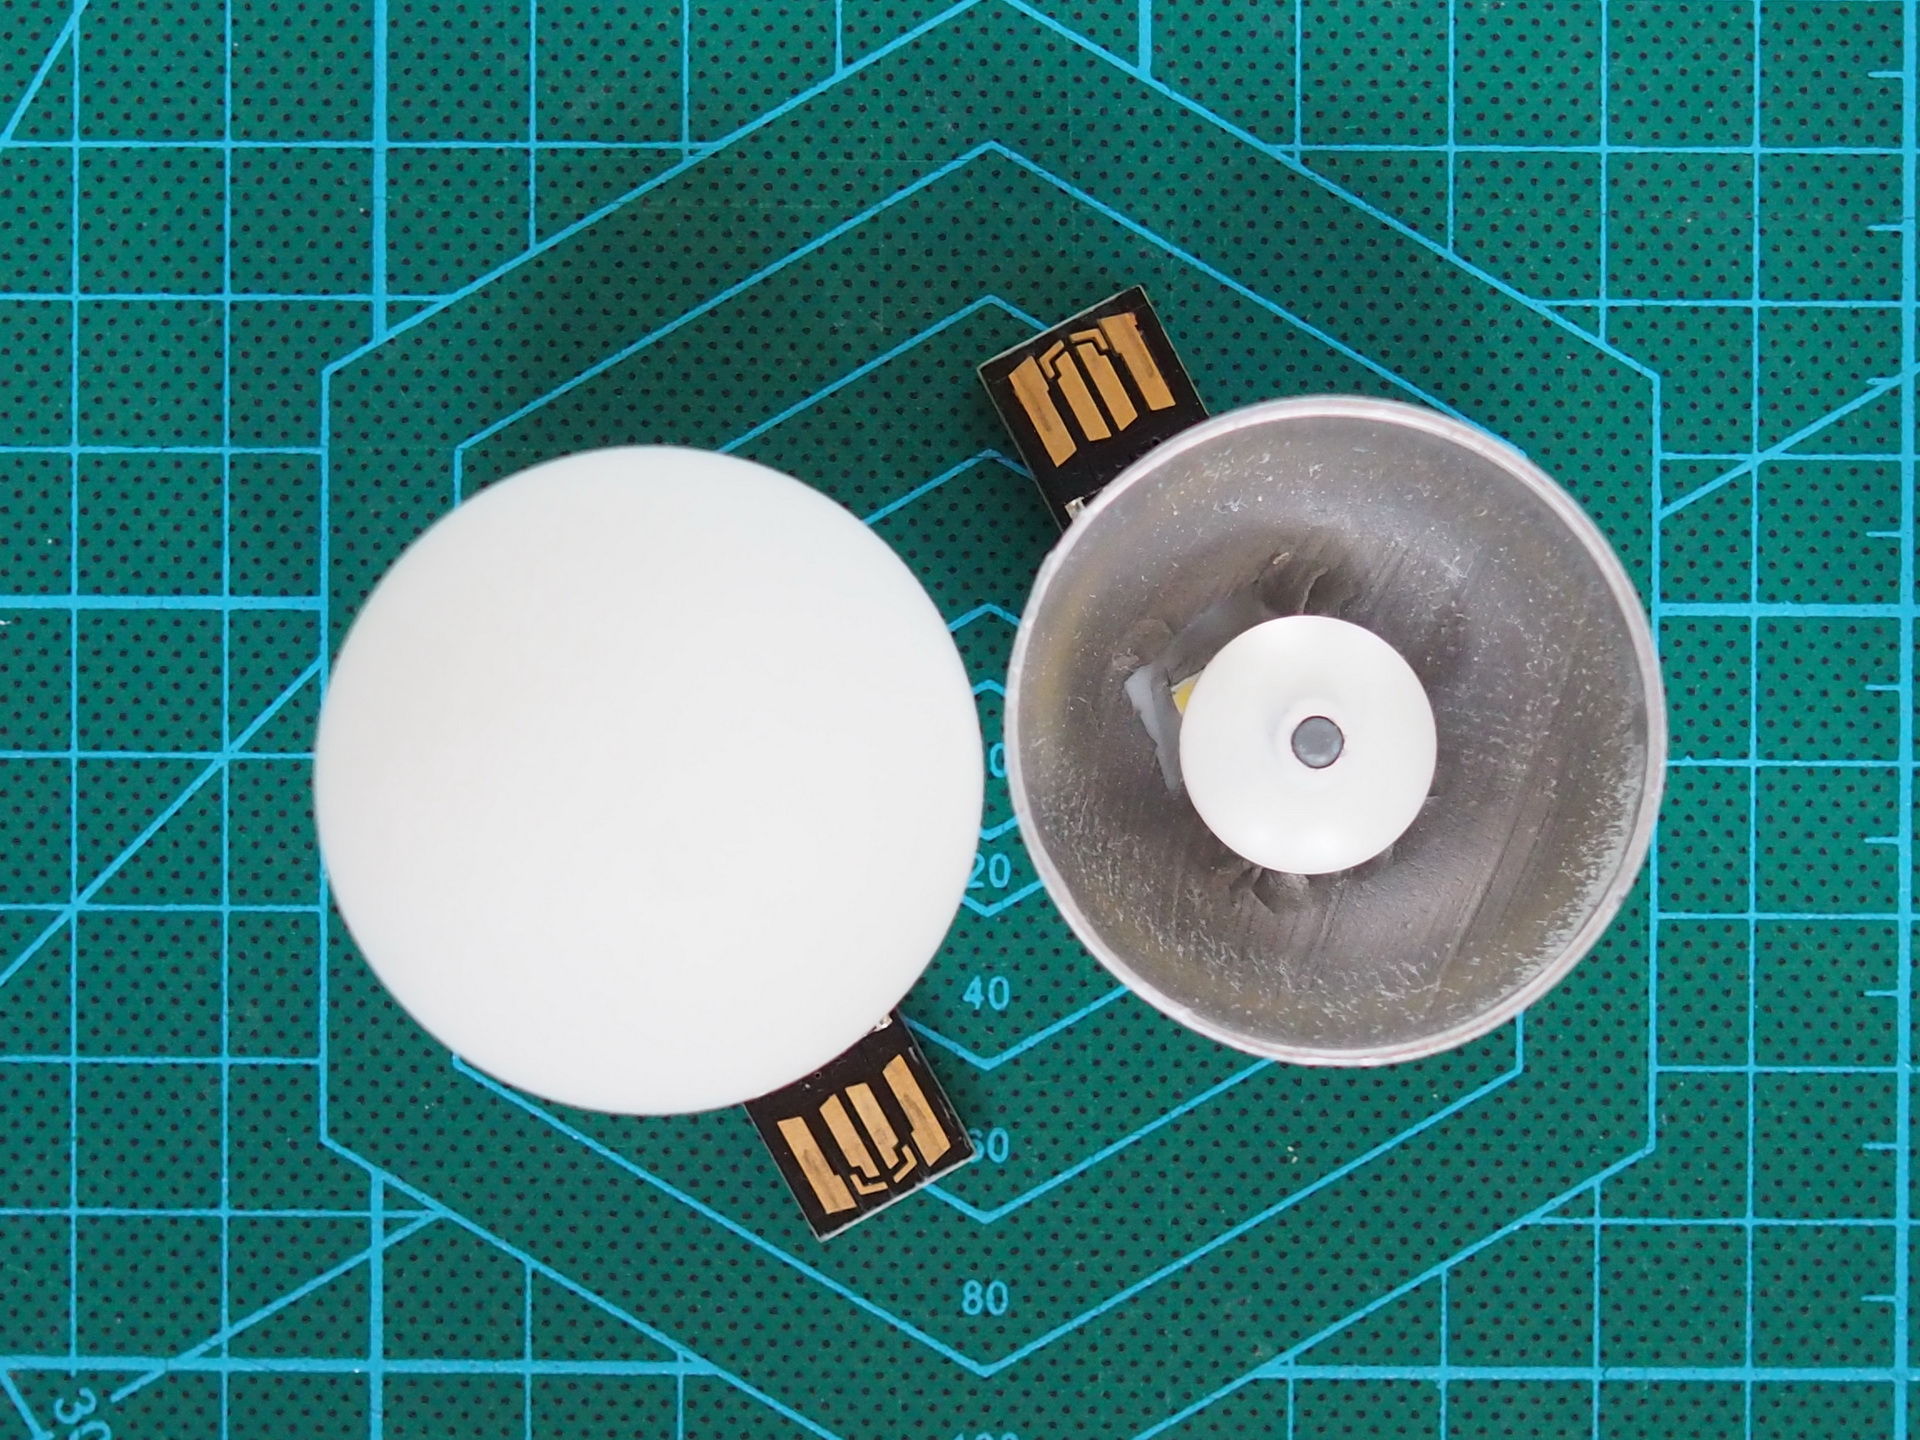
Softbox
The softbox traditionally has a flat diffuser in front of the light source. It produces soft, even light over a large area and produces soft shadows with detail. This build would be more accurately called ‘a large white spherical diffuser which throws light everywhere’ (now you can see why I call it a softbox). You could stop some of the light falling behind the light by splitting the ping pong ball in half then painting it the same as the beauty dish, and reattaching the second half. I have found the extra light no real burden, so have left it as it is. The benefit of my laziness is that it works quite well as a background light, and at the same time a handy backlight for larger toys (see part 3). If you go my easy way then all you need to do is cut a 13mm (½”) square out of the back of the ping pong ball (away from the seam) and place the LED array facing into the sphere. Finish by squeezing a couple of lines of glue between the sides of the USB LED Card and the ping pong ball to keep it there.
Beauty Dish
The beauty dish is often used in portraiture for strong, but not harsh light, and gives nice highlights in reflective surfaces, as well as subtle shadows. Its use is possibly limited in toy photography and I had do use Mod Podge in the eyes of my subject to show the reflections (see part 3). It gives a nice effect but given the amount of work to build it I think I could have coped with just a softbox. For the build I cut a table tennis / ping pong ball in half (along the seam) and sprayed primer, then silver paint inside one half. I super-glued a Bar 1L with Clip Mechanical Claw, Cut Edges and Hole on Side (48729b) with the tips of the claw straddling the two middle LEDs. and then slipped a Dish 2 x 2 Inverted (Radar) (4740) over the shaft of the claw. You can use a plain white one, or you can spray the inside with primer, then silver paint as I did. Then I cut a 13mm (½”) square out of the back of the half ping pong ball and placed the LED array facing into the hemisphere. I squeezed a couple of lines of glue between the sides of the USB LED Card and the ping pong ball to keep it there. When lit, the light from the LEDs will bounce off the 2 x2 dish and then off the inside of the ping pong ball.
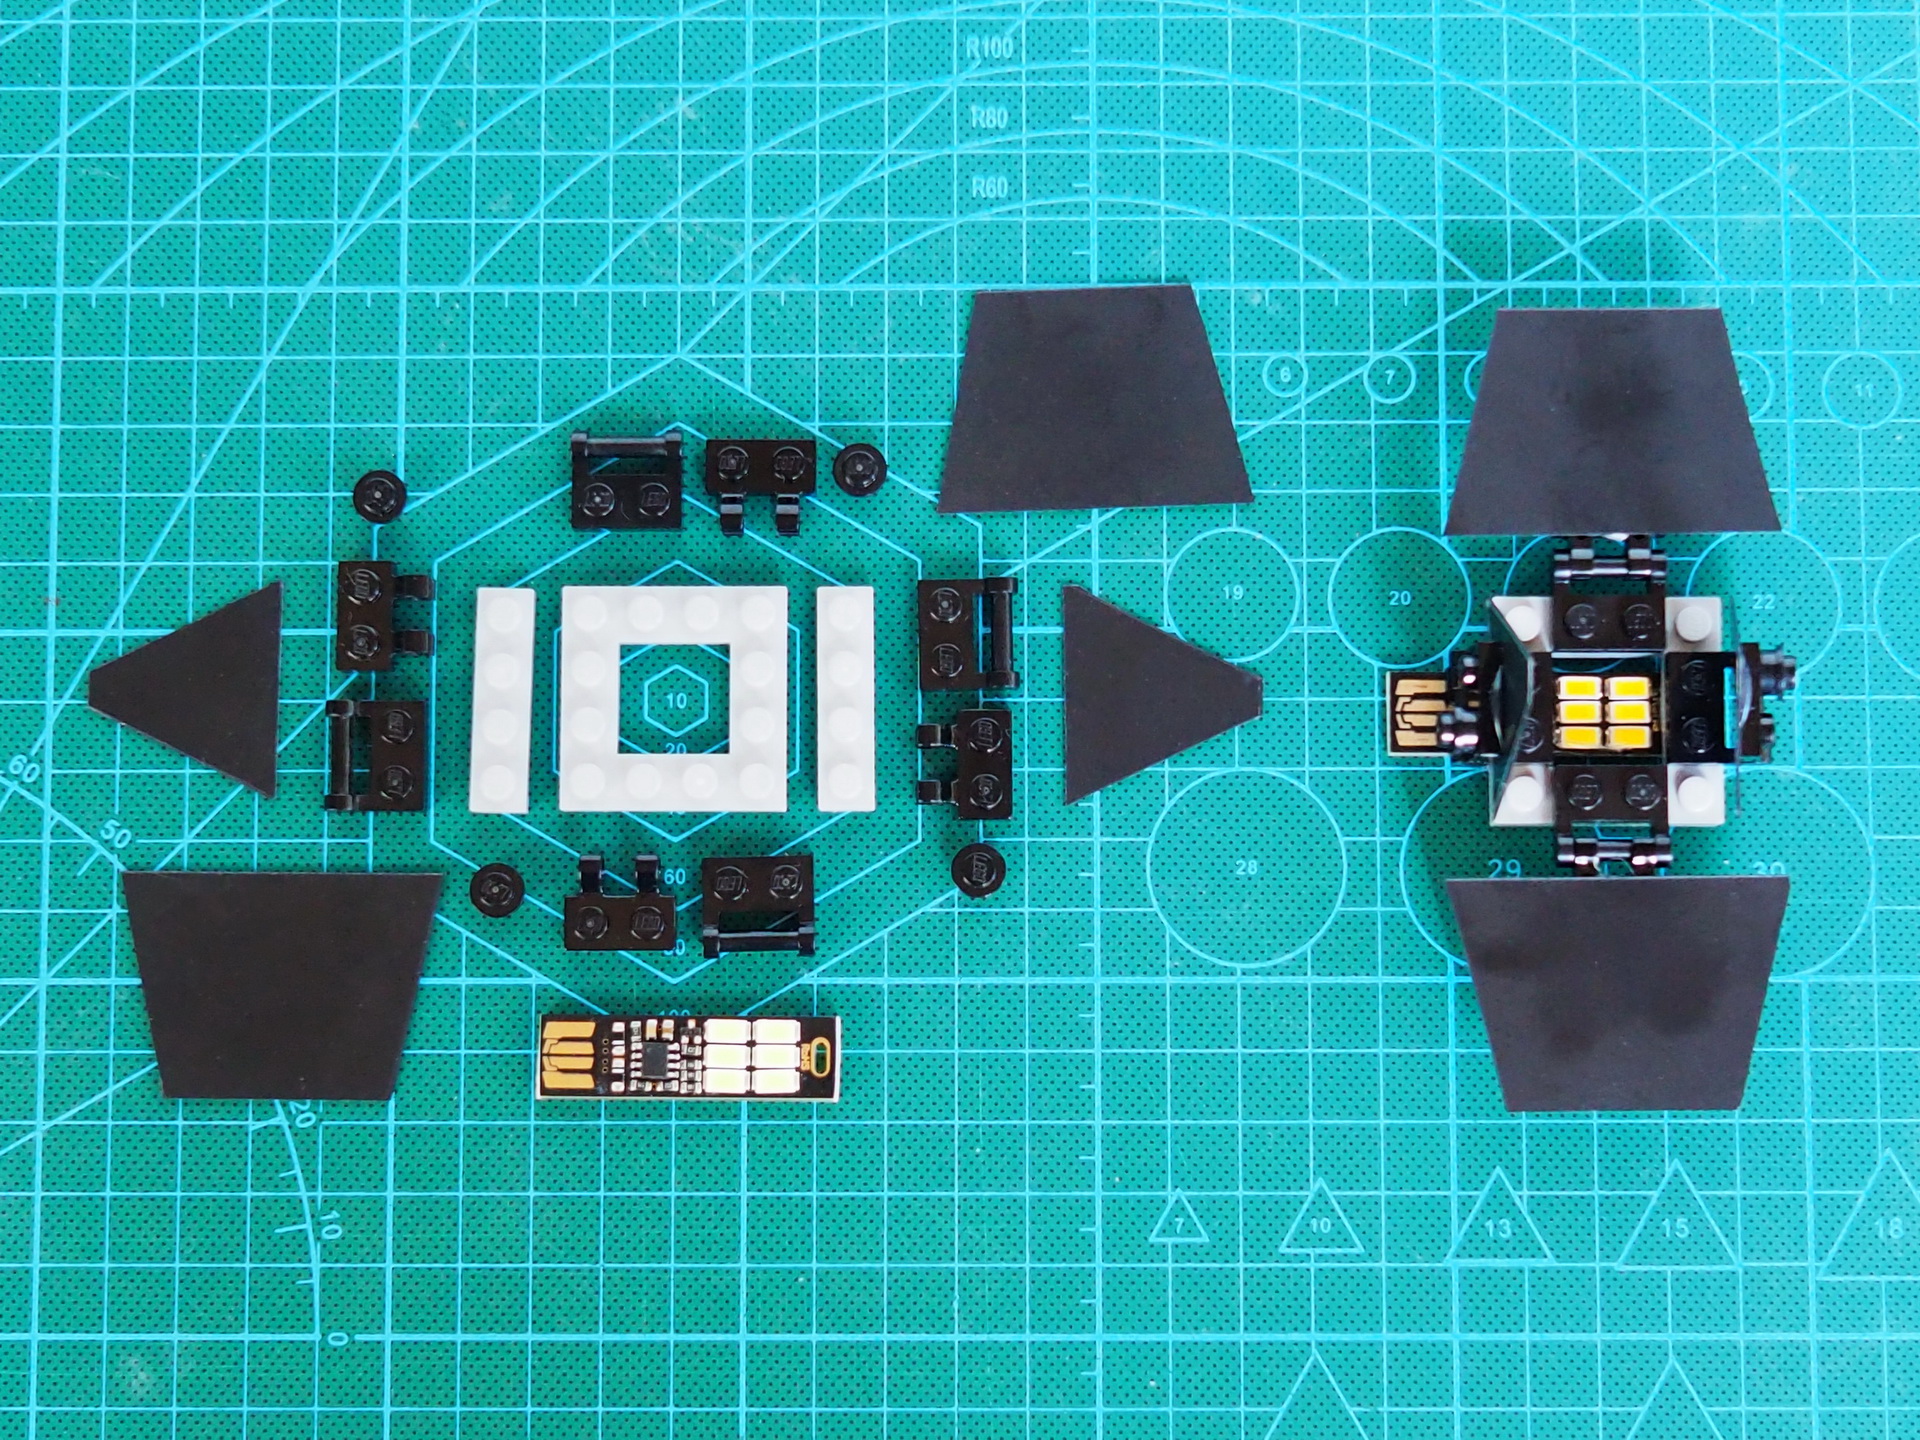
(L) Barn Doors parts; (R) Barn Doors assembled
Barn Doors
These are my favourite to shoot with (and to build) as they allow you the maximum control over your light. They can be opened wide for a huge spread of light, or closed up to a long, rectangular slot of light. Diffusers and gels can also be placed in front of the light to make them even more versatile. The build is more complex than the other four lights, but it is straightforward. Most of the build is with Lego, but the four doors will need to be cut from sheet plastic. You could try thick (200-300gsm) card, but I feel the plastic is more robust. The recommended parts are:
- one Plate, Modified 4 x 4 with 2 x 2 Cutout (64799);
- two Plate 1 x 4 (3710) [optional, but they block light at the rear of the 4 x 4 plate];
- four Plate, Modified 1 x 2 with Clips Horizontal (thick open O clips) (60470b);
- four Plate, Modified 1 x 2 with Handle on Side – Closed Ends (48336);
- four Plate, Round 1 x 1 Straight Side (4073).
Build as shown in the photo above. Glue the USB LED Card into the centre of the 2 x 2 cutout of the 4 x 4 plate, facing the same way as the studs. The card has a small component that will cause the card to sit unevenly on the back of the 4 x 4 plate. I built up a small amount of glue first, then stuck the non-component end of the card on to that. That allowed the card to sit flat and even. Cut the card to a 31mm (5/4 ”) strip and cut two doors, approximately six studs long one side, and approximately four studs the other. Cut the other two doors approximately four studs wide one side and form into a triangle. Snip off approximately 3mm (⅛”) of the point parallel to the base. This will allow a clear rectangle of light to form when the barn doors are closed. Glue the doors centrally on each Plate, Modified 1 x 2 with Clips Horizontal (thick open O clips) with the long edges aligned with the ‘clip’ side of the plate. The two different modified 1 x 2 plates, when connected, have a reasonable amount of clutch power; and if you move the barn doors by the plastic sheet you can damage them (or pop that assembly off the 4 x 4 plate). Where possible use the round 1 x 1 plates as handles. I find a fingernail under the lip of the 1 x 1 works quite well.
The Power
As I stated above, I have used 2200mAh power banks to power each individual light. I have chosen these for three reasons:
- they are cheap (about AU$5, US$4 each);
- they are small and light, so they sit nicely on the battens with the aid of a rubber band to hold them;
- they are quick(ish) to charge and last a reasonable amount of time between charges.
There are many alternatives out there, including larger power banks with two USB-A ports, phone chargers, and AC powered USB charging hubs.
In addition you will need, per rig:
- one 30cm (12”) USB-A male to female cable;
- one Technic, Axle and Pin Connector 2 x 5 with Two Ball Joint Sockets, Closed Sides (retired 61053) [to be glued to the plastic sheath on the female end of the cable].
The Conclusion
The USB LED Card has some limitations, but given its price, its size and weight, and its versatility as a base for modifiers, I think it is a worthwhile investment. For about AU$25 (US$20) you can set up three lighting rigs and three different lights [add another AU$15 for power banks]. The five different lights are only a sample of what you can use, and you may think of better designs for them. Please feel free to leave any ideas, designs, or experiences you may have had with USB powered lighting below.


Leave A Comment