
This series is about sharing the lessons and insights I’ve gained throughout my journey as an artist. So far I’ve covered my formal learning in The Arcanum, and I’ve covered the importance of story in our images. Today I want to step back and discuss one of the major insights I’ve had that has fundamentally changed how I approach how I learn more about toy photography.
I started shooting toys before I really started studying the art of photography. When I did start studying I left toys behind, and concentrated on landscapes. While I did get some formal training in The Arcanum, I also spent a lot of time reading books and watching tutorials. Occasionally I still went back to shooting toys, but I never found good tutorials on how best to shoot toys. So I was left to figure all that out on my own.
That feeling of frustration lasted until quite recently, until I stumbled across a fundamental truth.
This is best explained with the following story.
Story Time
It happened at a photography conference called PhotoshopWorld, specifically PhotoshopWorld 2017, held in Orlando Florida. This was my first photography conference and I was unsure of what to expect. As it turned out, all of it was wonderful, and I learned a lot. I took courses on how to pose models, on how to run a photography business, how to do some special effects in Photoshop, and in camera. I took in a lot of sessions on inspiration (I mean, who can’t use some more inspiration?) but none of it applied to my toy photography. It did apply to other areas of photography I am interested in, but I wasn’t getting much to advance my toy photography.
Then late in the last day I had a conundrum. None of the sessions currently on offer piqued my interest. So after some consideration, I picked the session given by Tim Wallace. Tim is a commercial photographer based in the UK, and makes his living shooting cars and planes. Pretty much the exact opposite of everything I am interested in: It’s not people or landscapes, and it is harder to get farther from the micro world of toys by shooting large commercial aircraft. But, he is British, and I am sucker for the british accent and sense of humour, so I threw caution to the wind, said “what the heck!” and joined his session.
The session was pretty much what I expected. Tim walked us thru the steps of getting the best out of shooting details on a car (a Tesla), and how to light it, and how shoot it. He had that dry british humour too, so I was enjoying myself. Then he said the following: “Lighting cars can be tricky because they are basically large curved shiny mirrors.”
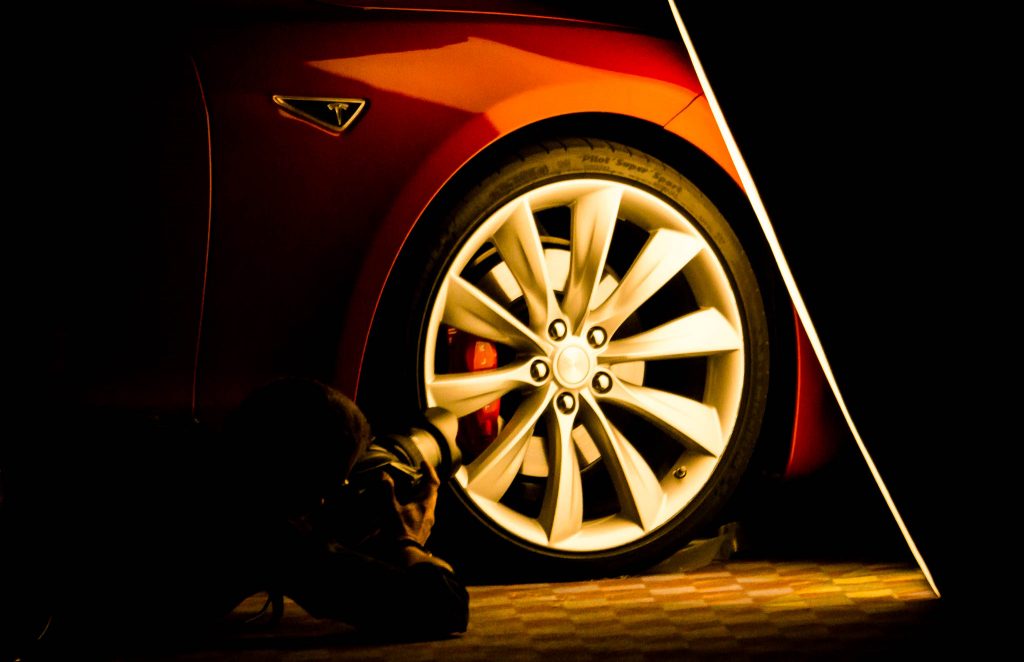
Tim Wallace giving a lesson on close up car photography at PhotoshopWorld 2017
That line made my spidey-sense tingle, and my interest was suddenly piqued… I didn’t know why yet. Then he suggested the following exercise. “Not everyone has an interesting car to practice on”, Tim said, “But you can normally get your hands on one of these.” He pulled out a shiny watch. “Watches are basically small shiny curved mirrors.”
Something in my brain took notice of that. I felt I was about to learn something profound…
While he went on to demonstrate how one could use flashlights, and white cards, to simulate studio lights, and can practice how to light shiny objects at home, my brain went somewhere else.
Finally my brain put all the pieces together: Lego minifigs are basically small shiny curved objects.
All Lessons Apply
Then the epiphany clicked in my brain. Everything I absorbed in this past hour class applies directly to toy photography! The only difference is scale. As I left the session, I was in a daze and lost deep in thought. I considered all the information I had learned over the past few days, and I realized that fundamental truth that had escaped me. All of the skills I have learned over the past several years applied to toy photography.
When I thought back on everything I knew about photography in general I realized that each area contained something useful that can be used in the micro world of toys.
It can be easy to get frustrated about the lack of tutorials and other study material specific to Toy Photography. However when I realized that I can draw lessons directly from other areas of photography I quickly understood that I have a massive amount of study material to draw from, that spans back 150 years of photography, and if you include the classic painters, 500+ years of material. Once learned, the lessons can be scaled down to 1:48 scale.

Even Bob Ross can provide toy photographers with useful lessons on how to use light.
This is a Gift
This may seem obvious now, but at the time it was revolutionary to me. If you think about it, a LEGO minifigure, is just a small, albeit oddly shaped, person. Often I place these minifigures in scenes that resemble portraits, or action scenes, or street photography. All of which are standard types of photography. This means, for example, that if I want to learn how to take a good portrait of a minifig, I don’t have to limit myself to tutorials on shooting toys. I can learn how to take a good portrait of full sized humans, then use those principles and scale it down to minifig size.
It works amazingly well.
So now I actively seek out areas of photography I don’t know about, and study those. My work with small plastic bits has been greatly improved by learning how to take good portraits, interesting street photography, and lessons in advanced photoshop compositing.
Now there is no limit to the things I can learn about with photography. I can be fully confident that whatever I learn will directly apply to my love of taking photographs of toys.
That thought gives me tingles.
Learning More Lessons:
Your assignment, all voluntary of course, for this post is to learn something about a different aspect of photography that you haven’t explored before, and ponder how it can be applied to toy photography. It doesn’t matter which aspect of photography or which tutorial you use. Phlearn, and KelbyOne free trial are two sources to look at, but YouTube is also chock full of excellent tutorials). Just pick something, or two somethings, and learn from them.
Some ideas:
- Sports photography, which teaches about catching peak action
- Street photography, which captures light, gesture, and colour
- Portraits to learn how to properly pose models
- Learn how to set up studio lights for casting a flattering light on a model.
Once you learned the lessons, practice them by creating some of your own shots that take advantage of that newfound knowledge.
See you next time!
[dave]
If you’ve made it this far, come continue the discussion over at our G+ community! And while you’re at it, subscribe to our weekly email round up so that you never miss a post!


Nothing smart to add today. I just enjoyed reading this, Dave. So, thanks!
Glad you enjoy it!
Thanks for posting. It was a good read. I also find it frustrating that there is a lack of information for photographers shooting on a small scale. I’m going to try shooting with white cards to bounce the light. Good tip.
Thanks James. Hopefully this post will help alleviate some of those frustrations !
The day I stop learning is the day I stop. I’ve learned some things today reading your post Dave, so I guess I’ll continue! Thanks for an interesting post mate.
Your welcome. Thanks for reading it!
Really interesting post Dave! Thanks for sharing!
Thanks Lizzi 🙂