
On a recent episode of the Toy Photographers podcast, I was a member of a round table discussing lighting preferences in our toy photos. I was asked what my one tip for those starting out with using light. This is the second of two posts that take a deeper dive into my answer.
The basic advice is to forget about gear for now. As a beginner it is vastly more important to understand the mechanics of light than it is to own the best lighting gear. You likely have all the lights you need in the form of a flashlight, so you can save some money up front and use that to learn the mechanics.
Last time, in Part 1, I covered how the angle of your light affects mood. This time we’ll look at how to create harsh or soft light by modifying it through a diffuser.
Light is light
Before I get to the main point, let me toss in one more insight about photography lighting gear. It has a dirty little secret: No one cares what lights you use. When they look at your photograph all they see is the results. No one, not even the engineers who make them, will be able to tell if you used a $50 flash or a $600 flash. Both ultimately produce the same light, and once it leaves the flash, it has all the exact same properties, regardless of what created it. Your camera is going to treat it the same as well.
This gives us plenty of freedom to use whatever lights we have. All that matters is that our lights result in the photographs we want to produce. Everything else is trivial.
Now, I will say there are many reasons to buy higher-end gear. More expensive lights often have features that are super handy if you are doing complex shots—remote trigger groups, remote settings adjustments, different mounting options for light stands, automatic intensity adjustments, more rugged construction, etc. These are just a few examples. However, if you are not doing this day in and day out (and given you are reading a post on beginning with light, that isn’t you—at least not yet). Don’t stress the gear.
Instead, stress about learning how light works with the light sources you have.
Size (and distance) matter
The main principle of light mechanics covered in this post is this: The size of the light, relative to the subject, affects the softness of the light.
Light is often described as being soft or harsh. This really has to do with the transition of the shadows. If light on a subjects goes from light to shadow very quickly, it is called harsh light (the line between the two is sharper). If the transition from light to shadow is more gradual, the light is called soft.
Softer light is considered more beautiful and serene, while harder light is considered more harsh and dramatic. One of the more common ways to modify light is a soft box, which is basically a box that takes in a light source at one end, and has a larger panel of diffusion material on the other. When the light hits the diffusion material, it spreads the light over the entire span of the material. In this way you can take a light that is 6 inches wide (or in the case of using flashlights, 1 inch wide) and turn it into a much wider light source, like 24 inches or, really, as large as you like.
The important consideration here is the size of the light relative to the subject. So the closer the light is to the subject, the softer the light will be. Often you will see portrait photographers take really large soft boxes, like a 7-foot octo box, and put it mere inches away from the model, barely out of frame. This is done intentionally to get the softest light onto the model.
However if you took that same 7-foot light and moved it 20 feet away, the relative size would be smaller and the light on the model would be harsher.
The universal light
The ultimate example of this is the sun. The sun is 865,370 miles across. It is the largest light in the solar system by a crazy large number of orders of magnitude. So it should be a soft light. However it is also 92 million miles away, so it is really a small pinprick of light in the sky. This is why direct sunlight is so harsh.
The important thing to know about all of this is that the distance to the subject matters only at the last point of diffusion. This means if you shine the sun through diffusion material that is placed 6 inches from a model’s face, then the distance to the light is considered to be 6 inches, not millions of miles away. (If you could put your subject 6 inches from the sun, you’d have a very crispy model, but the light on it would be fabulously soft.)
This is also why light gets softer during sunrise and sunsets, the magical golden hours that many photographers rave about (including myself). Not only is the light a nice warm golden colour (hence the name), but the reason why it’s so nice is that the sun is hitting the atmosphere at a very low angle and it is diffusing the light (I think you can see where I am going here), across the sky, turning the entire sky into one large soft box.
Make your own modifier on the cheap
Just to prove the point that you don’t need expensive gear, the following instructions will allow you to make the moral equivalent of a softbox that will turn a small flashlight with a 1-inch size light into a larger 5-inch light. 5 inches for 1/6 scale figures is like having a 60-inch soft box for human models. All you need is a cereal box, some tissue paper, some sort of paper glue, an elastic (rubber band) and a flashlight.
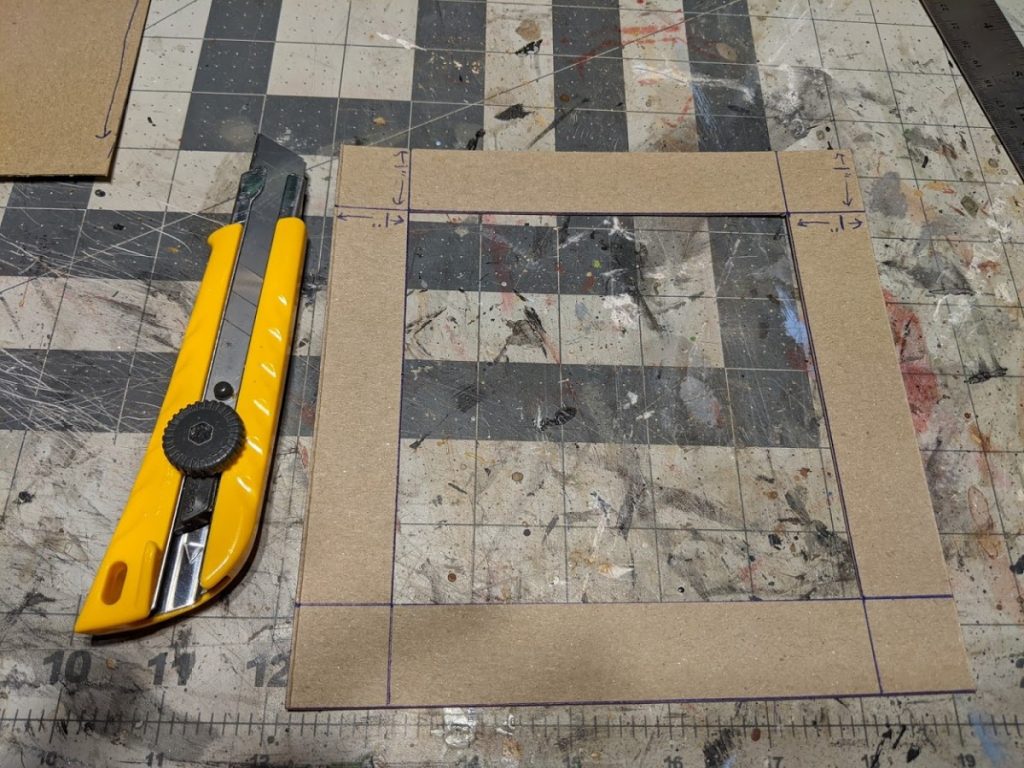
I started by taking a cereal box (Honey Bunches of Oats, if you’re curious) out of my recycling box. I drew out a square frame that is 7 inches on the outside, and 5 inches on the inside, with a 1-inch border, and then cut it out with a utility knife.
Then I cut four 7-inch strips of cardboard that were 1 inch wide. These strips will be the arms to hold the frame to the flashlight.
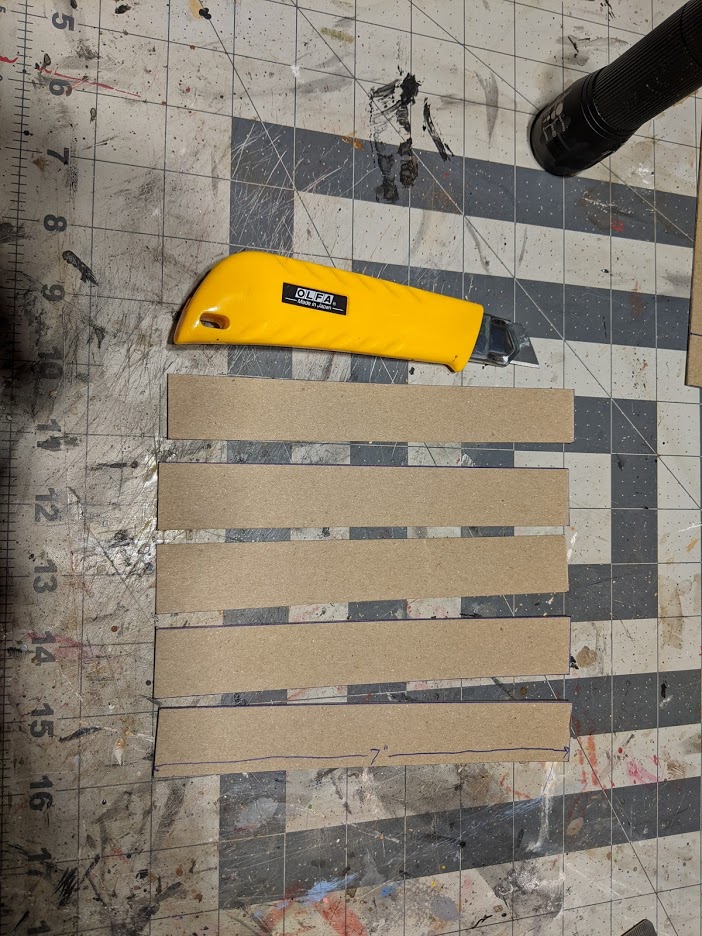
Then I scored (lightly cut, but not all the way through, so it’s easier to bend) 1 inch from each end.

The arms are attached to the middle of each side of the frame with some glue. I used Aleene’s Original Tacky Glue—it’s what I had, but any glue that sticks to paper will do.
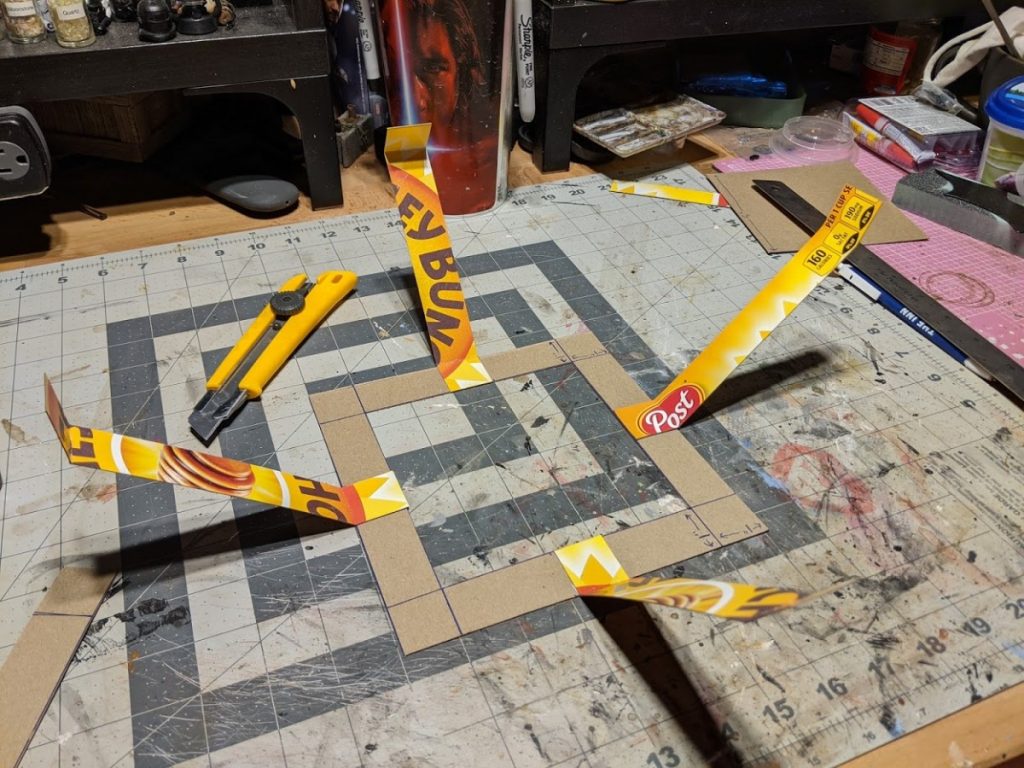
Next I cut out a 7-inch square of tissue paper, and glued it down to the other side of the frame.
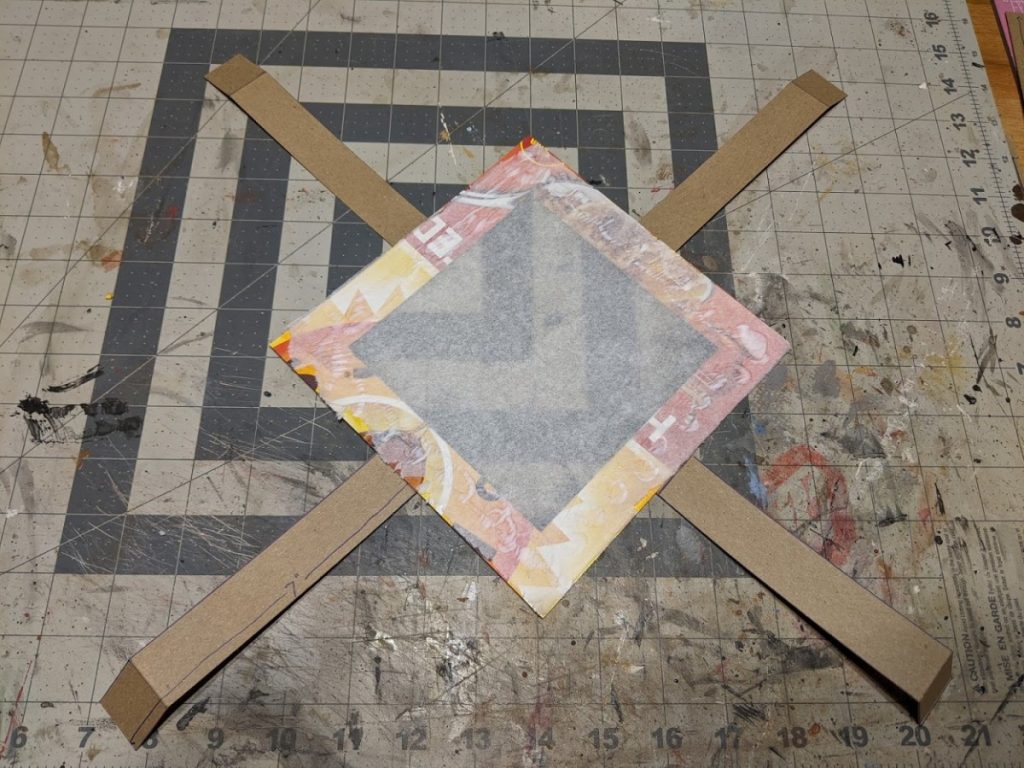
Once the glue had completely dried, I attached it to the head of the flashlight with the rubber band.

Voila! You now have a handy light modifier that didn’t cost anything but 30 minutes of your time.
Depending on the size and power of your flashlights, you may need to change some things. If your beam is too wide and it’s spilling over the edges of the modifier frame, make the modifier bigger. If the beam doesn’t fill up the entire modifier, make the arms longer. You can also use different diffusion material instead of tissue paper. Amazon actually sells the same diffusion material they use in commercial soft boxes. Translucent shower curtains are another common material for DIY soft boxes.
This is DIY, so change things as appropriate. There are no real wrong answers here.
Putting the light to use
Now that we all have a modifier we can use (either the one above or one you already own), we can use it to demonstrate the principle I’ve been telling you about.
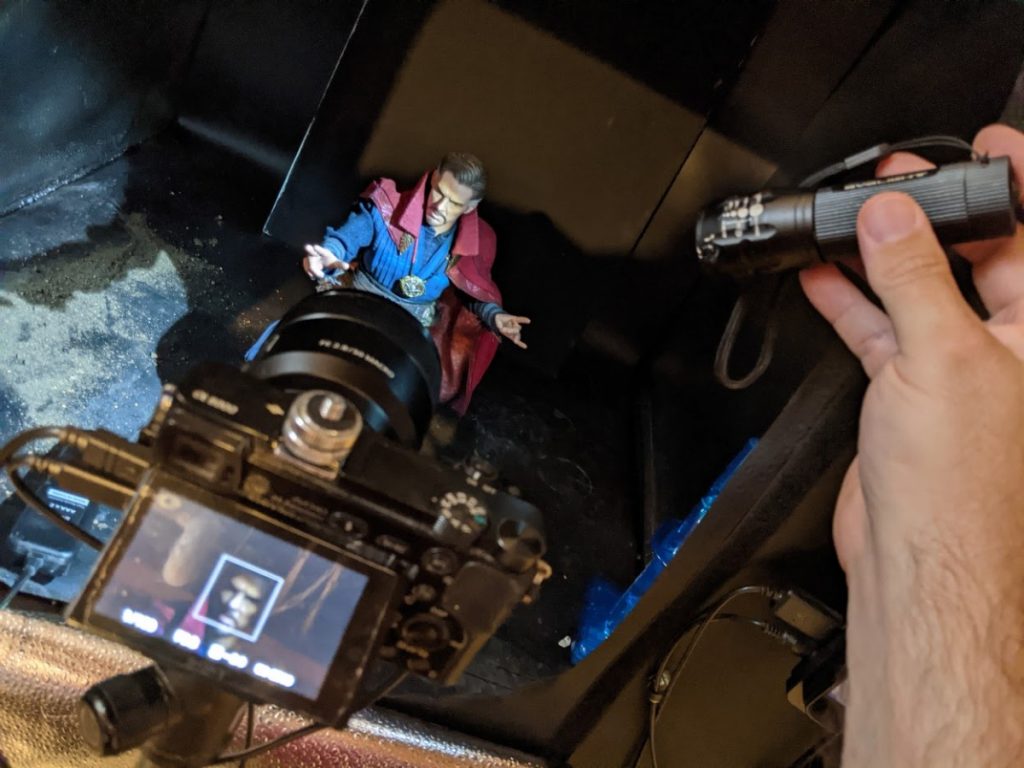
I took my Hot Toys Doctor Strange figure (partly because he has prominent facial features, and partly because he’s so dang dreamy), and put him in my light box. This is to control the light and ensure there is no ambient light that will affect my demonstration.
Then I shone an unmodified flashlight onto Strange. The flashlight I am using has a 1-inch diameter and a focus beam set to the widest setting.
I then switched to using the DIY modifier we made above. It is the same relative distance from Strange and in the same relative angle as the previous setup.
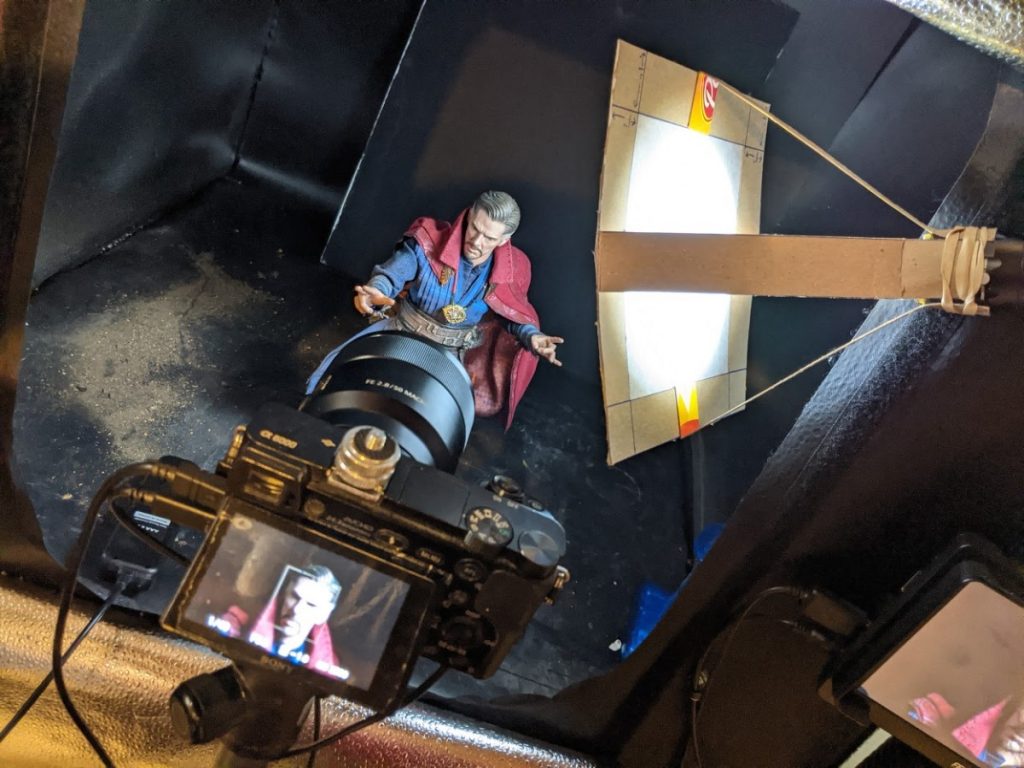
Now we can do a side-by-side comparison of the effects of the different light sources.

As you can see, the unmodified raw light has very deep, harsh shadows. You’ll also notice that you can’t see his right eye at all. The modified light has much softer shadows. The light seems to wrap a bit around his face, and you can even see a hint of his right eye.
The only difference between the two is the size of the light source. The raw was a 1-inch light straight from the flashlight. The left is a 5-inch modified light from the same flashlight.
There is one slight difference. Pushing the light through the tissue, and spreading it out, causes the light intensity to degrade. As a result I had to set my camera to a longer shutter speed to keep the relative exposures the same. This happens any time one modifies light—it is just the nature of the beast.
Excerise
Now we have a handle on the principle that softness of light increases with the size and proximity of the light relative to the subject, it’s your turn to play around with it yourself.
Again, like last time, don’t try to make art with this exercise. This is strictly intended as a learning exercise to gain familiarity. Also like last time, the exercise is the same: Take your modifier and move it all around your subject. But this time also move the light farther away and closer to the subject, all the while seeing how the shadows fall, how they get softer or harsher and how that affects the mood and look of your subject.
By playing around with it, you will get a good idea of how the mechanics of light work, and you can begin using it for the reason you came here in the first place: making awesomely lit toy photos.
Sudden but inevitable conclusion
I hope this information will help give you a better understanding of how artificial lights work in photography. As the saying goes, “knowing is half the battle.” I hope this will arm you with the knowledge and courage to keep going with lights, if that is what you want.
One last thing before I let you go. There is no right answer to whether you should have soft light or harsh light on the subject of your images. It all depends on what you are trying to do. It’s important that the light matches the mood and atmosphere you are trying to create. Beyond that, it is entirely an artistic choice—but one you should now be better equipped to make.
If you have questions, please drop them in the comments below.
[dave]
Want more toy photography goodness? Subscribe to our weekly email round up so that you never miss a post. You can also listen to episodes of the podcast! You can follow my work at @therealstudiodave


Leave A Comment