
Who says dragons are scary? Well, not this brave little girl. Even seasoned knights run at the mere mention of the dragon’s name, but she doesn’t fear a face-to-face encounter with the beast. 🐉
What happens next? I’ll leave that to your imagination. In the rest of this post, I’ll walk you through how I used focus stacking to create this photo.
Nikon recently released its new Nikon Z5II camera, which finally convinced me to switch to a full-frame system. It took me a bit of time to get familiar with all the settings and features this device offers, but it was well worth it.

One feature that really caught my attention—something my previous camera didn’t have—is focus shift shooting. This mode allows the camera to take a series of photos, each with the focus point slightly shifted forward. These images can then be merged using focus stacking to produce a single photo with increased depth of field.


This scene, with two subjects positioned at different depths, was a perfect opportunity to try out in-camera focus shift shooting. Why is this useful? If I had simply narrowed the aperture to get both subjects in focus, the background would have remained sharp as well, making the final image feel cluttered. With this technique, both the knight and the medieval dragon are in sharp focus, while the background remains gently blurred and unobtrusive.
After positioning the subjects and framing the shot, I added an RGB LED light from the side. I set the light to an orange hue to mimic sunlight and to provide a warm contrast against the green tones of the dragon and grass. For the background, I used the LEGO Lion Knights’ Castle set, while a face mister helped create a subtle misty atmosphere.
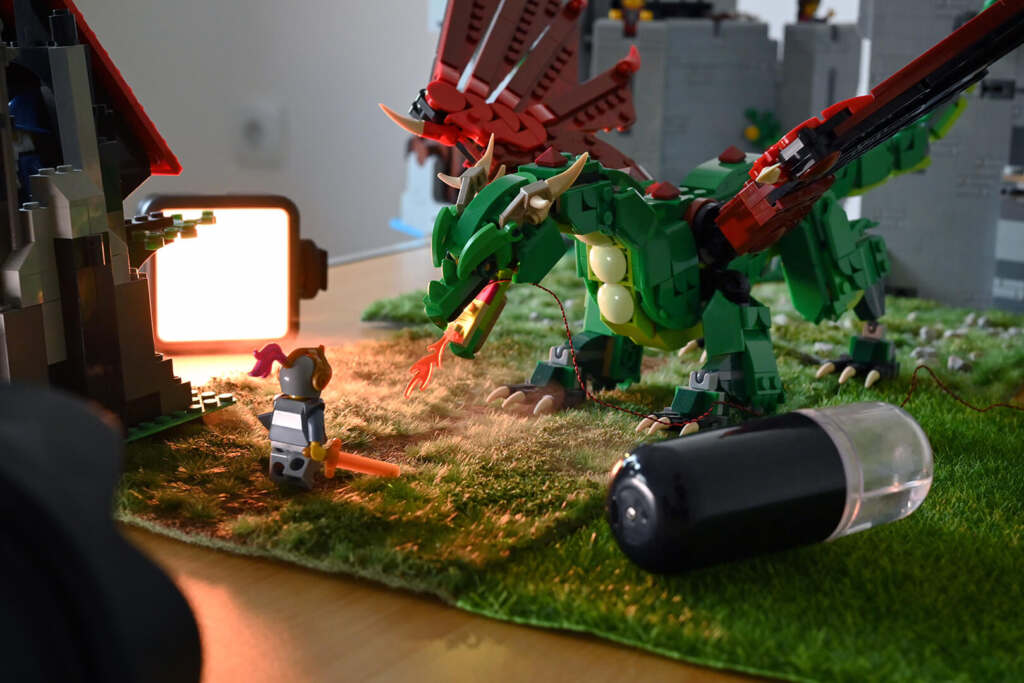
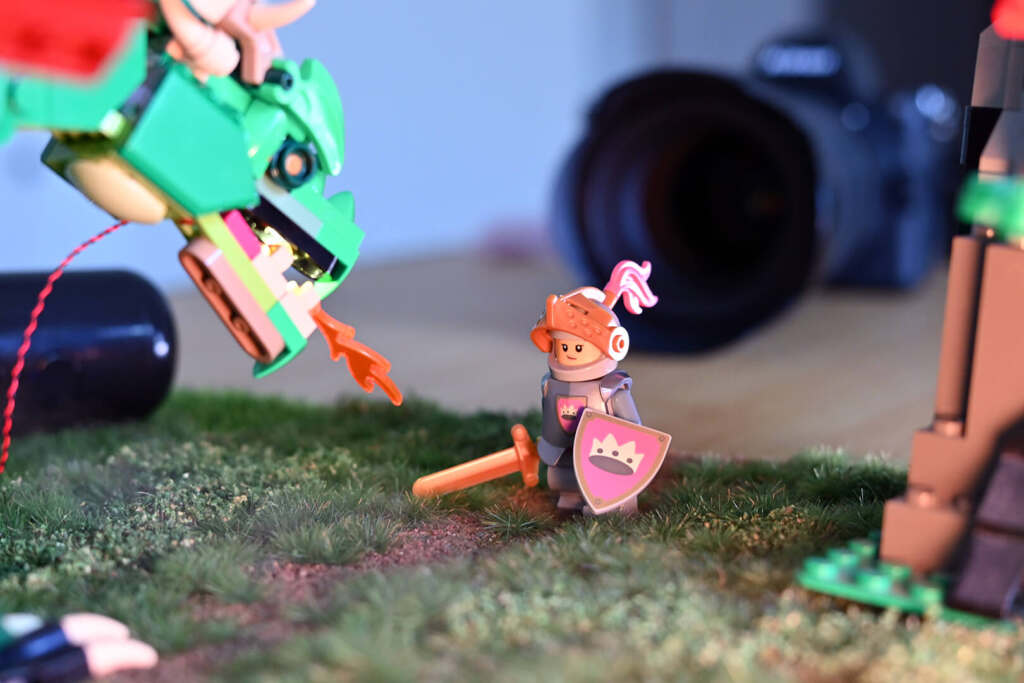
Because I used a pico LED to light up the dragon’s mouth, I needed to shoot two separate series of photos. While this can be done manually—adjusting the focus slightly between each shot—the camera automates the process in mere seconds.
After the shoot, I blended the first 10 shots (where the wire is visible) into a single image, and then did the same with the other 10 (without the pico LED). Finally, I combined the two results to produce one seamless image in which the dragon’s mouth is lit—but without any visible wire.


The process is actually quite straightforward: import all the images into a stack, let Photoshop auto-align them, select all the layers, and blend them into a single frame. I recommend checking out Dave DeBaeremaeker’s blog post, Expanding Depth of Field with Focus Stacking, for a detailed walkthrough of the technique.
I was really happy with the original colors, so I didn’t apply any extra color grading or post-processing beyond the stack blending.
Bonus tip: Don’t be like me—dust your sets before shooting! I spent nearly an hour removing tiny specs of dust from the dragon’s head. 😅
Additional details you might find interesting:
- Camera: Nikon Z5II
- Lens: Tamron 28-75mm f/2.8 Di III VXD G2
- Mode: Manual
- Aperture: f/7.1
- Shutter Speed: 1/3
- ISO: 250
Thank you for reading!


Zoran, thank you for sharing this! I enjoyed the “how to’s” of this and the end result was wonderful!
I’m glad you enjoyed the article. I hope the tips are helpful.
My camera doesn’t have that cool effect but I’ve always enjoyed playing with layers in Photoshop. Good article and I love your photo!
Thank you, Mary! I appreciate it!
I guess you can do focus shift manually, little by little. It would just take some time to get all the shots.