Like many of us I shoot toys all the time. It is not every day one gets to watch a rocket launch in person. It is a very special experience to combine the two at the same time. I was fortunate to be able to have that experience. This post is all about getting a toy photo with a real life rocket launch.
Shooting rockets is very, very difficult. Shooting toys is easier, but it comes with its own set of challenges. In fact, as it will become painfully clear later on, rocket photography is one of the most difficult shots to pull off. In fact it’s so difficult I had decided that just watching the launch would be enough to satisfy. However, being me, I *really* wanted to make some art out of it.
Let’s talk about the experience.
Space exploration is awesome
I have been a space nerd since I can remember. I mean, growing up with both Star Trek and Star Wars was definitely a spark. However being born just 5 years after the first moon landing, and growing up in the time when the Space Shuttle went into space constantly, it was a match made in heaven for a little geeky child.
Space exploration is the ultimate human achievement. As a species we are creators, and we are explorers, and we’re driven constantly to explore new world and new civilizations, and boldly go where no one has gone before. The more we push into the stars, the more we fulfill our destiny as a species.
This is best summarized by a speech by the (fictional) President Bartlett from the show West Wing (who was quoting the non-fictional President Reagan, who was quoting the actual poet John Gillespie Magee Jr.) “What will be the next thing that challenges us, Toby? That makes us go farther and work harder? Do you know that when smallpox was eradicated, it was considered the single greatest humanitarian achievement of this century? Surely we can do it again, as we did in the times when our eyes looked towards the heavens and, with outstretched fingers, we touched the face of God.”
Space is the ultimate frontier. Big fan of seeing what space has to offer. So, naturally seeing a rocket launch is high on my bucket list. However I don’t live near any places that launch rockets, so I hadn’t had a chance until this adventure.
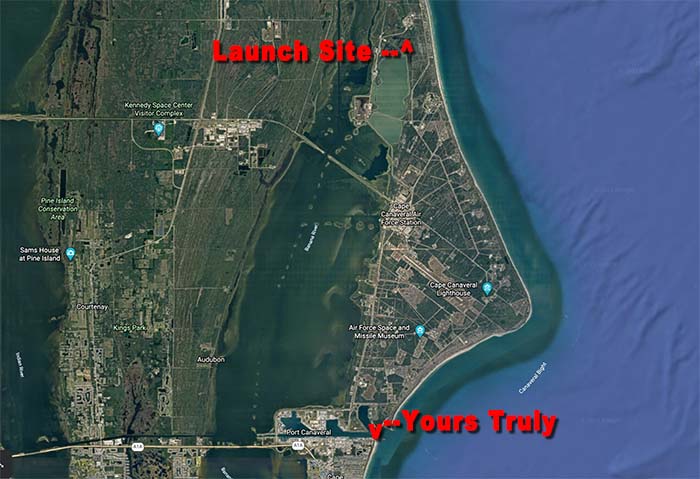
For certain family reasons that are not important here, and thanks to COVID, we found ourselves heading south to Florida for Christmas break, instead of north to my homeland of Canada. Florida is where they launch rockets. A quick check confirmed a launch was scheduled while I would be in the area. I think you see where I am going with this.
I arranged my road trip plans to be in the area by Cape Canaveral during the launch window.
Then I called Erik.
Who the heck is Erik?
Erik Kuna is a buddy of mine who lives in Florida. He has been shooting rockets for years, and is amazingly good at it. I actually collaborated with him to make a shot for my LEGO Saturn 5 review. I highly recommend you check out his work. He also teaches a course on photographing rocket launches which I highly recommend you check out if you want to try this yourself. However the salient detail here is this:
Shooting rockets is *complicated*. It is one of the most complex and error prone photography experiences I can think of. So having an expert by my side was a huge help.
Erik doesn’t shoot toys, but I already know toys. However, Erik does shoot rockets, and he would provide a lot of advice for shooting them. Cause, like I said, shooting rocket launches is complicated. Together our odds of success are vastly improved.
Plus he is fun to hang out with, Win/win.
What makes it so hard?
The thing that makes it complex is all of the unknowns. There are a lot of them, and each of them can screw up a shot.
The biggest unknown is that, unless you get special access from NASA (they do sell tickets, but not for every launch, and even then you can’t get all that close), you can only see a rocket launch from miles away. In fact I was standing 11-ish miles away on a beach for my shot. This means you can’t actually see the launch pad. This makes knowing where to point your camera rather difficult.
The second difficulty is that this launch was happening at night. This has the benefit of allowing a really awesome long exposure streak shot that lasts the entire first stage of a Falcon 9 rocket. However it also means figuring out the correct camera settings for the ~3 minutes it takes to streak across the sky. This means one needs to get ones exposure correct, and testing it takes 3 minutes each time you change a setting.
There are several more things that make this hard, but the one thats really important is framing. Rockets go into space. Space is a long way away. Depending on the trajectory for any given mission, a Falcon 9 rocket’s first stage can be from 50 to 70 miles above the earth, and hundreds of miles down range by the time the first stage shuts down. That is a lot of sky to cover. Even being 11 miles away at launch, and the rocket flying almost straight across the frame, one needs the widest lenses to capture a full streak.
There are several online tools that help one visualize what the streak for each launch will be, and allows one to visualize the shot on a computer screen. However one still needs to manually point the camera properly in the field. With my camera, a 12mm lens on an APS-C sensor, the streak would barely fit in frame. So getting things lined up properly is imperative.
Added to all of this is the fact that a single rocket only launches once, and every launch is a different trajectory and a different time of day. So you don’t get to use the same settings the next time. Even with the increased schedules, the wait between launches can be weeks to months apart. This makes it hard to get into a rhythm and learn from ones mistakes.
Pretty complex, right? And that is just for a simple rocket launch. It’s based on a lot of planning, and a large serving of luck. Factor in the complexities of adding in toy photography, and it’s mind boggling.
Coming up with a shooting strategy
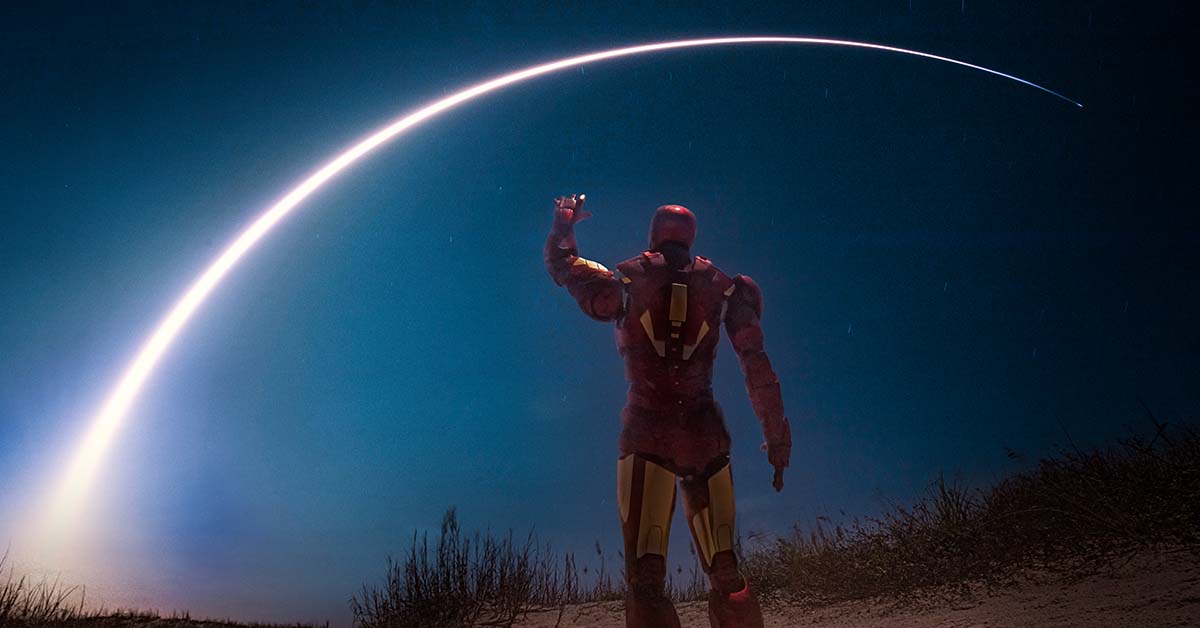
The vision I had for this shot was Iron Man standing on a beach with an arm raised towards the rocket, which was streaking across the sky.
When I was planning this shot out at home, I had two strategies in mind to make my vision happen. Plan A was to shoot everything in one exposure. All in camera, all at once. This is, of course, fraught with peril. If the camera doesn’t get the right exposure for both (or the toy falls over mid launch), the shot would be completely ruined. On the other hand, pulling off such a should would be amazing!
Plan B was to shoot the toy separately from the rocket streak, then composite them together afterwards. Since both would be captured at the same location at roughly the same time, the composite would be easy as everything should match. This should be one of the easiest composite jobs there is.
Erik offered to set up one of his cameras as a backup, in case mine failed. That gave me the confidence to try capturing everything at once.
Having a backup camera was wise, since the one-shot strategy failed completely. However I didn’t know that at the time, so I went ahead with Plan A.
No plan survives contact with the enemy
I arrived at the shooting location 2 hours ahead of time. After deciding on the exact spot we were going to shoot from, I set up my camera with a Hot Toys 12″ Iron Man about 2ft away from my lens. My camera itself was on a Platypod, and dug into the sand. Erik set up one of his cameras beside mine (he had two other bodies he had also set up for his own creative efforts).
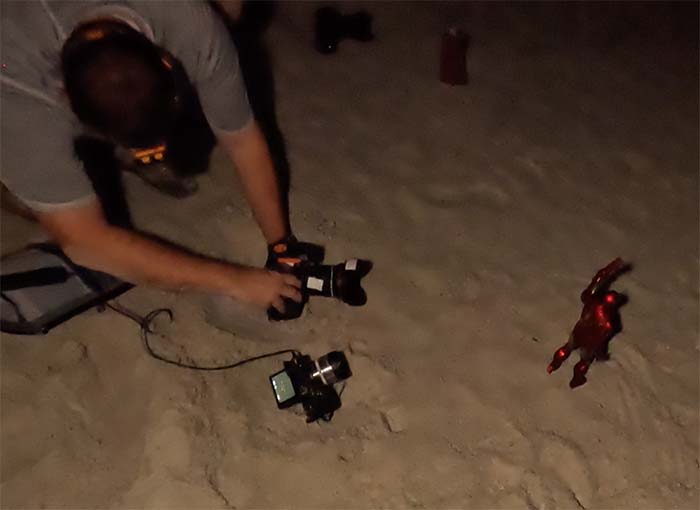
I then spent an hour getting my exposure correct. My test shots were starting to look promising.
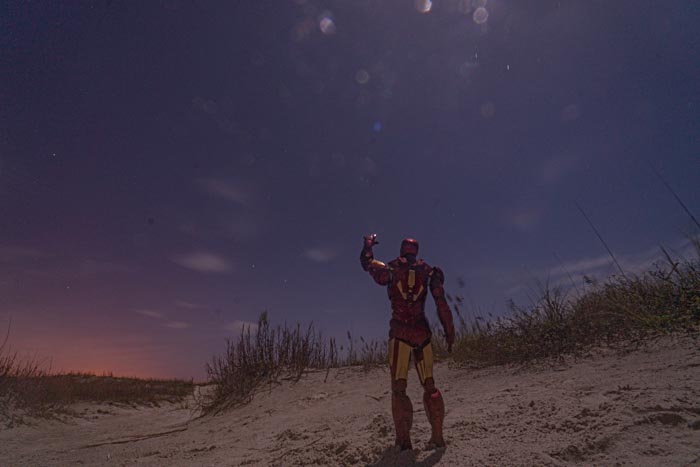
It wasn’t quite perfect tho. My vision had Iron Man being much larger in the frame. However it was impossible to get him closer in frame, in focus, *and* get the depth of field required to also get the sky in focus to capture the streak. So I settled with a smaller Iron Man. This was the first sign I had that Plan A wasn’t the best strategy.
The other confirmation than Plan A was too fragile was that, when the rocket launched and I clicked the shutter on my remote trigger, it fell apart in my hands, and didn’t trigger the camera. A remote trigger failing like this is something that could happen at any time. However when one only has a single chance to capture an image, that failure cost me the entire shot. So my camera missed the rocket launch completely.
The camera that Erik set up as a back-up also failed, due to the framing being off on his. Two cameras. Nothing.
Fortunately one of Erics other cameras that were set up independently of the action figure did catch the streak. I had an acceptable Iron Man thanks to my test shots. This meant I had all the pieces I needed to make a composite shot after all.
So I spent some time in Photoshop and merged the two images together. Along the way I embiggened Iron Man (cause why not?) .The final result is here:
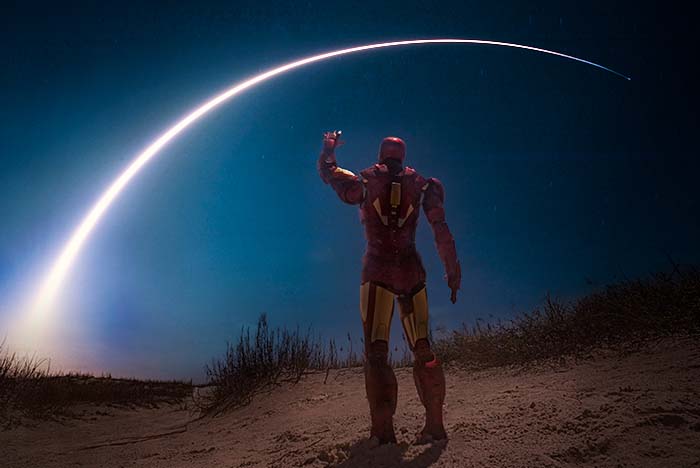
The end result is the image I had in my head, and I couldn’t be happier with how it all turned out.
By the way the new Sky Replacement tool in Photoshop is like magic! Highly recommend it.
Lessons Learned
I learned a whole lot of things by going through this experience. Obviously just trying to shoot a launch taught me a lot about that process, which will be invaluable if I ever get the chance to do this again.
However, for the purposes of this blog, the most important lesson I learned is that rocket photography and toy photography do not play well together. The problem is that pesky depth of field. Getting toys to be large in frame with a wide angle lens requires the figure to be really close to the camera. However this dramatically narrows the depth of field, blurring the background. Normally with photography a blurry background is aesthetically OK, and often even desired. However with rocket photography it is more important to have the distant streak in focus. With normal sized things in the foreground this isn’t a problem. With a 12mm lens at f/10, everything from about 2 feet away, all the way to infinity, will be in focus. However with that wide of a lens, even a 12″ figure needs to be within 12 inches or so to be large enough in frame, which shifts the field much closer. Even f/22 isn’t enough to overcome the difference between the two depths of field.
This means that optically, toy photography and rocket photography are opposing forces when it comes to depth of fields. Making capturing everything in camera in one shot ala Plan A tricky at best, and perhaps even impossible, with small figures.
Also, Plan B allows for multiple cameras to be in operation at the same time, and aimed independently. This means a single failure would not cause the shot to be missed. This actually became beneficial as Erik was able to provide me a shot of the streak without Iron Man from one of his other cameras. In my day job we use the motto “luck is not a strategy”, but in this case luck paid off as I did luck out and get all the parts I needed to composite two shots together. Otherwise known as Plan B.
The sudden but inevitable conclusion
Going into this experience I knew the chances of even seeing a rocket launch was relatively low. There are many things that could have prevented the rocket from launching – weather problems being one factor, and technical difficulties with the rocket being another, Throwing cameras into the mix and the odds of success are dramatically reduced. I gave my chances at about 70% that I’d even see a launch. If it did launch, I gave myself a 50/50 change of getting in on camera, and less than 25% I’d get a useable toy photo.
As a result, and to manage my personal expectations, I had determined that just seeing the rocket go up would be considered a complete success, and anything that happened after that would simply be a bonus.
Combining rocket photography and toy photography turned out to be even harder than I expected. With a lot of planning and a splash of luck, I managed to create the image I wanted. I really hope I get the chance to shoot more rockets in the future. If I do I’ll be armed with all the lessons I learned from this experience. If I don’t, I can look back at my toy photography portfolio and remember the time I watched the magic of space exploration happen right before my eyes. That, my friends, is a lifelong happy memory.
[dave]


I so enjoyed reading about your experience! I can’t say I’d have even tried to get everything in camera in one exposure. I’m learning to do some night photography (Milky Way/meteors) and there are vastly different things to consider. I love the image you came up with. Gives me hope to try at least Milky Way and toys.
Thanks Molly!
Shooting the milky way is also fun. I’ve only done it a few times with moderate success. Good luck with that, and if you manage to shoot it with toys… let me know!