Like most toy photographers, I like to put practical effects into the images I create, but the scale of toys makes it hard to find perfect tools for the job. I have been on the lookout for a decent toy-scale fog machine for a long time now, but I never could find the perfect tool. I tried Atmosphere Aerosol, reptile misters, other smoke machines, and even invented my own solution. Unfortunately, they all felt like incomplete solutions to my problem: Making a realistic amount of smoke—not too much, not too little. I just needed the perfect amount. Was that too much to ask?
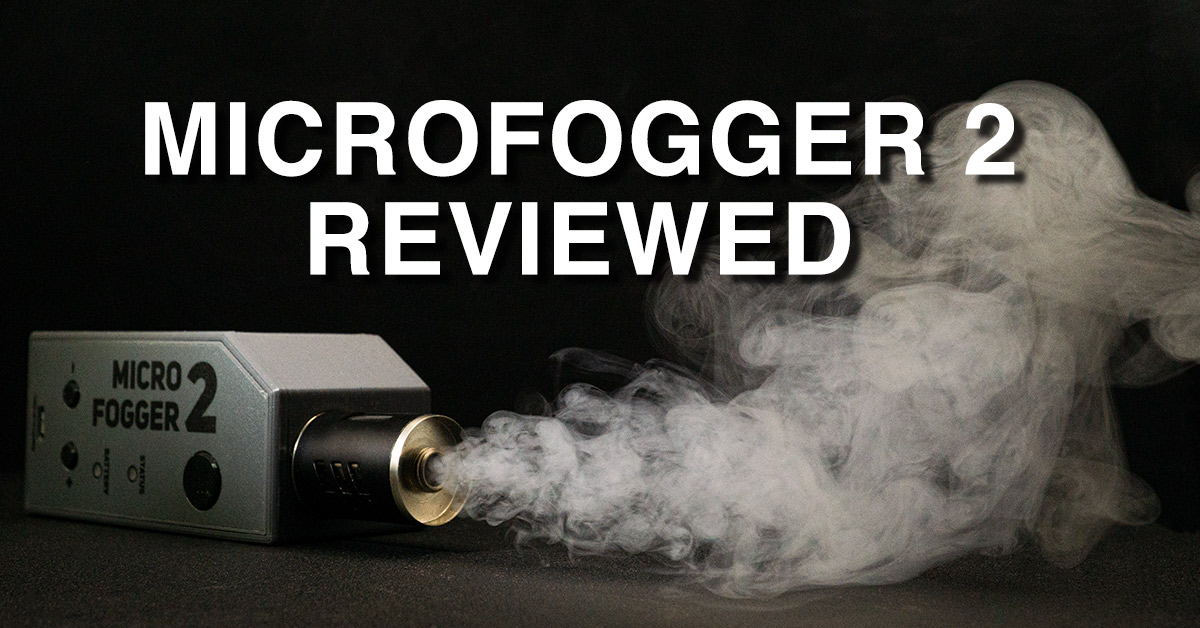
I knew exactly what I wanted: a vape stick that blew itself, instead of using lung power (cancer is not my friend). When I discovered from a YouTube video on movie making that such a solution actually existed, I jumped at the chance. These are my adventures, and opinions, of the MicroFogger 2 by Vosentech
Disclaimer: This review is based on a device I paid for with my own hard earned money. As such, Vosentech had absolutely no influence over this review in any way. In fact, they don’t even know I’m writing it. Though, to be fair, calling this a review is a bit of a misnomer, as this is more my adventures with it instead of a full on test-it-thoroughly review.
The MicroFogger 2 in all its glory
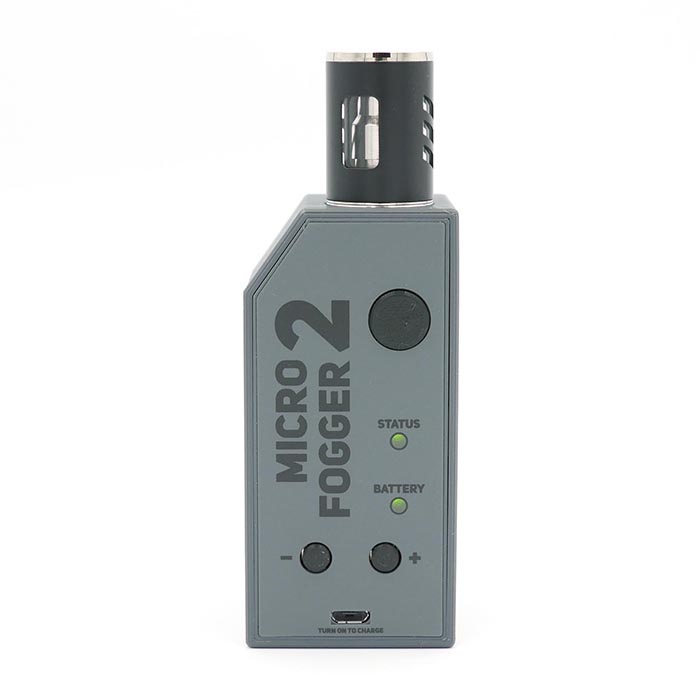
Vosentech’s MicroFogger is a compact bit of kit. It is about 6 inches long, and a couple inches wide and deep, and charges via USB, so it travels easily in a camera bag. It does, however, kick out a rather large amount of smoke. The cool thing is there are controls to adjust exactly how much smoke comes out—from almost nothing (appropriate for a minifigure), all the way to more than enough for your average 12-inch (1/6 scale) figure. The build quality is excellent, as this is a hefty little device.
The device comes with a remote control, which has a range long enough for any toy photography purpose. The spec sheet says the remote can be used to control multiple units, but I only have the one (for a reason that will become apparent), so I couldn’t test this, but given the fact that everything else worked as advertised, I have no reason to believe this isn’t true.
Its price is rather steep for such thing. At $160, this is an expensive item. But similar devices with the same specs can cost 5–10 times that, so it’s not crazy for what it is. That said, the price does prevent me from absolutely recommending this as a must-have device for most toy photographers (though spoiler alert: it’s worth the money if you have the means). No one ever said photography, even toy photography, is a cheap hobby.
The MicroFogger has a threaded tip that allows one to add various diffusers and other attachments and whatnots to help control the smoke. The only attachment I picked up was a hose attachment.
The first image
To give this unit a test, I set up a shot. I wanted it simple in order to make the fog a major part of the image. I tossed a 6-inch Mezco One:12 Collective Spider-Man figure onto a black background, added a simple key light, and pointed the MicroFogger at it. The hose attachment allowed me to connect a small rubber bit of tubing (hose) to introduce the fog more strategically in scenes—think coming from a chimney, or a fired weapon, as opposed to always coming in from screen left or right.
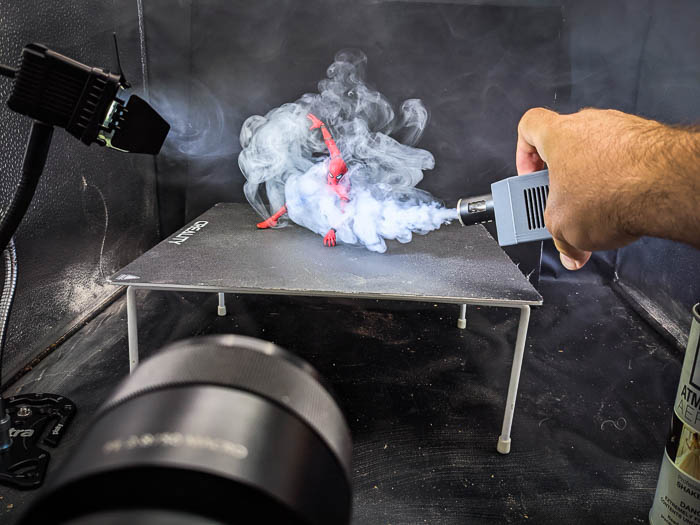
As you can see, the amount of smoke is significant. This isn’t even full blast—more than enough for a 6-inch figure. Just for kicks, I tried the fogger with the hose attachment, just to see what the smoke looked like with it on.
It didn’t affect the amount of smoke that came out, which was expected. However it came out in a more focused pattern, which was also expected. I timed a burst of fog with my camera shutter using good old fashioned manual dexterity. When I finished the image in Photoshop I got these results, which are most pleasing:
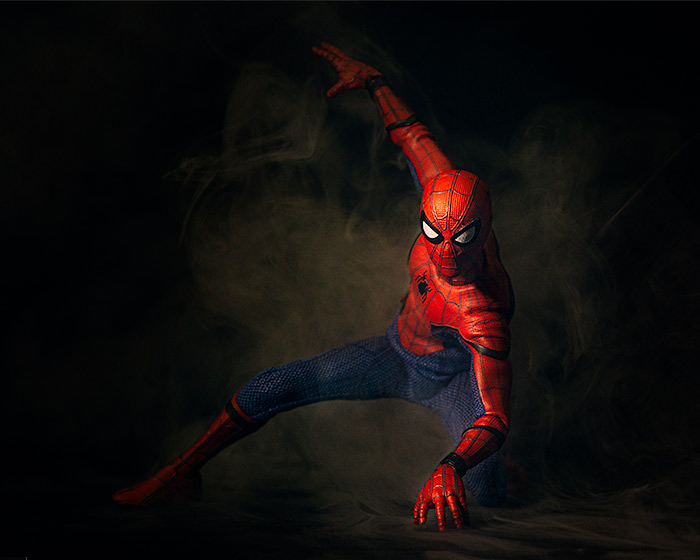
This looks like perfectly cromulent smoke to me. It does have the same issue that almost all other smoke machines have: The process of making the fog uses heat, which means the fog is hot. Since heat rises, the smoke rises out of frame very quickly. I had a plan to fix that.
Going the extra mile (aka making the smoke machine literally cooler)
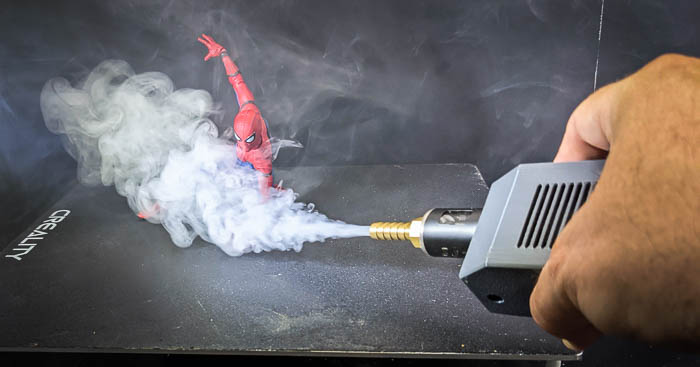
If I wanted smoke not to rise so quickly I need to make it cooler and more dense than the ambient air around it. I decided to accomplish this by adding a hose to the hose attachment, and running that through some ice water. Digging into my Big Pile O’Junk, I found the perfect ice water container in the form of an old margarine tub. I cut a hole in the bottom for the hose to exit, coiled the rest inside, and added the fogger to the top. Then I tossed everything into my freezer for a few hours to get it all nice and cold.
When I tested the rig with my Spider-Man setup, the smoke acted exactly as I’d hoped. It came out like a water mist, and hugged the metal sheet I used as the base quite well (I love it when a plan comes together). It made an excellent mist effect. I suspect if I tuned this some more I could get a truly proper fog effect from top to bottom.
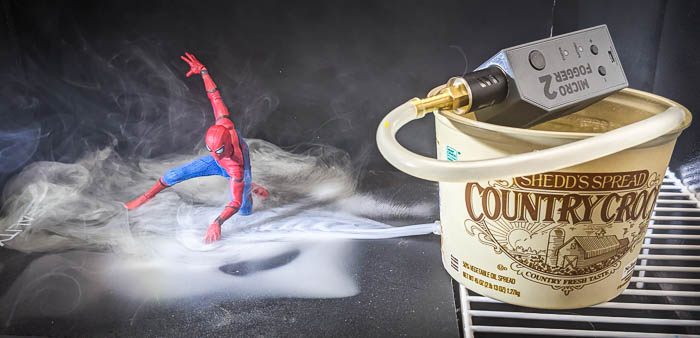
Like the last shot, I used good ol’ manual dexterity to match a burst of mist and my camera shutter, but this time using the MicroFogger remote, to snap an image and finish it in Photoshop.

I intentionally finished both images the exact same way (or at least as close as I could manage) to highlight the differences in smoke effect styles between the hot and cold versions.
The sudden but inevitable conclusion
I must say, I am thrilled with how flexible and useful the MicroFogger is. It is an expensive bit of kit, but it is easy to see where the money goes. It is also not, by far, the most expensive thing I own. Heck, in this shoot alone—with the lights, stands, camera, lenses etc—this was just the third most expensive tool used. Let’s face it, photography is an expensive hobby, and quality tools cost some significant coinage. That is what the MicroFogger is: a quality tool. One that has found a prominent place in my creative toolbox.
There are lots of ways to create smoke for shots, many of them much more reasonably priced than this one. However, the MicroFogger does all the things those other options do, but all in one package, and it has the flexibility to do even more. This is a quality one-stop shop for smoke. For that reason, the MicroFogger is going to be my go-to smoke creation device for a long time to come.
[dave]
Want more toy photography goodness? Subscribe to our weekly email round up so that you never miss a post. You can also listen to episodes of the podcast! You can follow my work at @therealstudiodave.


Is this running with some glicerine-based liquid or is all water vapor? If not, there’s some residue to clean away?
Its a concentrated version of a normal fog machine, and there is little to no residue to clean away- it gets all burnt up as smoke.
That is an amazing tool and I love the heavy and low lying effect it gives.