It’s no secret that I love my Lensbaby Composer lens system. In fact, its this lens that has been giving me the pictorialist style images that I love to create.
Did you know that the composer is really several lenses in one? With one lens body and multiple swappable lens choices you can create different effects. Once you get the hang of the system, the Composer is one very powerful tool for your artistic tool box.
Ultimate flexibility
The LensBaby lenses can be daunting. I realized this after watching other photographers struggle with this foreign looking device at the #Uttoyphotosafari. When I look back at my own experiences with the lens I realize it has a bit of a learning curve. Not because they’re especially difficult to use, but because they’re so flexible. As the artist you’re asked to make a lot of decisions about your lens and how you want to use it, decisions you might not be used to making with a traditional lens.
Here is a list of a few of the decisions you make when choosing which insert to use with your Composer lens:
- What focal length do you want to use?
- What is your depth of field going to be?
- Where do you want the center of focus to be?
- How dramatic do you want the blur effects to be?
- How much bokeh do you want?
- What style of bokeh do you want?
- Do you need a macro attachment: filters or converters?
Seriously?That’s a lot of decisions to make before you even take one photo. It helps when using this system that you either know what you want to achieve or you’re up for some experimentation.
The Composer
The LensBaby Composer is a ball and socket lens that you can tilt and swivel. This gives you control over where you place the center of focus, or sweet spot, on the photographic plane. The more you tilt your lenses sweet spot of focus off center, the more pronounced the lenses effects will be. Depending on which lens insert you choose, when you start stretching the focal plane, you will see interesting effects around the edges. This is where the LensBaby shines…on those whimsical edges. Think of the LensBaby as a plug and play system for creative in-camera effects. When you’re in the field (or studio) you can easily change how your images look by changing the lens insert. This flexibility and expandability is a major appeal of this system.
The lenses
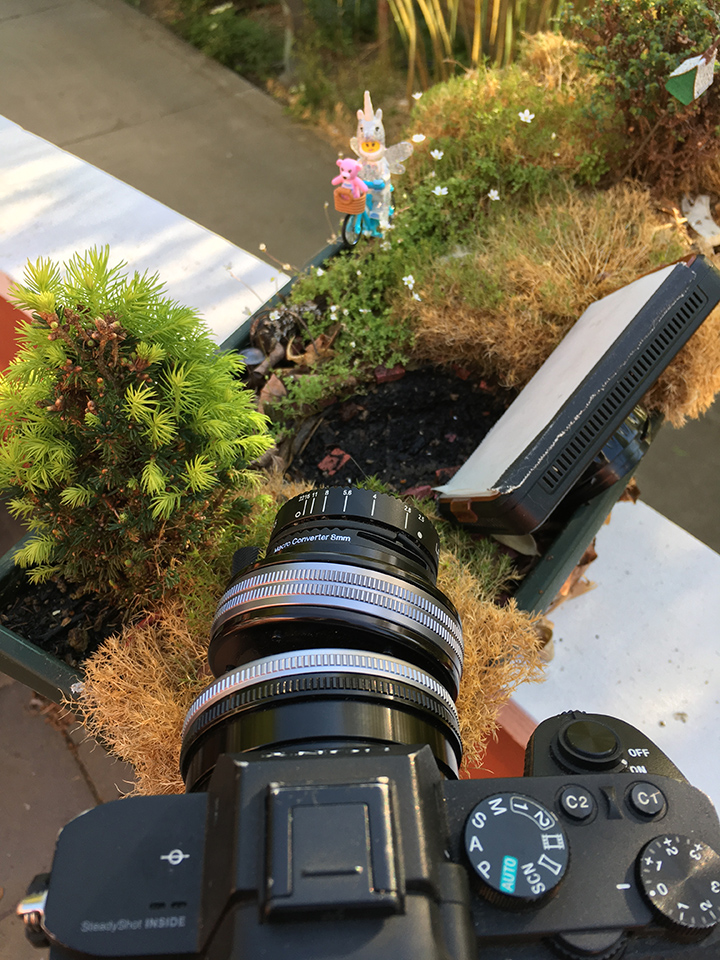
I’ve only acquired a few of the possibly inserts for my Composer Optic Swap System. To give you an idea of what the different lenses look like side by side I set up a typical “Shelly scene” and I ran through the inserts I own. Before I get started, here is a behind the scenes look at the lens to show you how much I’ve shifted it off center.
Sweet 50
This is the lens that started it all and it is still my go-to lens. Over the past two years I’ve come to rely on this lens to create interesting edge blur, wonderful lens flare and bring a sense of motion to my images.
While it has taken me some time to get the hang of this lens, now I compose my photo as quickly as with any standard lens. When I look at me scene I know where I want my sweet spot of focus to be and I adjust the lens accordingly. To maximize the blur effect I generally photography between 2.8 and 5.4. Between trial and error and some practice, I can capture what I’m looking for quickly with no unneccesary fumbling. Of course when I switched to a Sony camera body with focus peaking my focus became more accurate. I love technology!!
Sweet 35
I picked up the Sweet 35 lens insert just before the Utah Photo Meet up. I wanted to play with another lens and I thought a wider look might be a nice change of pace. I fell in love with the wider angle almost immediately and never took it off the entire weekend. As you can tell the Sweet 50 and the Sweet 35 create a similar edge blur and swirl. The biggest difference between the two is how much information around your figure you want to capture.
Edge 50
The Edge 50 (or 35) creates a very different effect from the Sweet 50 and 35. Instead of creating interesting swirls of bokeh around the edges it creates a slice of focus across your entire image. This slice of focus can be horizontal, vertical or diagonal depending on how you tilt the lens. How much blur around the edges is determined by your aperture. Wide open = more blur.
In the image below you can see the slice of focus starts in the lower right corner and moves diagonally to the left. You can see a small slice of focus in the moss because of the large aperture. One benefit of the Edge 50 is that it has a built in close focus feature. Perfect for capturing those small toys without adding a macro attachment!
Plastic Optic
Thanks to Dennis T I was able to get my hands on a discontinued 55 mm plastic lens insert for my Composer body. The plastic lens is one of the LensBaby’s softest focusing lenses they’ve made. It’s also a wonderful lens for capturing chromatic aberrations. The plastic lens, like older LensBaby lenses, doesn’t have a built in aperture system. Instead you have rings of differing aperture sizes that you drop in front of the lens. These rings are held in by magnets.
The beauty of this plastic lens is that it creates dreamy, soft focus images similar to analog systems like Diana or Holga. To be able to create a LOMO style photo without resulting to post production filters opens up new options and a streamlined work flow. Not to mention serindipity. I love the wonderful chromatic aberrations captured in moss and flowers in the below image. I’m looking forward to playing with this funky lens. It might just be my ticket to breaking through to another magical world.
In conclusion
In this LensBaby Composer side by side comparison I’ve only talked about the Composer inserts in my collection. You can also purchase an Edge 35 and Twist lens inserts from LensBaby and you can find an Edge 80 on the after market. If you’re looking for maximum portability you might consider the Sol 45 / 22 (reviewed here). This lens gives you many of the same effects of the Composer in one compact package.
I realize these creative lenses aren’t for everyone. I’m committed to my Pictorialist view of the world while Straight Photography seems to be the order of the day. But if you’re interested in breaking out of the box of edge to edge pristine focus I recommend you check out the LensBaby line of lenses. The LensBaby website is a wonderful resource to help you pick which lens to start with. They even have an entire “University” to help you get started.
I’m sure you will hear about these creative lenses from me again. I cant help myself! I love these lenses and the company that makes them. They were kind enough to send a few lenses along for the toy safari and everyone at the company I’ve talked to has been super awesome. Thank you LensBaby, Keri and all the folks who help design and promote these lenses. Thank you for helping photographers See in a New Way.
~ Shelly
Do you have a favorite lens that sparks your creativity? Leave your comments below about your favorite lens so we can check them out too!







![Ahsoka Tano’s Duel on Peridea [75385] photo review](https://toyphotographers.com/wp-content/uploads/2024/11/header-scaled-500x383.jpg)



I really enjoyed reading this Shelly. Thank you for the thorough description of how these lenses work. I’ve always been curious about them and I’ve always loved the effect you get with them 🙂 I have to admit that I’m a little intimidated by idea of having to focus manually though 🙂 I didn’t mind it when I was 16 but now… Half the time I take photos, I realize I have the wrong glasses on and I’m grateful for the camera’s autofocus 🙂
Thanks Lynn for commenting on the post. I realized after watching the folks at the meet-up struggle with the lens that I really needed to back up and start from the beginning. I will confess that my focusing has gotten better since I moved to a Sony Alpha body. It comes with an Electronic View Finder with focus peaking. When I was videoing for the radio station I fell in love with focus peaking (when you get a red line around all the areas that are in focus). Using this with my LensBaby lens has made focusing nearly fool proof. Look! Tech working for me, not against me!! So, yes I understand the hesitancy, but gosh, the effect is worth it!
Hi Shelly! Now I super regret not trying these out at the Utah meetup. Regardless, I loved your piece and the side by side shots of that glorious unicorn with their bear and bike. Clearly you’ve created some magic that really pops in different ways through your lens choices. Thanks for breaking it all down. I can hardly wait to see what you do with them next. Maybe some day I’ll give LensBaby a shot.
Thanks Doug for reading my ramblings and commenting. When we get together next I will bring my LensBaby with a Canon mount and you can give it a try. I think in a situation that is a little less chaotic will be better anyway. So don’t despair – I will convert you yet!! (Bwahahahaha)
Ha. I’m allllllll in Shelly!!
Thanks for this article, Shelly. I had some trouble understanding how these work and had saw a video couple of days to have a better understanding and your article made it even clearer for me. These are lens are really cool and you certainly have make your pictures stand out from my feed with the use of these lenses.
Thanks Sunny for your comment. While these lenses are tons of fun, they aren’t really plug and play like modern lenses. But the extra effort can pay off in unique results. I finally picked up the Twist insert (my Mother’s Day gift) because Im so impressed by the effects Jo Cowlishaw gets with his. In fact, check out his review later this weekend. While these lenses aren’t for everyone or even for every photo, they certainly can be just the ticket for some photos!