The other day I was surfing Instagram and I came across an interesting idea that was new to me: spraying flat clear coat onto toys to control light reflections. It sounded interesting so I decided to test it out. Adam Savage once said, “The difference between science and goofing off is writing stuff down.” This post is me engaging in science as I test out this idea: Can you use flat clear coat to reduce light reflections?
Note: I got this idea from @blksrs, aka Isaiah Takahashi. His work is amazing, so check out his ‘gram, or find him featured in a number of posts right here on this blog.
Also note: This involves spraying clear coat onto toys. I do not know if there are any long term issues with how this will affect the various plastics or cause any yellowing, etc. over time. This would also almost certainly destroy any resale value of the figures, so if you are a collector as well as a toy photographer, you may want to avoid this technique.
Testing process
The testing process was pretty simple: Set up some lights, point them at a figure in order to create a bad light reflection, and take a photo. Then remove the figure without changing its pose, and spray it with some flat clear coat. Once dry, set up the figure in the same position, and take another photo. Finally, compare the two and look for any differences. After that it’s just a matter of making wide, sweeping, life-affecting decisions based on incredibly small sample sizes, ’cause: science!
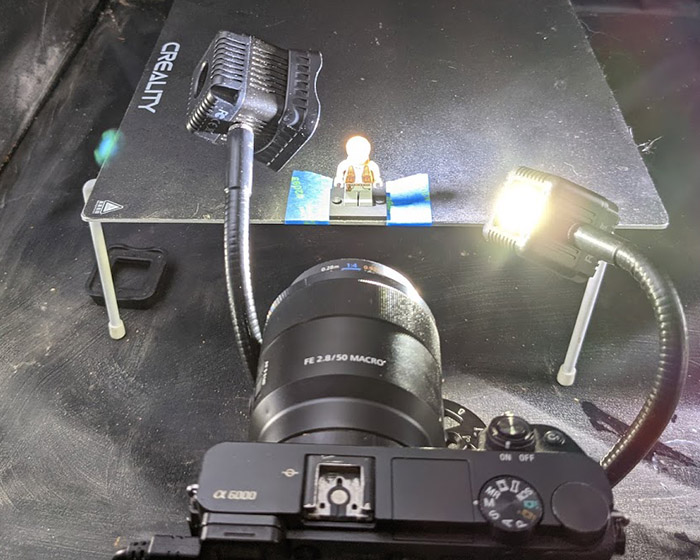
I used an action figure and a LEGO minifigure for this test. The clear coat was Krylon ColorMaxx Flat Crystal Clear, selected for the highly technical and scientific reason of “I already owned a can.”
Clear coating action figures
To test an action figure, I grabbed a figure I didn’t really care about. The one I selected was Marvel’s Ares—who I only bought as I needed the Build-A-Figure part he came with to make a Hulk Ragnarok figure (the Build-a-Figure scam is a great way to build up your toy box detritus). So Ares seemed like a good sacrificial candidate for testing.
I followed the highly scientific process listed above and came up with these results. The before is on the left, and the after (clear coated) version is on the right.
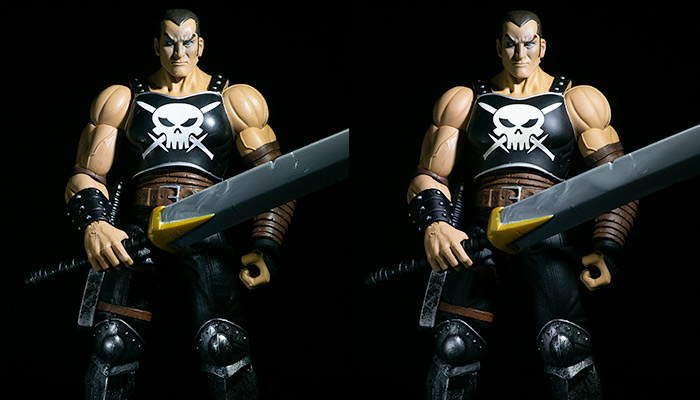
As you can see, there are some significant differences. The most obvious is the glare on his breast plate, which is much more diffused on the clear coated version. Another change is the hairline highlight, which is more subtle on the clear coated version.
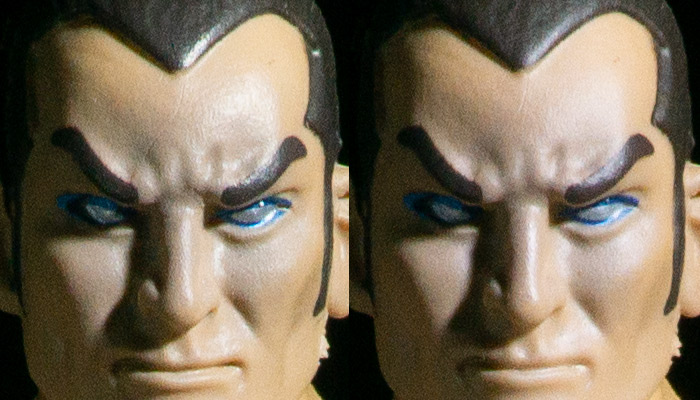
The other thing I noticed with these is that there is a very subtle colour difference between the two, with the untreated version being a bit more yellow. I am not really sure why this would be. However, one of the selling points on the spray can is “non-yellowing,” which may have something to do with it.
Let’s move on to the LEGO minifigures.
Clear coating LEGO minifigures
For the LEGO, I used an Owen Grady figure from Jurassic World. I repositioned the lights on the minifigure so I could bring out the classic “vertical line down the face” light reflection. Then I did the same before/after photo process as I did with the action figure, and came up with these results. Again, left is the before, right is the after.

Clearly the flat clear coat has the same effect on the LEGO minifig as it did on the action figure. The light reflections are massively reduced. That face line is pretty much gone. One thing I did notice is that the clear coated version has a texture on it. If you notice, the vertical face line is less defined, but is no longer smooth. In fact, it is quite rough. I suspect this has to do with the sprayed-on aspect of the clear coat not resulting in an even finish. Whether this is due to user error or a function of the material itself, I do not know. I zoomed in on the clear coated Ares and I don’t see the same texture effect, but this still may simply be due to scale.
If I was going to do this again, I would take care to ensure properly consistent coverage on the figure. But, I would also be prepared to just write off the technique as being inappropriate for minifigs. More testing required.
In conclusion
This was an interesting idea when I saw it, and in retrospect, it is an obvious idea. The technique of using a flat clear coat to reduce reflections on toys absolutely works. I don’t think I would use it for all my toys, but if I find myself in a tricky shoot where I can’t seem to remove light reflections, it may be handy to have this idea in my mental tool box.
[dave]



I have looked into clear flat makeup setting spray. But i have not tried it yet. Glad to see you commit to sprat paint! I have it sitting in my basement amd have thought about it, but i haven’t had the guts to actually try it.
To be honest I only used spray paint clear coat cause its what I had. Didn’t know others existed 🙂
Nice! I’ve heard about this method but have not seen it tried on minifigures before. Good to know it works well. I’ve tried Tamiya matte primer before – didn’t work for me. I think the spray method is the way to go.
Great to see the before/after to compare like this. I’d like to get rid of the minifigure face reflections, for sure. Once we find a good clear coat for them (if there’s one that doesn’t result in the texture effect) I’d probably grab all my most commonly photographed heads, stick ’em on poles and spray ’em as a batch! One-n-done. Well, until the next minifigure I buy, ha ha!
I sprayed mine outside in windy conditions, so your mileage may vary.
hi i was wondering would a cpl filter help with this issue, sorry if its a silly question but im new to photography but was given a filter set as a gift,
A CPL very well may also solve this problem. Only way to find out is to try 🙂
Great article. I’m going to try it.
Also, would using powder work the same? That wouldn’t be permanent and could be washed off. I’ll experiment with both.