For a long time the limited options in my little photo studio annoyed me. Here in Germany it is cold, rainy and unpleasant at the moment, the perfect time to start some indoor changes.
A stock-survey: What do I have?
I take photos at home at a small wooden table that has 2 drawers. In the drawers I keep wires, glue, wire cutters and all kinds of other useful devices. On the table a freely movable large glass plate is placed and on this a smaller magnetic plate. This is very convenient because I can fix colored papers quickly for example. Behind the table is a large magnetic plate on the wall so that I can attach and replace photo backgrounds with small magnets very quickly. I have 3 large daylight lamps, a Litratorch with colored extensions and various flashlights.
How should my photo studio look like?
- Light sources should illuminate my photo scene from below as well.
- I would like to lift or lower design elements and set up brighteners on the side.
- A uniform illumination of the surface should be possible
1. Lighting from below
That was easy to implement! My photo table already has a movable glass plate. I just went to a hardware store and got a thick round bar sawed down to 6 pieces of equal length. This allows me to lift the glass plate so high that I can even place small flashlights underneath. I store the support elements in one of the drawers of the photo table so that I can lift or lower the glass top very quickly.
2. Equipment for lowering of design elements and lateral support
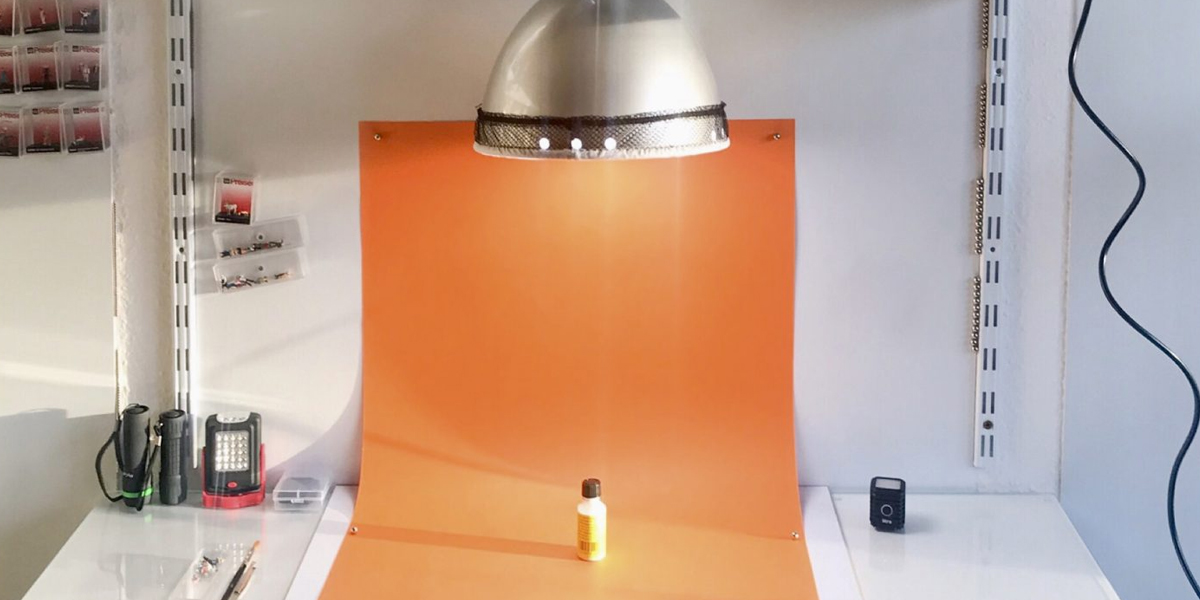
I wanted to have equipment which can be moved over the photo table easily, takes up little space, does not stand out and could be placed at different heights. I bought 2 rails and fixed them to the left and the right side of the large magnetic plate on the wall. They are white and hardly noticeable. They are cheap, can safely carry larger weights (e.g. lamps, branches, …) and allow an easy and fast attachment of the matching metal supports in many different heights. I bought 4 supports so that I can easily lean brighteners against them.
Another perforated rail of suitable length can be placed across the side supports. I put small screws on the left and right through the holes and these sink into the supports. This allows me to slide the rail safely back and forth over the photo table. Another big advantage is that this system is magnetic and with my magnetic ball I can quickly fix all things to hang on the rail.
If I do not need the hanger, I simply store the supports and rail behind a shelf.
3. Even lighting of the photo surface
With this system, I can also illuminate the entire photo surface well. The Litratorch can be magnetically attached to the side supports or the upper rail. I can hang large daylight lamps everywhere over the table. The only thing I needed to buy were bigger clamps to attach the lamp to the rail.
This is it and now I’m curious what kind of additional idea you have for me! What do you love most about your photo studio?
Astrid (@hey.light)




You have such a neat setup! Looks very efficicient!
It is Sunny ?
Very elegant and useful table You have! Wow!
Thanks a lot Tomasz,
it was a lot of fun to buy all things and to build the studio ???
Very nice. Thanks for sharing.
My pleasure Rich ???
Absolutely outstanding! I love this simplicity and neatness! Thanks for sharing this, Astrid!
Warmest thanks Yuri. Meanwhile, I have my set supplemented by 2 more spotlights (IKEA) and am very satisfied. ???
Thank you for sharing this Astrid! Brilliant! The rails make it convenient, and the movable glass plate is clever. Definitely inspired ideas to set our own studio!
Cool Leila,
then you only need a lot of bad weather ? and the construction of the photo studio can start ? ??