
Authors note: Before going any further, you may like to play this great song whilst reading. We do what we must because we can. I am not responsible for any earworms that may occur.
One of the best books I have bought for understanding some simple things about photography was ‘Read this if you want to take great photographs’ by Henry Carroll. It’s a very clear look at lots of different ideas and techniques through the realm of photos by inspirational photographers.
I know Shelly mentioned it last year in her book blog post last summer, but for me, this is one of only three(!) books about photography that I own. I wanted to share a little about how it helped me understand aperture in a very simple way.
Please keep in mind I’m the least technical photographer out there, so you may know better, and you most certainly want to get hold of the book to get the full picture! However, quickly, and very simply put, aperture is about making the hole in your lens smaller or larger control to the amount of light entering your camera.
The size of the hole is measured in f-stops. (I think ‘f’ stands for focal, but I could be wrong there). Basically though, on a DSLR camera you can select the f-stop (usually shown as F/the number on the screen).
The numbers start from small, say f/2.8, where the hole is really big, to large, say f/22, where the hole is really small. The range of f-stops available to you will depend on your lens.
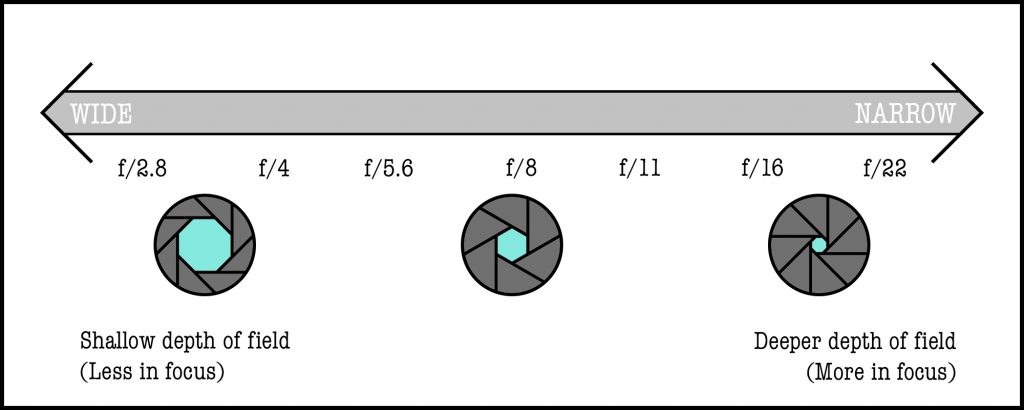
For me, as a toy photographer, the really important thing that this does is it changes the depth of field. So by using a smaller or larger F stop, I can change my background to suit what I need.
For a lot of my photos, I tend to keep the depth of field very shallow (so a smaller f stop). The drawback to this is that if my figure(s) are not on the same plane, one of them might be less focused than the other. Or if they have an accessory, part of the figure might not be in focus, depending on where you have focused the camera. This can work for you, depending on what photo you are after. However, if you want more of the picture to be in focus, then it’s better to use a higher f-stop.
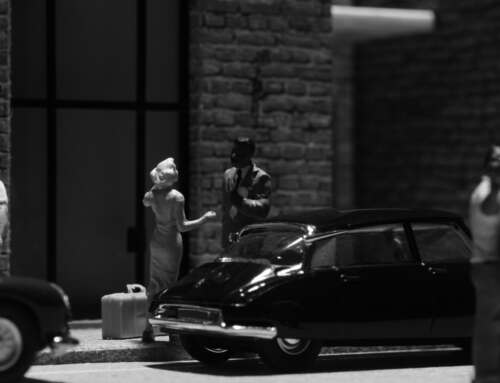
To show how this works, I did a little photographic experiment looking at the same picture through different apertures.
[metaslider id=16638]
Comparing f/3.2 to f/25 you can see the difference this makes. At f/25 you can clearly see the posts and netting of the fruit cage in my back garden. You can also clearly see the full depth of the tree branch. At f/3.2 both the foreground and the background are blurred, leaving more to the imagination as to what’s behind the figure. It’s a softer look.
My best advice to working all this out in your head is to pick up your camera and do this experiment. Set up a photo, and play with the focus to see what happens when you change up your f-stop. Take the photo and play compare and contrast on your computer.
If you understand all this and don’t want to do that particular experiment, try shooting your shot with something different to what you normally use. Personally, I’ve become a creature of habit and tend to shoot at a very small f-stop. Maybe I need to up those numbers and try working with more focus. (There’s a pun there somewhere right?)
If you do decide to do this experiment, let us know. It would be great to talk about what you preferred to shoot and why! Don’t forget to share your photos on G+ so we can all see what you do!
All this also links into exposure and shutter speed and other technical things like ISO. I may repeat this experiment in explaining things with photos whilst looking at those. Seeing the steps really helps clear things in my head. I’m hoping it maybe did that for you too!
– Lizzi
Stepping on Bricks
P.S. Icon attribution for my graphic:
– Arrow icons made by Smashicons from www.flaticon.com
– Aperture icons made by Freepik from www.flaticon.com


Nice explanation and exercise!
There are ways to calculate, given lens, distance to subject, and f-stop, what the depth of field will be. If folks are more numerically minded, they may want to play with that. Here is a web based one:
http://www.dofmaster.com/dofjs.html
I use HyperFocal Pro on Android for this as well:
https://play.google.com/store/apps/details?id=in.zendroid.hyperfocal
Finally you didn’t mention one trade off, which is that the higher f-stops (wider open) lets more light into the camera and onto the sensor. This means that in low-light situations, if you can afford a shallower depth of field, then opening the aperature can let in several stops of light, and perhaps make an impossible shot possible.
Thank you for this Lizzi! I am slowly learning to convert from my phone camera to a DSLR, and this was hugely helpful. Especially your visuals, both the diagram and your comparison photos. Part of what finally clicked for me is that f-stop numbers are like wire gauges, the larger the number the narrower it actually is, which is kind of counterintuitive for me. I think I was also much more focused on how it effects the amount of light, rather than the depth of field of your focus. So, so helpful! Thank you again!!
Great rundown on the basics of aperatue Lizzi. I also prefer to shoot wide open. In fact I have recently acquired a Bokeh monster lens – the Kamlan 50mm f1.1. Unfortunately, I do not have a camera to use it on yet!?
This is a great test to also know the capabilities of the equipment. I like to ask “pro” photographers what an f-stop is. If they don’t know then I quietly steer the conversation away from photography. I figure if you haven’t put in enough time to understand this fundemental part of photography then you should not be advertised as a pro photographer.
Awesome post Lizzi. I’m glad you find ‘Read this if you want to take great photographs’ by Henry Carroll as instructive as I did. I thought his explanations of F-stop, shutter speed and ISO where all extremely clear. Which is of course the hallmark of someone who really knows what they’re talking about. Also great us of the slider plug in!!