
At the risk of starting a post with a silly pun, playing with light can be illuminating. How light plays off a figure can dramatically change the mood of an image.
A good understanding of light is a powerful tool for a photographer, however it can be hard to understand, especially for beginners. Fortunately light is also cheap to make, and easy to play with. This post describes an exercise anyone can try that will help them understand some of the basics of this illuminating subject.
It is often recommended to start with a single light source when starting out. Once that is mastered more lights can be brought in. So in that line of thought, I spent some time playing in my studio with a single cheap light source. The following is a simple exercise I went through to see how moving that single light source around an object changed the look and feel of the scene.
The Light
The dirty little secret when it comes to light is that you don’t need expensive studio lights. Light doesn’t know and doesn’t care what generated it. Your viewers also don’t know and don’t care what creates the light in an image. As long as whatever you use produces enough light, any source will do. This is good news for us photographers who are on a budget.
So on that theme of light on a budget, the light I used is a single tactical flashlight. The exact model I have costs $20 for a pack of 4. I got mine off Amazon. However any flashlight would work for this exercise.
The Setup
The setup is very simple. I put my camera on a tripod so it would not move between shots. I set up a white foam core background with a soft light shining on it to provide a bit of ambient light for the background. In front of the background I placed a Captain America action figure.
I also used a remote trigger for my camera, but this was merely a convenience and not required for the exercise.
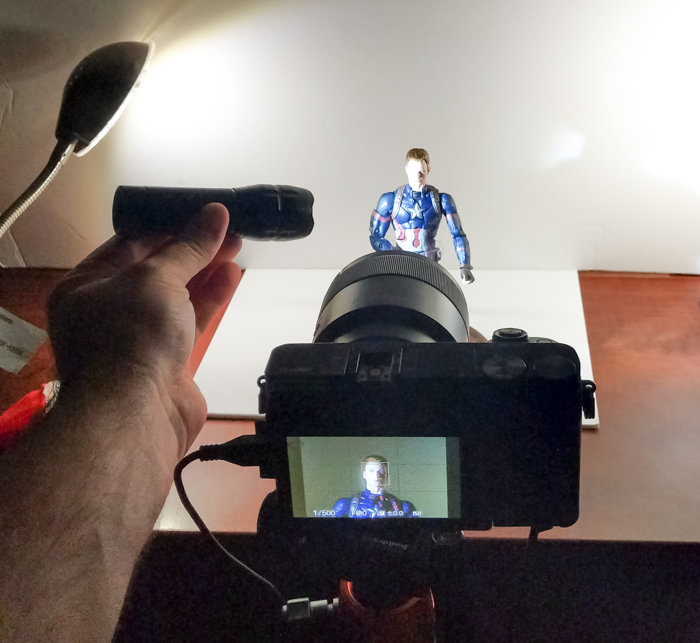
The setup: A camera, a flashlight, an action figure and a background.
Now that we have the setup in place, let’s get onto the business of shining some light around and see what happens.
First Pass: Moving Horizontally
All I did was hold the flashlight at an (approximate) 15 degree angle directly in front of Captain America, at about a 6″ distance, then slowly rotated it horizontally around his head. This is what I captured.
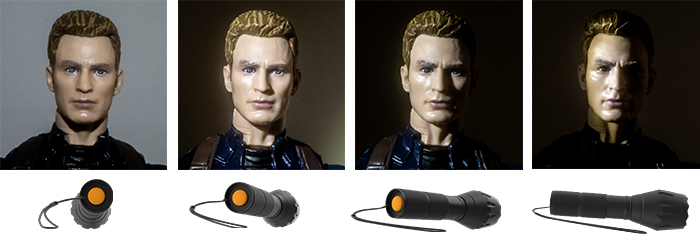
First pas: Scanning with the flashlight horizontally.
As you can see there are two things that happens. The first is as the flashlight moves, the background darkens. This is simply due to the angle of the flashlight changing as it rotates. At first it is shining directly onto the backdrop so it catches a lot of the light coming from the flashlight. Then as it slowly changes angles, the flashlight shines on the backdrop on an increasingly sharper angle, until the light beam stops hitting the backdrop completely, leaving it in darkness.
The second thing you may notice is that the shadows on the face change. As the flashlight direction changes, the shadows go from almost non-existent and slowly get larger and darker. The light coming from the side helps bring out the features of Captain America’s face. This is an effect called light sculpting. It also changes the mood from very open and flat to dark and mysterious.
Second Pass: Moving Light Vertically
The second experiment involves moving the flashlight vertically. The set up is exactly the same, except the flashlight is positioned directly above Captain America’s head so it barely illuminates his nose. Then we rotate the flashlight downwards so we can see how the difference in the height of the flashlight affects the face.
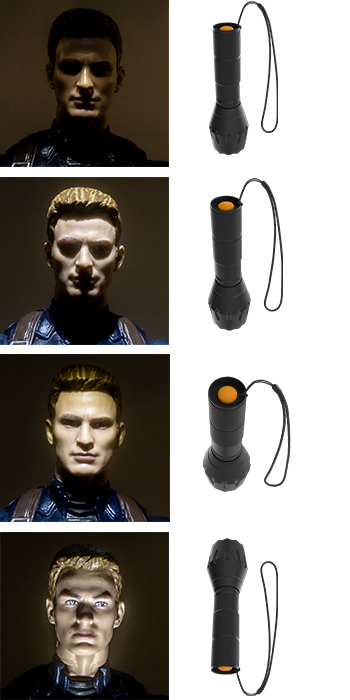
Second attempt – moving the flashlight vertically
The resulting images have a different effect on the mood. Almost all of these images have a dramatic quality to them. The main difference is how bright the eyes are.
Eyes in a photo are very important, as they allow viewers to connect with the subject. Since all of these images have eyes completely obscured or hidden in shadow, it gives a mysterious, almost dangerous look. The only image where the eyes are completely illuminated is the last one, where the light comes up from below. Everyone who has told scary stories as a kid knows that illuminating a face from below is a scary look. This is no exception, even for Captain America,
Conclusion
This simple exercise is a great way to start exploring how light affects the look and feel of subjects. You can try this with any flashlight, and any figure. I used Captain America because its one of the few figures I own that has a normal human head. However any character, LEGO or action figure will do. Of course the figures with more depth to their faces will cast more interesting shadows.
A camera isn’t even required for this exercise. Simply place a figure, shine a flashlight, and see how the shadows change the look and feel of the character. By doing this one can get an idea how angle of light can affect an image, and add another tool in their photography toolbox.
[dave]
Want more toy photography goodness? Subscribe to our weekly email round up so that you never miss a post. You can also listen to episodes of the podcast!


Neat! I’ve done similar things, though usually not just for practice. Right now my lighting rig consists of a few flashlights and a lightbox. I’ll definitely have to keep this article in mind as a reference.
Great, Demarcation Media!
Excellent article as always Dave! Thank you for sharing your experience!
Thanks Miss__Feklista!
This sounds like an exercise I could easily do. Sounds like a project for next weekend! Thanks Dave!