
In 2016 I bought my first Minifigure, an Indiana Jones. He was an excellent subject for a project that included the testing of macro lenses. This simple purchase was to put me on a path of toy photography and Minifigure collecting.
Two years later, my wife and I have a collection of somewhere near 700 Minifigures. This has led to much thought about how to store these wonderful little plastic people, and I think I have come up with one universal way for us all to do so.
The IKEA Kallax system
The Beginnings
I started with small plastic divided drawers, placing the Minifigures 5 wide and 2 deep on 7×16 stud plates cut from 16×16 plates. The Minifigs sat fairly neatly, but I was forced to keep many of their accessories separate from them. From about Lego CMF (Collectable Minifigures) Series 14 onwards this became a bit of a problem, as there are some with an excellent amount of accessories for them (I’m looking at you Series 15 Flying Warrior). I used old 35mm film canisters for the smaller pieces and small ziplock bags for longer accessories like spears and fishing rods. As you can imagine, 54 divisions holding an average of 10 Minifigures (sans accessories) soon became very hard to organise. I also found that I tended not to replace the individual Minifigs once extracted for photos, until I had a pile of them somewhere. The return was tiresome and frustrating.

We have turned our backs on the old ways
The Plan
I wanted to be able to store my Minifigures and accessories together, preferably in CMF series order. For the loose Minifigs: order of type or genre such as City, Kingdoms, Classic Space, Pirates, etc. I wanted to be able to easily identify them, choose them, and replace them. I also wanted them to be easily accessed, but out of the way. The final part of the plan was to be able to write a blog post for fellow toy photographers about a system that was universal, affordable, and easy to plan, make, and maintain. I believe that I have managed to do so, and have been quite pleased with the results.
The Materials and the Build
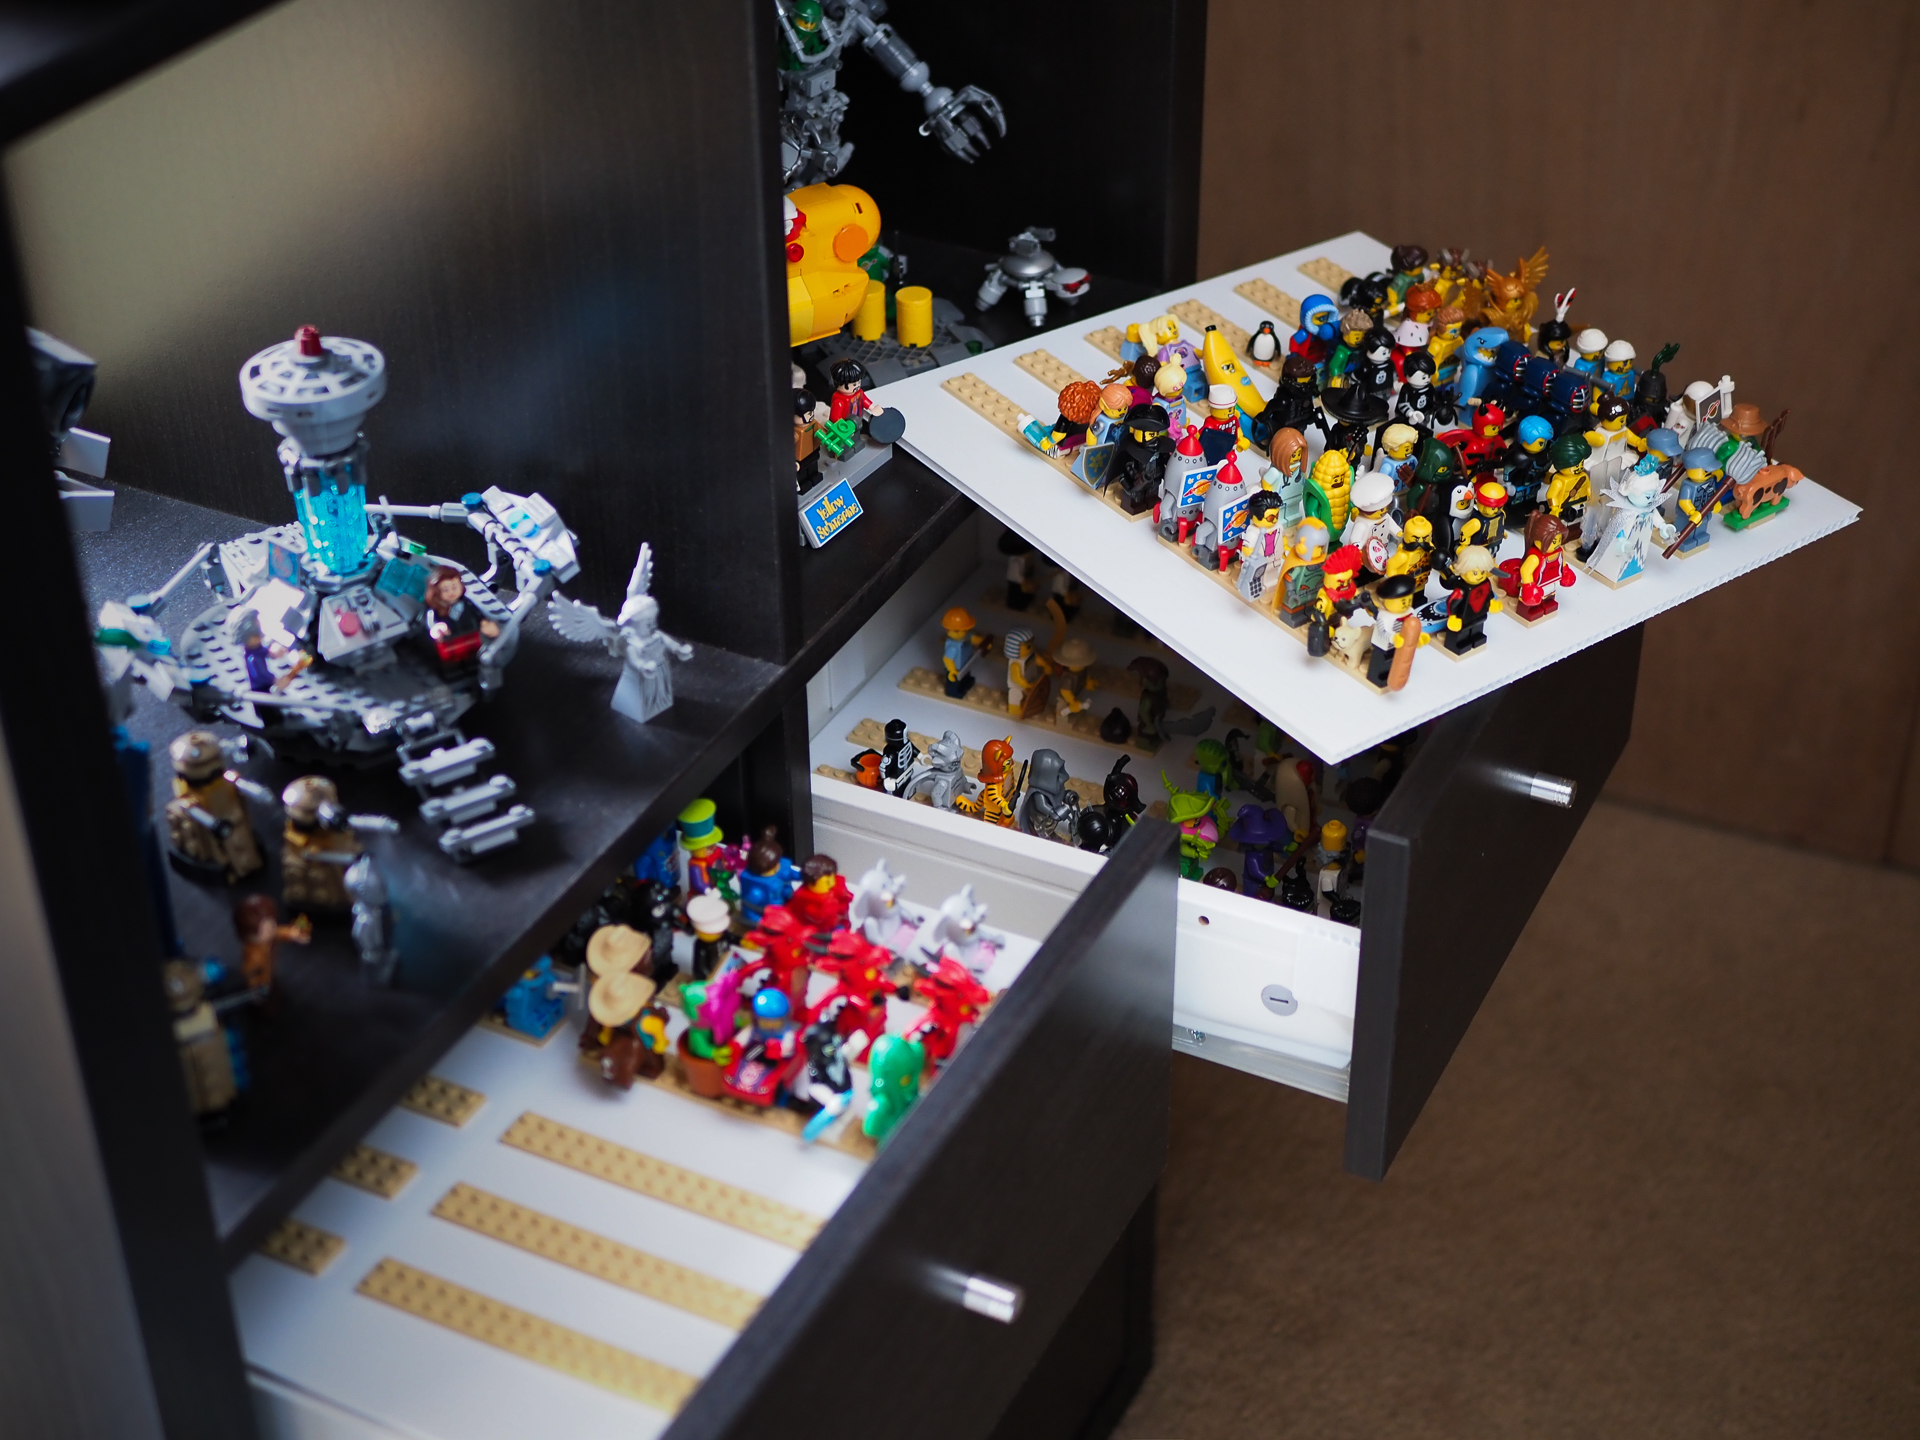
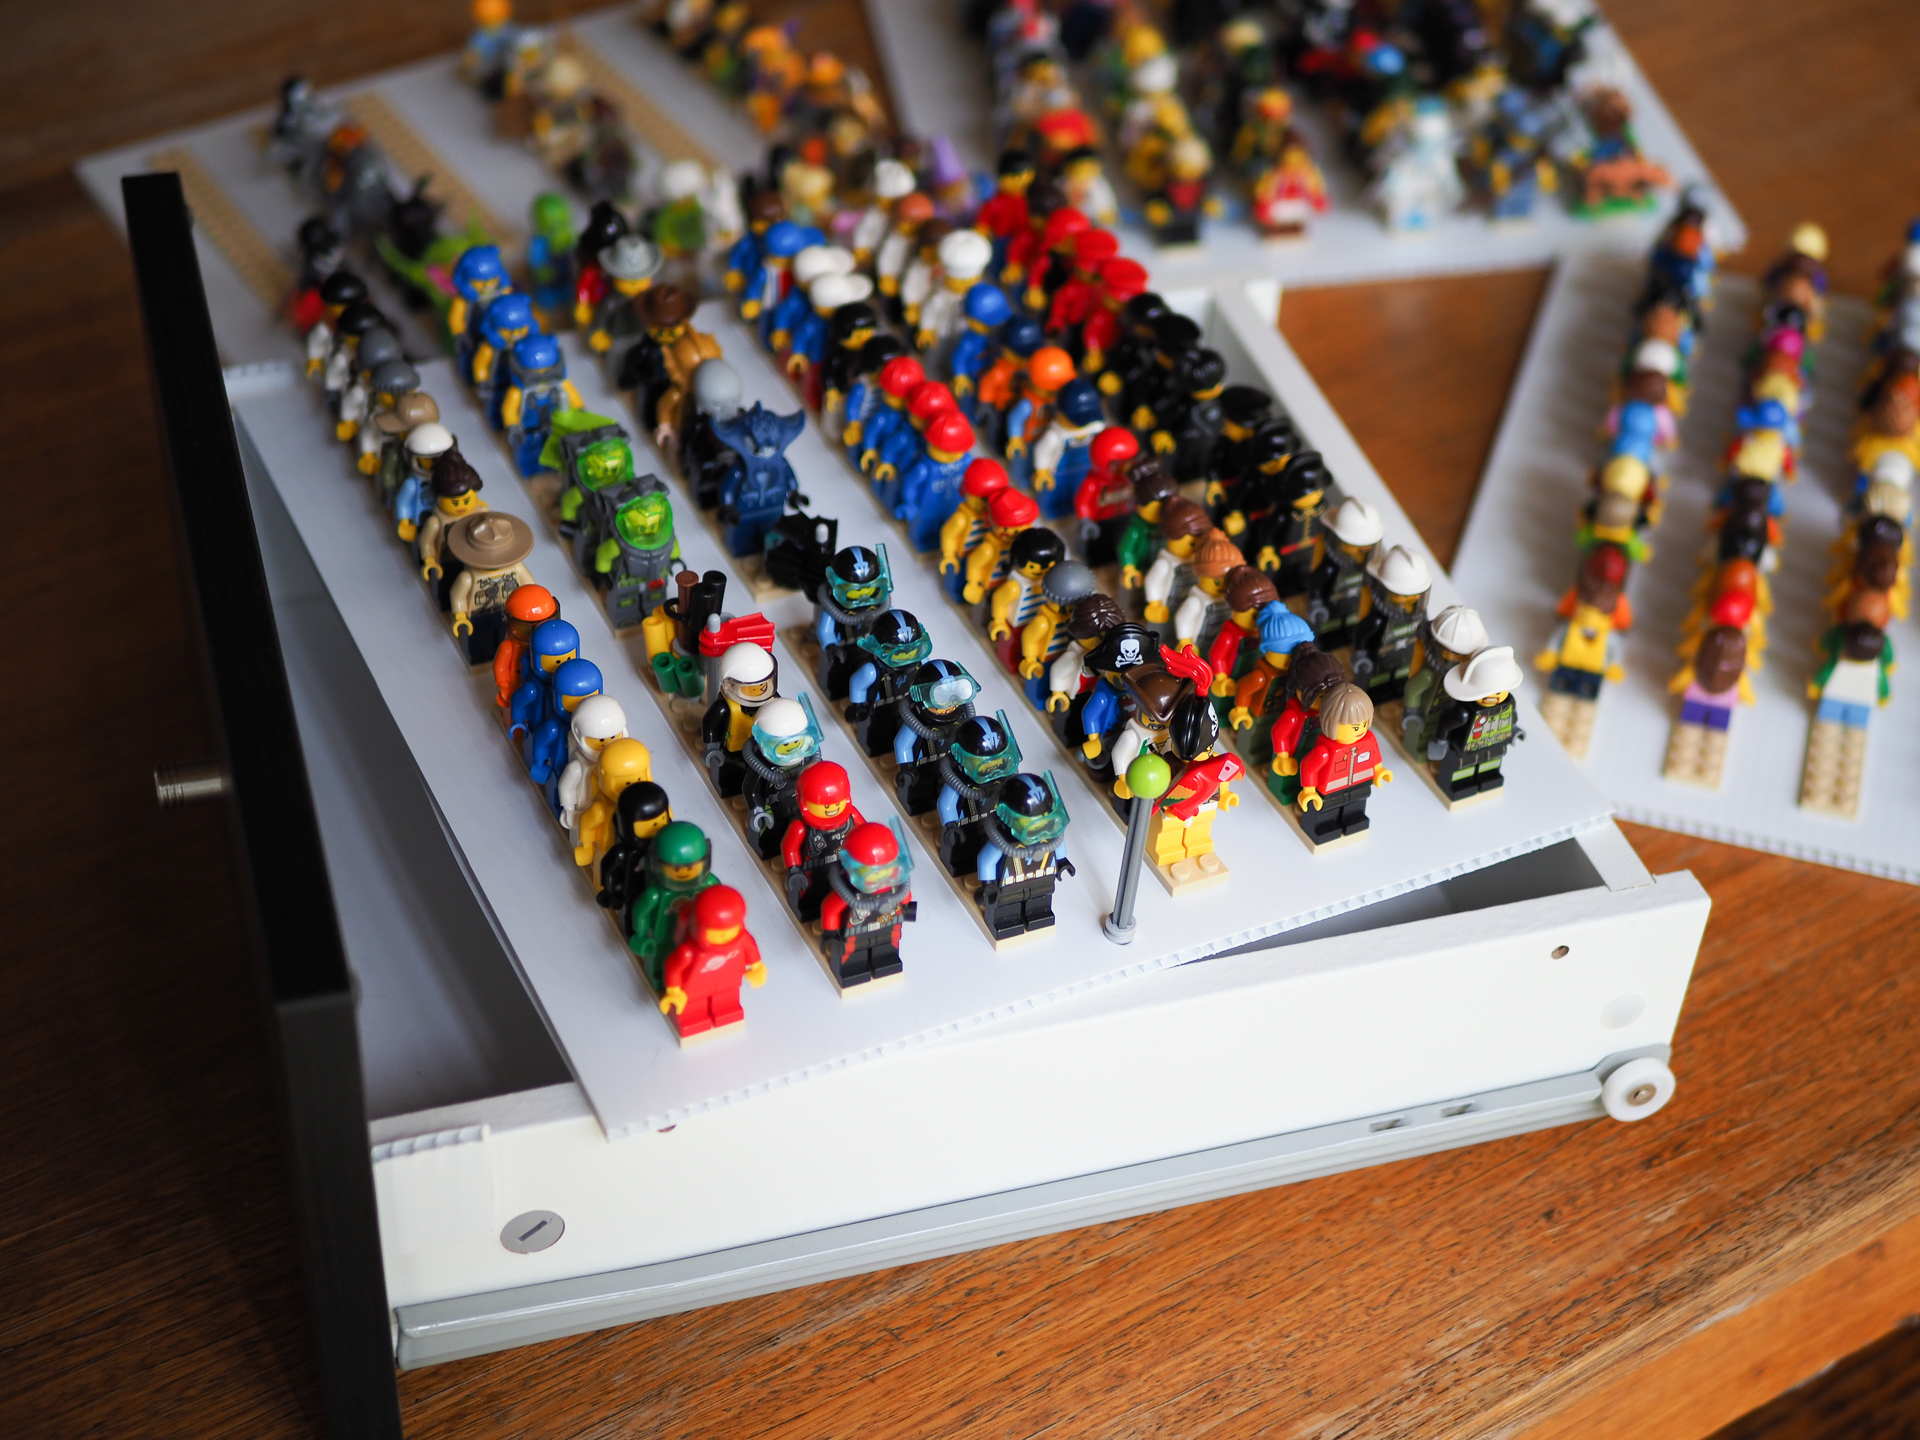
We are in possession of two IKEA Kallax shelving units. These are part of a shelving system that is based around square modular shelving units and inserts. One of these inserts is a two drawer unit that happens to fit a 32×32 stud plate easily within the drawer itself.
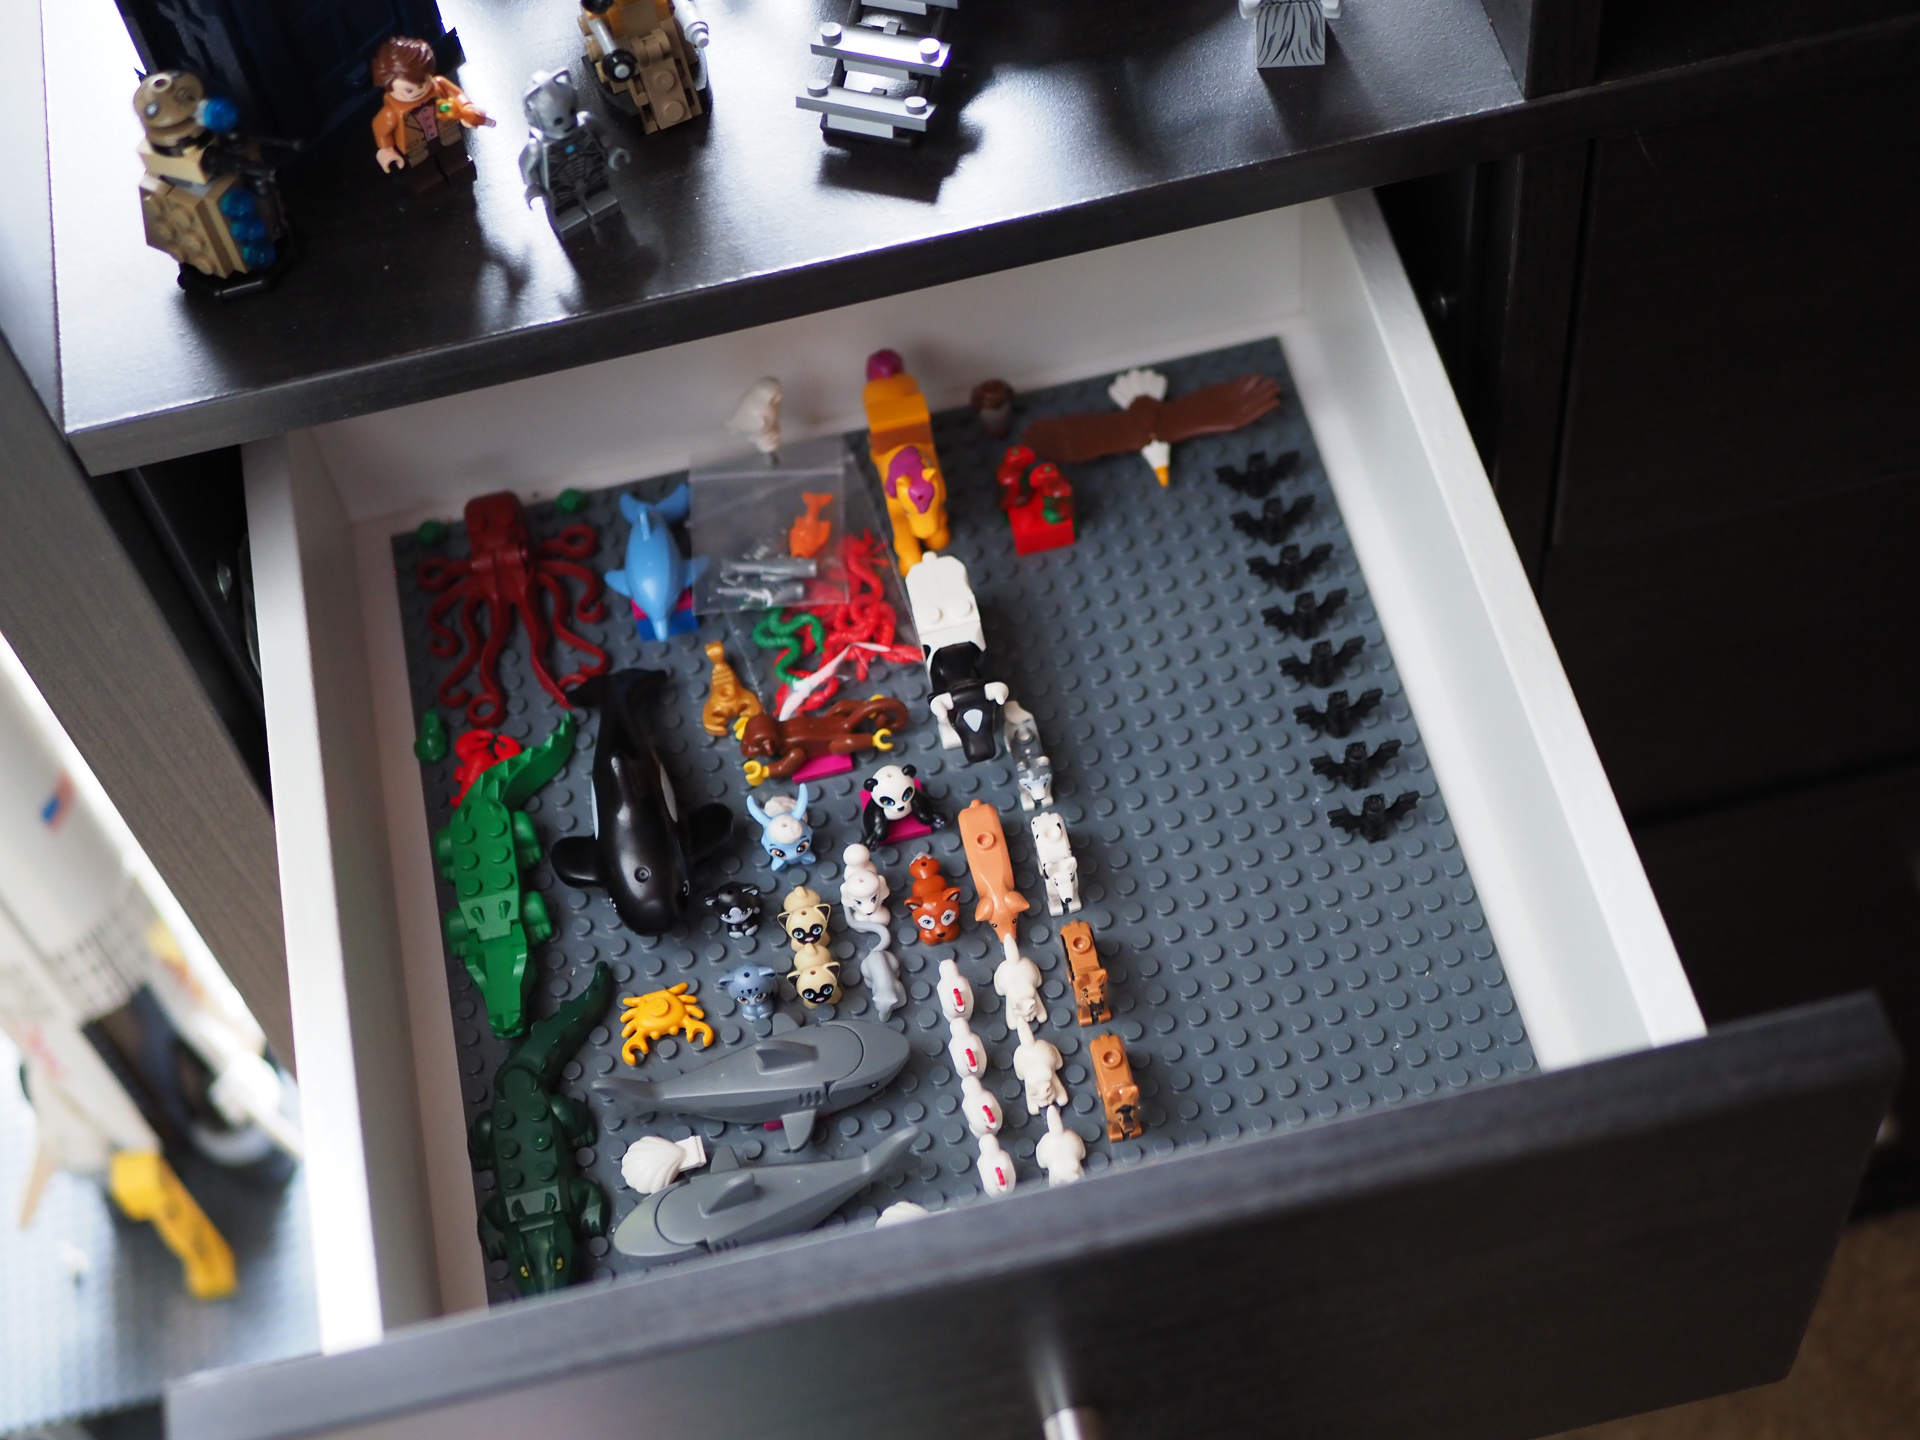
32×32 plates can still be used for other items
Each drawer is high enough to fit two layers of Minifigures, even the double torso Ninjago Garmadons and Minifigures with tall hats, such as the Series 12 Wizard. The sides and back of the drawers are only approximately ½ the height of the front, making it easily possible to have two shelves within the one drawer, without the need for supports to hold the top shelf.
I toyed with the idea of using 32×32 baseplates, but soon discounted it for three reasons:
1) the baseplates are reasonably expensive compared to other Lego parts that will hold the same amount of Minifigs;
2) only one baseplate per drawer will fit, unless shelving supports are added. Supports then require wood/metalworking tools to cut and affix them, and they get in the way of removing the bottom layer of Minifigs (trust me, I went through several designs);
3) the baseplates are reasonably flexible and the Minifigs often come loose from them as they are removed from the drawers.
Use a jig to help get the plates aligned
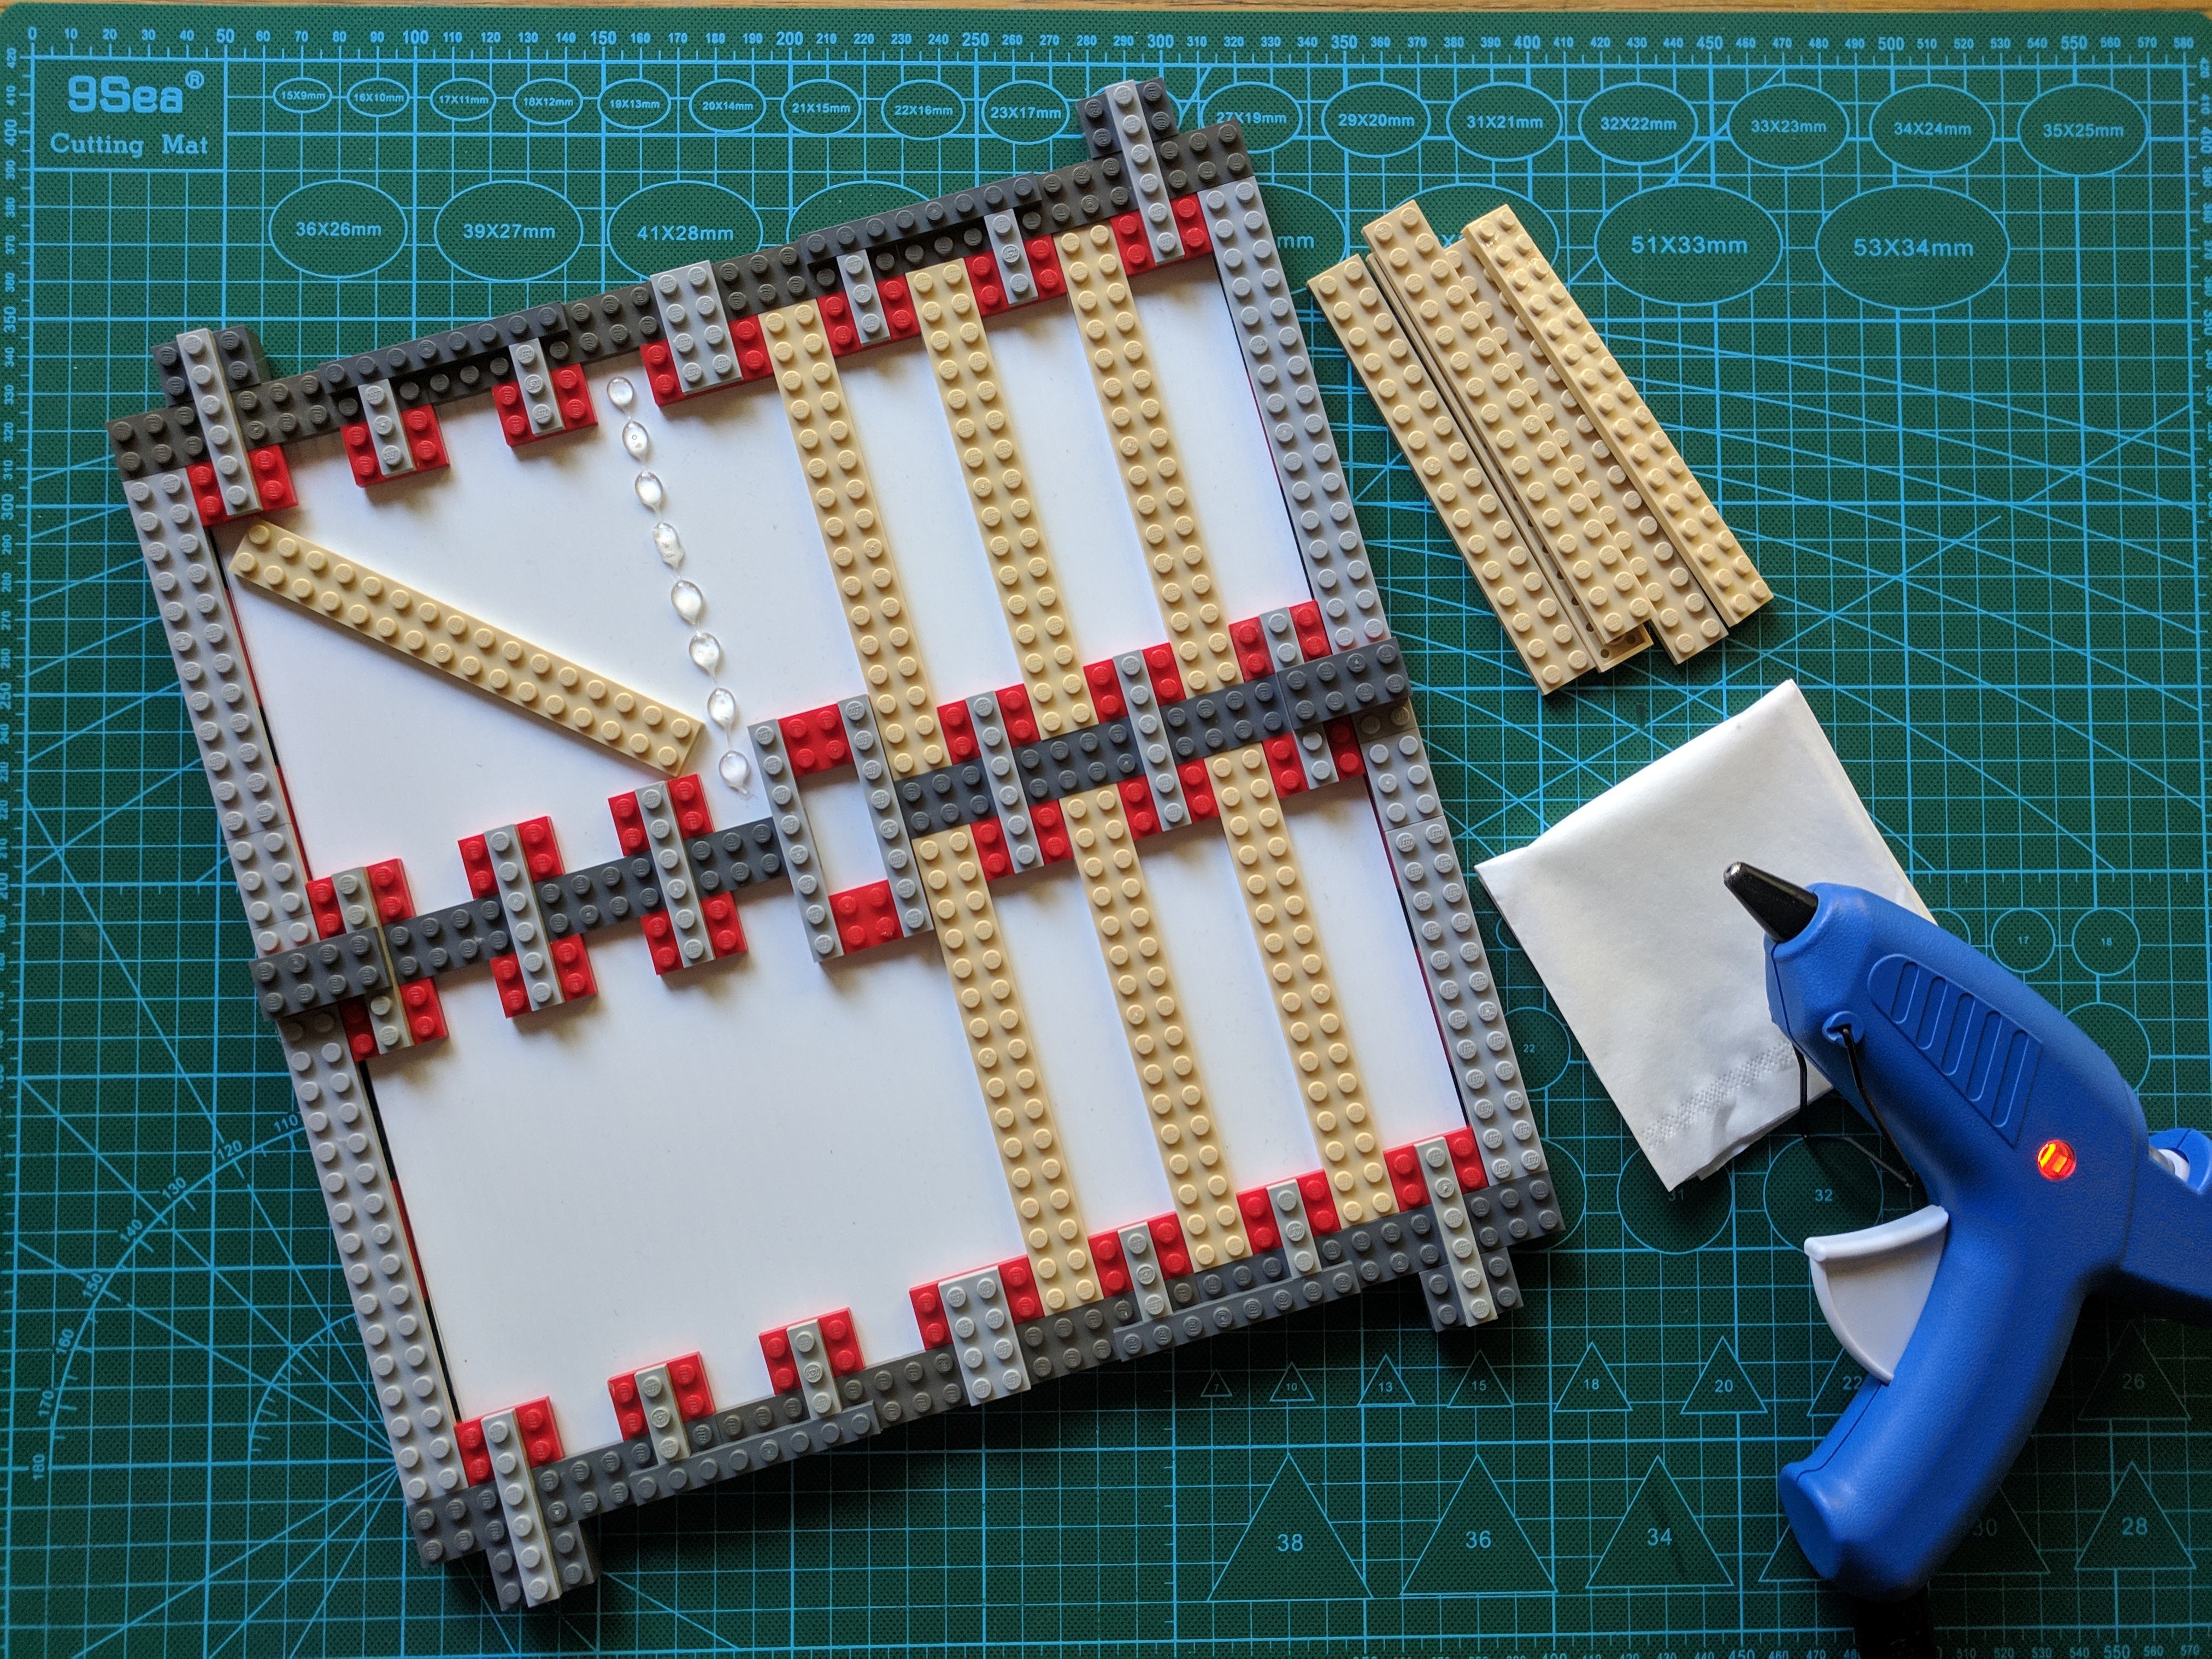
I the end I went for two shelves made from 5mm corrugated plastic, and cut with a hobby knife and a sturdy ruler. One shelf was 270mm wide, and 300mm deep, and the other 300mm square. The second allows the top shelf to straddle the sides of the drawer while still allowing the drawer to move smoothly. I used two 25mm square pieces of 5mm corrugated plastic affixed to the outside of the sides of the drawers, and one 3mm strip (big enough to glue and extend 5mm above the drawer back) affixed to the inside of the back of the drawer. All pieces protrude 5mm from the top of the draw sides and back, and allow the top shelf to sit neatly on the top of the sides/back of the drawer without sliding around. If you wish, you can skip this step as the shelf fits quite neatly on its own, but you run the risk of it twisting and blocking the drawer’s travel, or falling into the drawer. On the two shelves I affixed 12 Lego 2×16 stud plates (Bricklink item number: 4282) in 2 rows of 6 plates, running front to back. They were affixed with glue from a hot glue gun. This worked out to be approximately ½ the cost of using Lego 32×32 baseplates, including the cost of the corrugated plastic and glue.
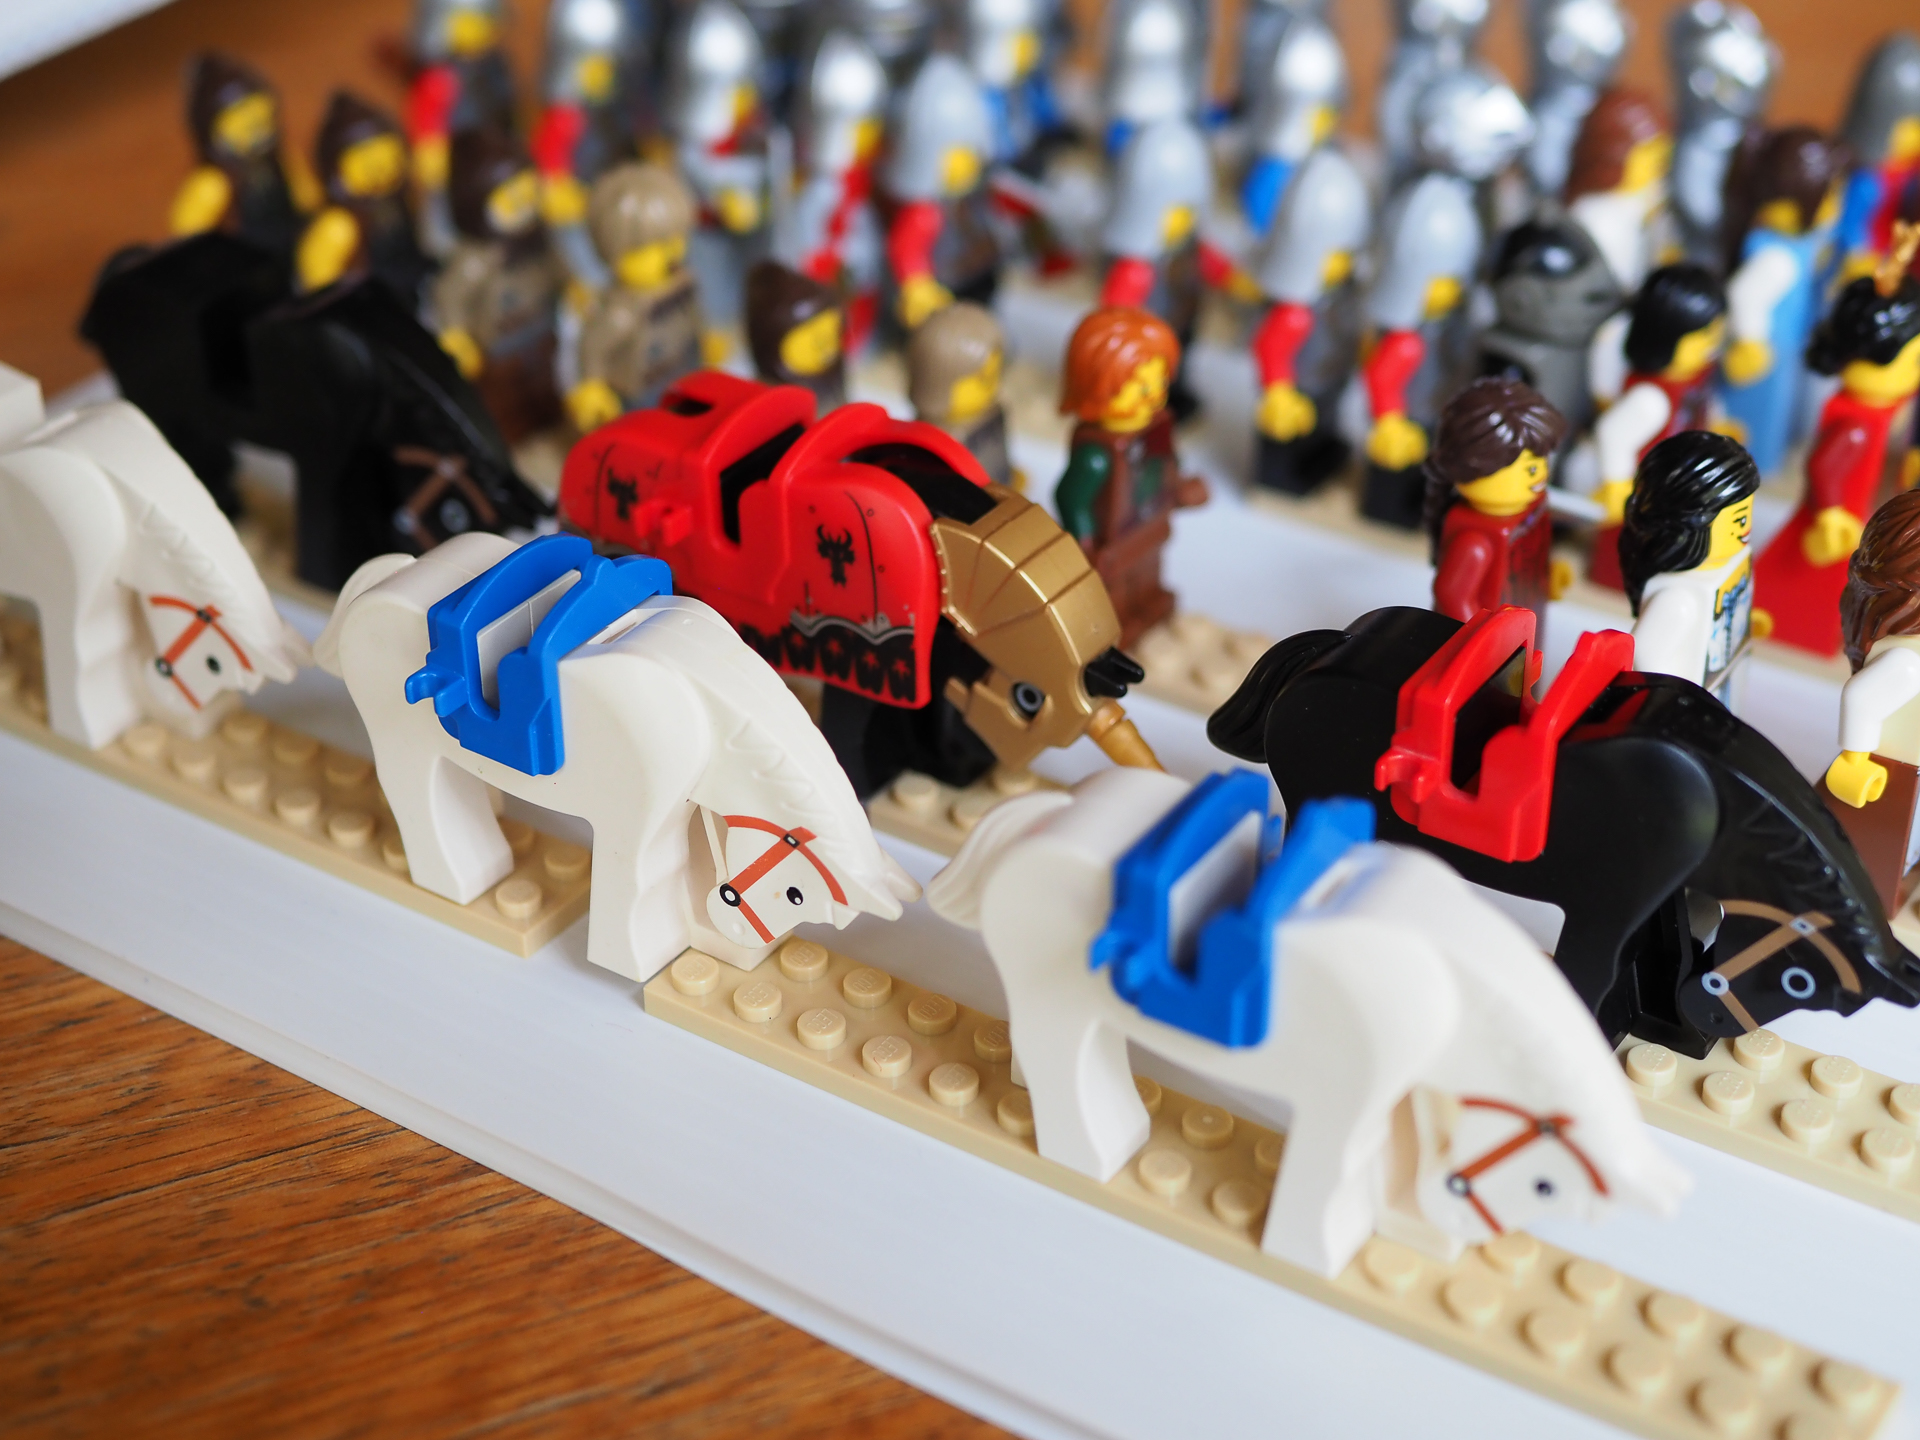
Longer figures can straddle rows
Making a jig to fit the 2×16 plates to the corrugated plastic shelves helps keep the rows neat and allows for long items, such as horses, to span two rows and have a solid connection to both plates. I found the easiest way to do this was to make a jig from Lego plates. The dimensions of the shelves approximates 34×38 studs for the bottom shelf and 38×38 studs for the top shelf. The distance between plates is 3 studs, except the gap between the centre plates, which is 4 studs. The distance between the two rows is 2 studs. This means you have a 2 stud clearance front and back for both shelves. There is a 3 stud clearance left and right on the bottom shelf, and 5 studs on the top shelf.
The bottom shelf with lifting handle
I found a handle was needed to lift the bottom shelf easily from the bottom of the drawer. I punched a small hole in the centre of the front of the corrugated plastic, about 12mm in from the edge. I then forced a Technic Axle 8 with Stop (item number: 55013) up from the bottom; secured it from the other side with a Technic Bush 1/2 Smooth (item No: 4265c); and topped it with a Technic Ball Joint (item number: 32474). This makes quite a nifty little handle that can raise the shelf easily with an upwards and forward movement, using the back edge of the shelf as a rest. Once raised past the height of the sides of the drawer, I suggest you place your fingers under the corrugated plastic to remove the shelf. A shelf full of Minifigures and accessories can get reasonably heavy and I’m not sure the handle would cope with the weight for too long.
Laying down on the job – you may need to lower some of the back Minifigs on the top shelf
The bottom shelf will hold approximately 72 Minifigures and accessories. The top shelf will hold approximately 54 Minifigures and accessories with the last 6-8 studs of the back row needing to be bare, or have very short pieces attached. This allows clearance for the top shelf to be removed without any Minifigures hitting the shelf of the Kallax unit above. This means that the two drawers that make up the modular drawer insert unit are able to accommodate around 250 Minifigures and accessories.
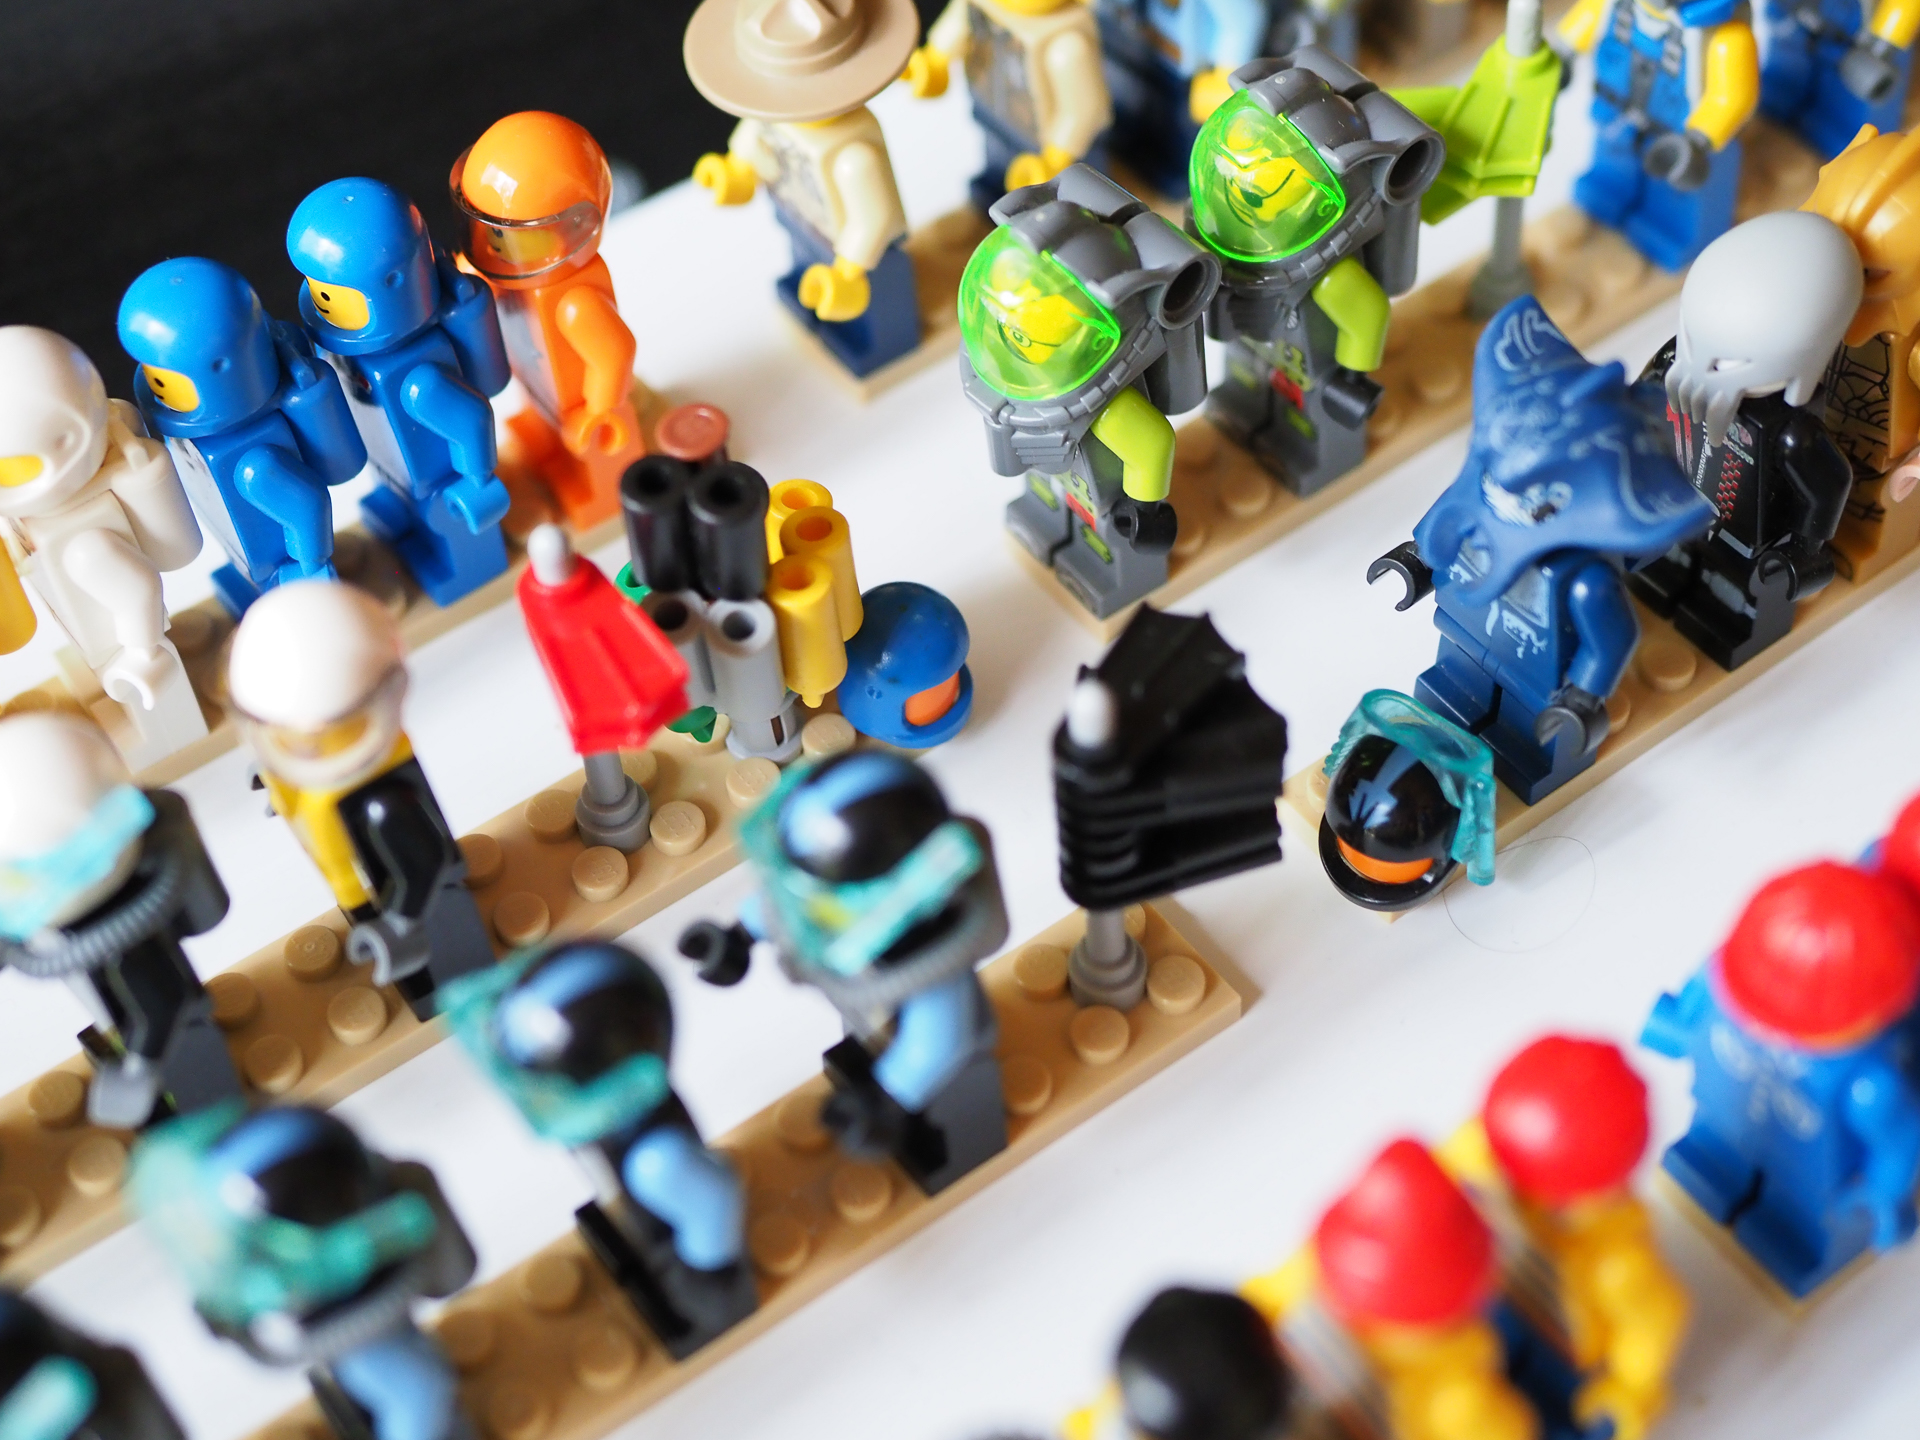
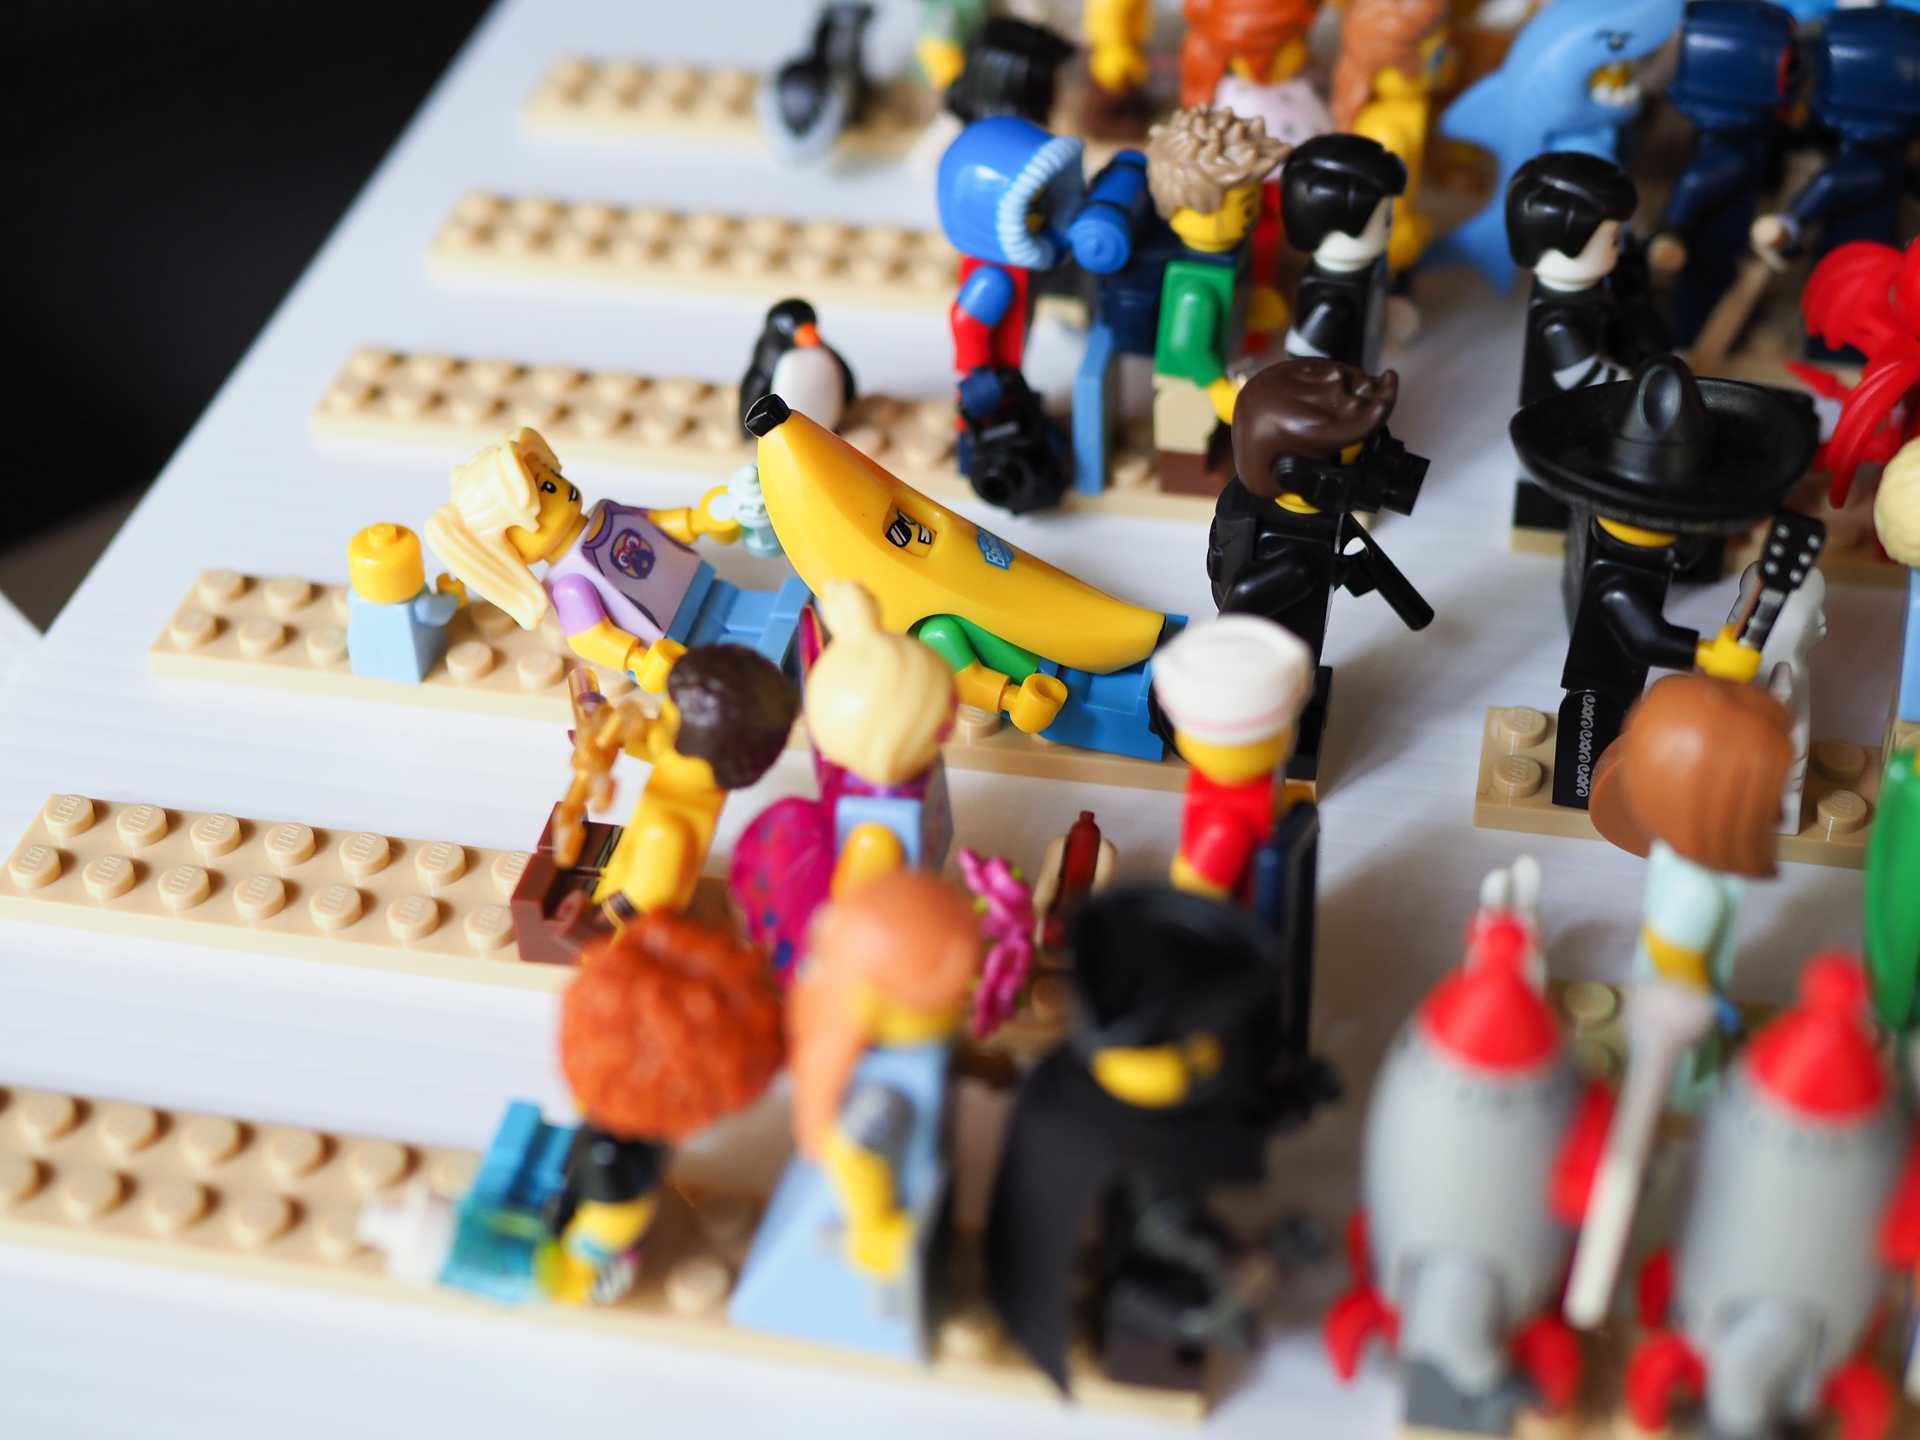
Accessories – sometimes you need to get creative
At the time of writing the modular drawer inserts cost approximately AU$30, €20 (IKEA Germany), £17. I have only been able to find the drawer units on the US IKEA site as part of a shelving unit with four door and four drawers. I would suggest US toy photographers contact their local IKEA store to see if they can get the drawer inserts separately as a special order.
The Conclusion
The drawers are easy to build and install into the Kallax units. They run smoothly and lock into place when open to allow easy removal/replacement of the shelves. I’d suggest returning the Minifigures and accessories to the top shelf while it is on a flat stable surface, especially those residing in the middle of the shelf. Otherwise you may wish to add braces underneath the corrugated plastic to strengthen the shelf and avoid any unnecessary bending and possible damage.
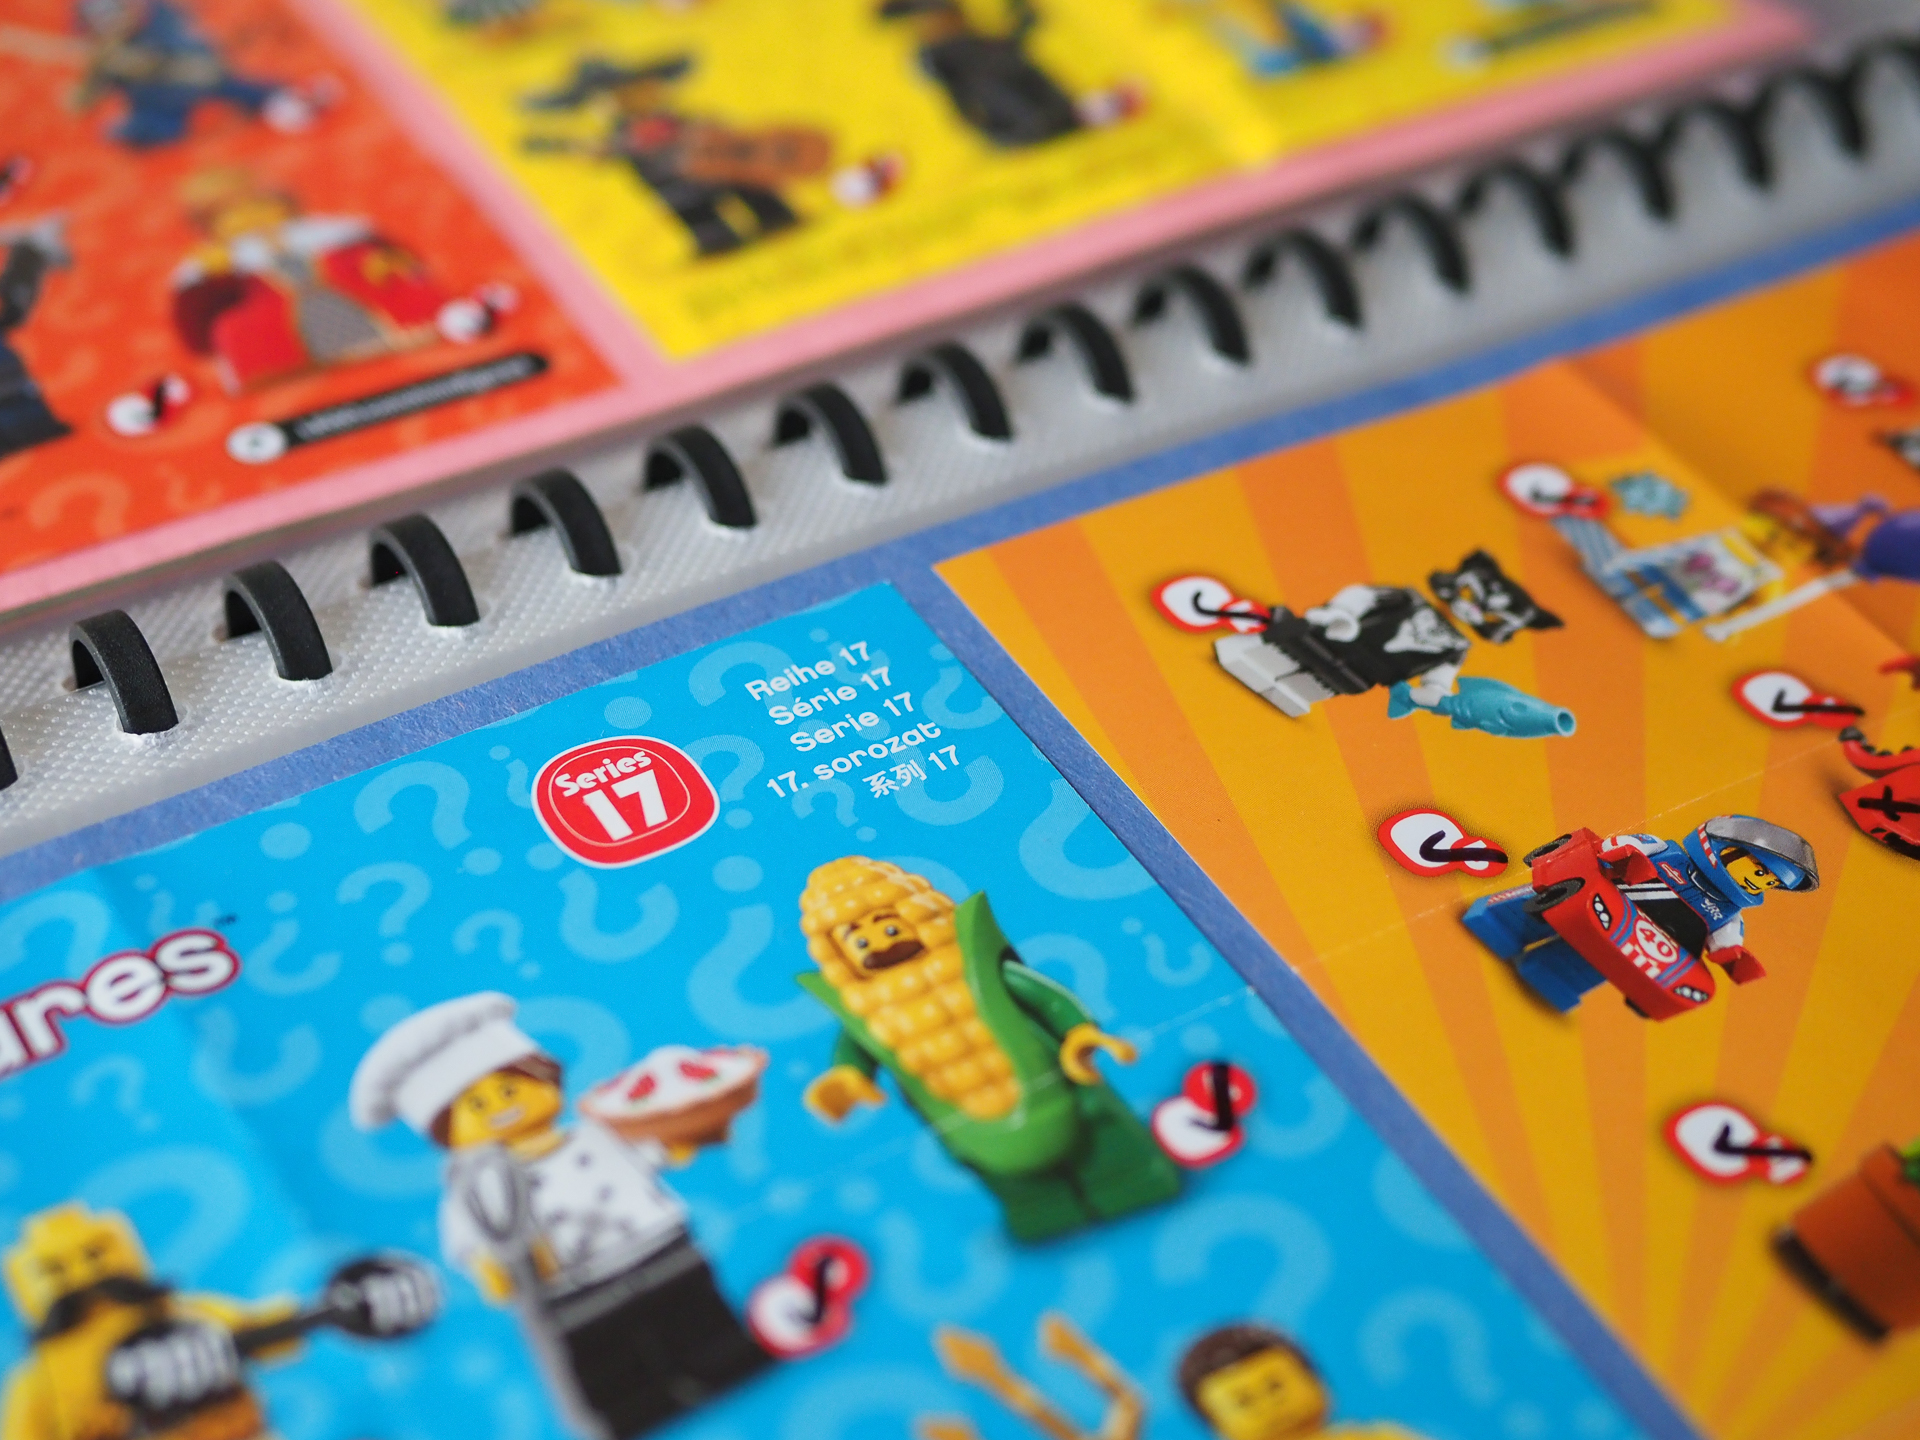
Catalogue – it helps to have a visual guide
To find the right drawer/shelf for individual Minifigures I have devised three things to help:
- I have put identification sheets of all CMF series into a book in the same order as the shelves/drawers;
- The series run from bottom right to top left, allowing for easy expansion upwards without having to swap over shelves and drawers;
- I have made small 2x2x5 pillars to replace Minifigures when they are out of the drawers.
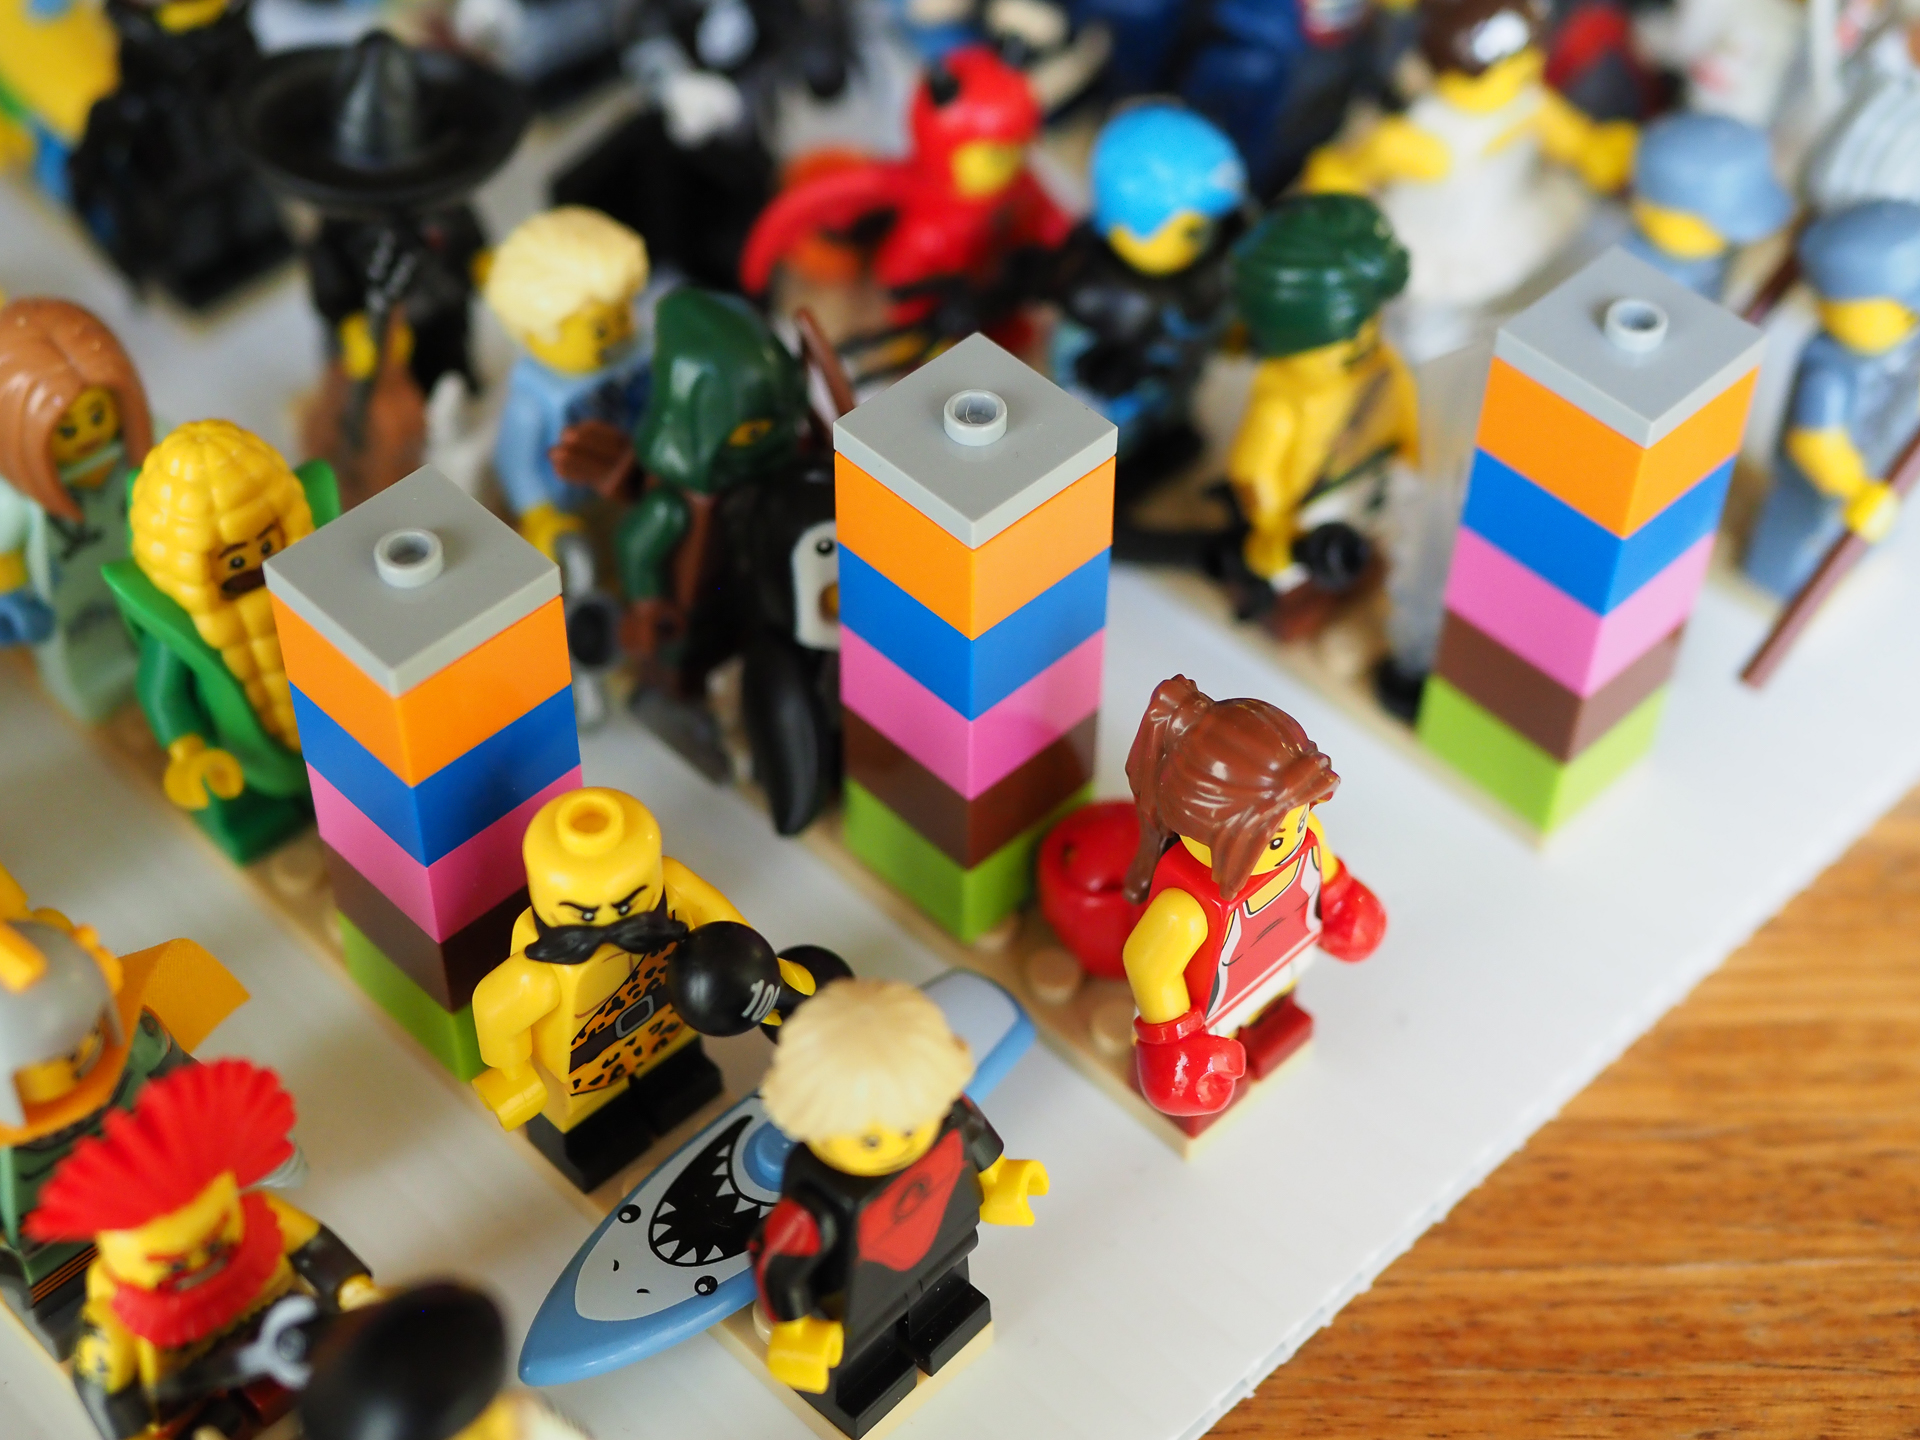
Replacement pillars help you find where the Minifigures came from
At the time of writing a 2×2 Kallax shelving unit costs approximately AU$60, €25 (IKEA Germany), £30, US$39 and will hold 1,000 Minifigures neatly and safely for a total cost of around AU$200, €115, £105. We have the larger 2×4 Kallax units and use the spare shelves to display completed Lego sets. Overall I feel they are nice looking units and show off the Lego admirably.
This may not be the cheapest storage around, or the simplest option (given that you have to build it). But I think it does a great job of organising and protecting our little plastic muses.


Excellent decision, Tony! Unfortunately, I have no place for two Kallax shelving units 🙂 But it’s really great guide for many other shelvings. Thank you very much!
Yuri, unfortunately it is not a great option for those with limited space. Although 2×2 Kallax units may fit under desks and shelves. I hope you find the right fit for your situation.
Gluing Lego? Sacrilege!! XD Your system looks very effective! Once I have a bit more space, I may have to try it.
DM: hahaha! I used to cringe too and only use Mega Bloks for my vandalising projects. However, I have found that the glue from hot glue guns can be (awkwardly) peeled off Lego without any damage.
That’s good to know (peeling off hot glue)!
Good stuff, T! We’ve definitely got some population growth here, and I’m always looking at options!
Population growth is definitely an issue with additions to series and sections. The ease of swapping the shelves in this design helps.
I like others first thought “What tha!” when I saw the glue gun, but see from your reply above it comes off easy enough.
A very cool idea for a set up. I just have all mine in individual snap-lock bags and then by series in bigger bags. With one copy of the ID sheets open against one side of the bigger bag and another copy in an A5 display folder.
Sadly I don’t have the space to implement your awesome idea. I do love the way you used other lego bricks to create your outline for the brick placement. Very cool.
Tyroga: sorry for the scare. I have to admit that I will not be removing the plates, so their value is far less than others may place on them. I tend to think of them as insurance for my Minifigures.
The Lego jigs certainly made my job a whole lot easier.
I love the way you figured this out Tony. I’m not sure this would work in my available space, but it does give me ideas. Thanks!
Thanks Mary. I went through a few designs to get here. It was the chance acquisition of the two IKEA units that really cemented the final iteration.
Cool post and your pics are so representative. Super helpful! I love the system you’ve created. I’ve got my figs in display cases of sorts… but they overflow. Soon they may have the run of the house. Cheers Tony.
Cheers Doug, we always appreciate feedback on our content and style. As for the run of the house: I feel we all just have to give in to toys ruling our lives!
Wow Tony. Impressive solution!
Thanks brickandmordor. I have tried to make it as universally appealing as possible.
This is an amazing post, Tony! Thanks for sharing such an in-depth view of this process. I’m always looking for good ways to organize my ever-growing toy collection and love the solutions your present here.
Cheers James. I sometimes worry about over-complicating things, but I think it’s important to share as much of the process as possible.
This is so useful, Tony! Even though I may not have the IKEA drawers you’re using, the idea of the corrugated plastic for the base is brilliant.
Even though you point out that the hot glue is removable from the LEGO flat parts, the first thing that came to my mind is the off-brand adhesive brick strips they sell nowadays (about $10 per 6 foot roll – https://www.amazon.com/Mayka-Toy-Block-Tape-Compatible/dp/B071J6NYVJ/). Probably not as cost-effective as buying a bunch of 2×16 from Bricklink, though.
They also have off-brand adhesive-backed 10″x10″ flat plates that seem cheaper than LEGO plates (4-pak for $35 – https://www.amazon.com/dp/B01M7M9PZ2/) or non-adhesive (4-pak for $14 – https://www.amazon.com/dp/B0776CY1X5/ref=dp_cerb_1).
Being able to stack these on a shelf or in a drawer seems like such a great option. And the towers to mark where missing minifigures should be returned — BRILLIANT!